- 1. How to Adjust the Temperature Settings?
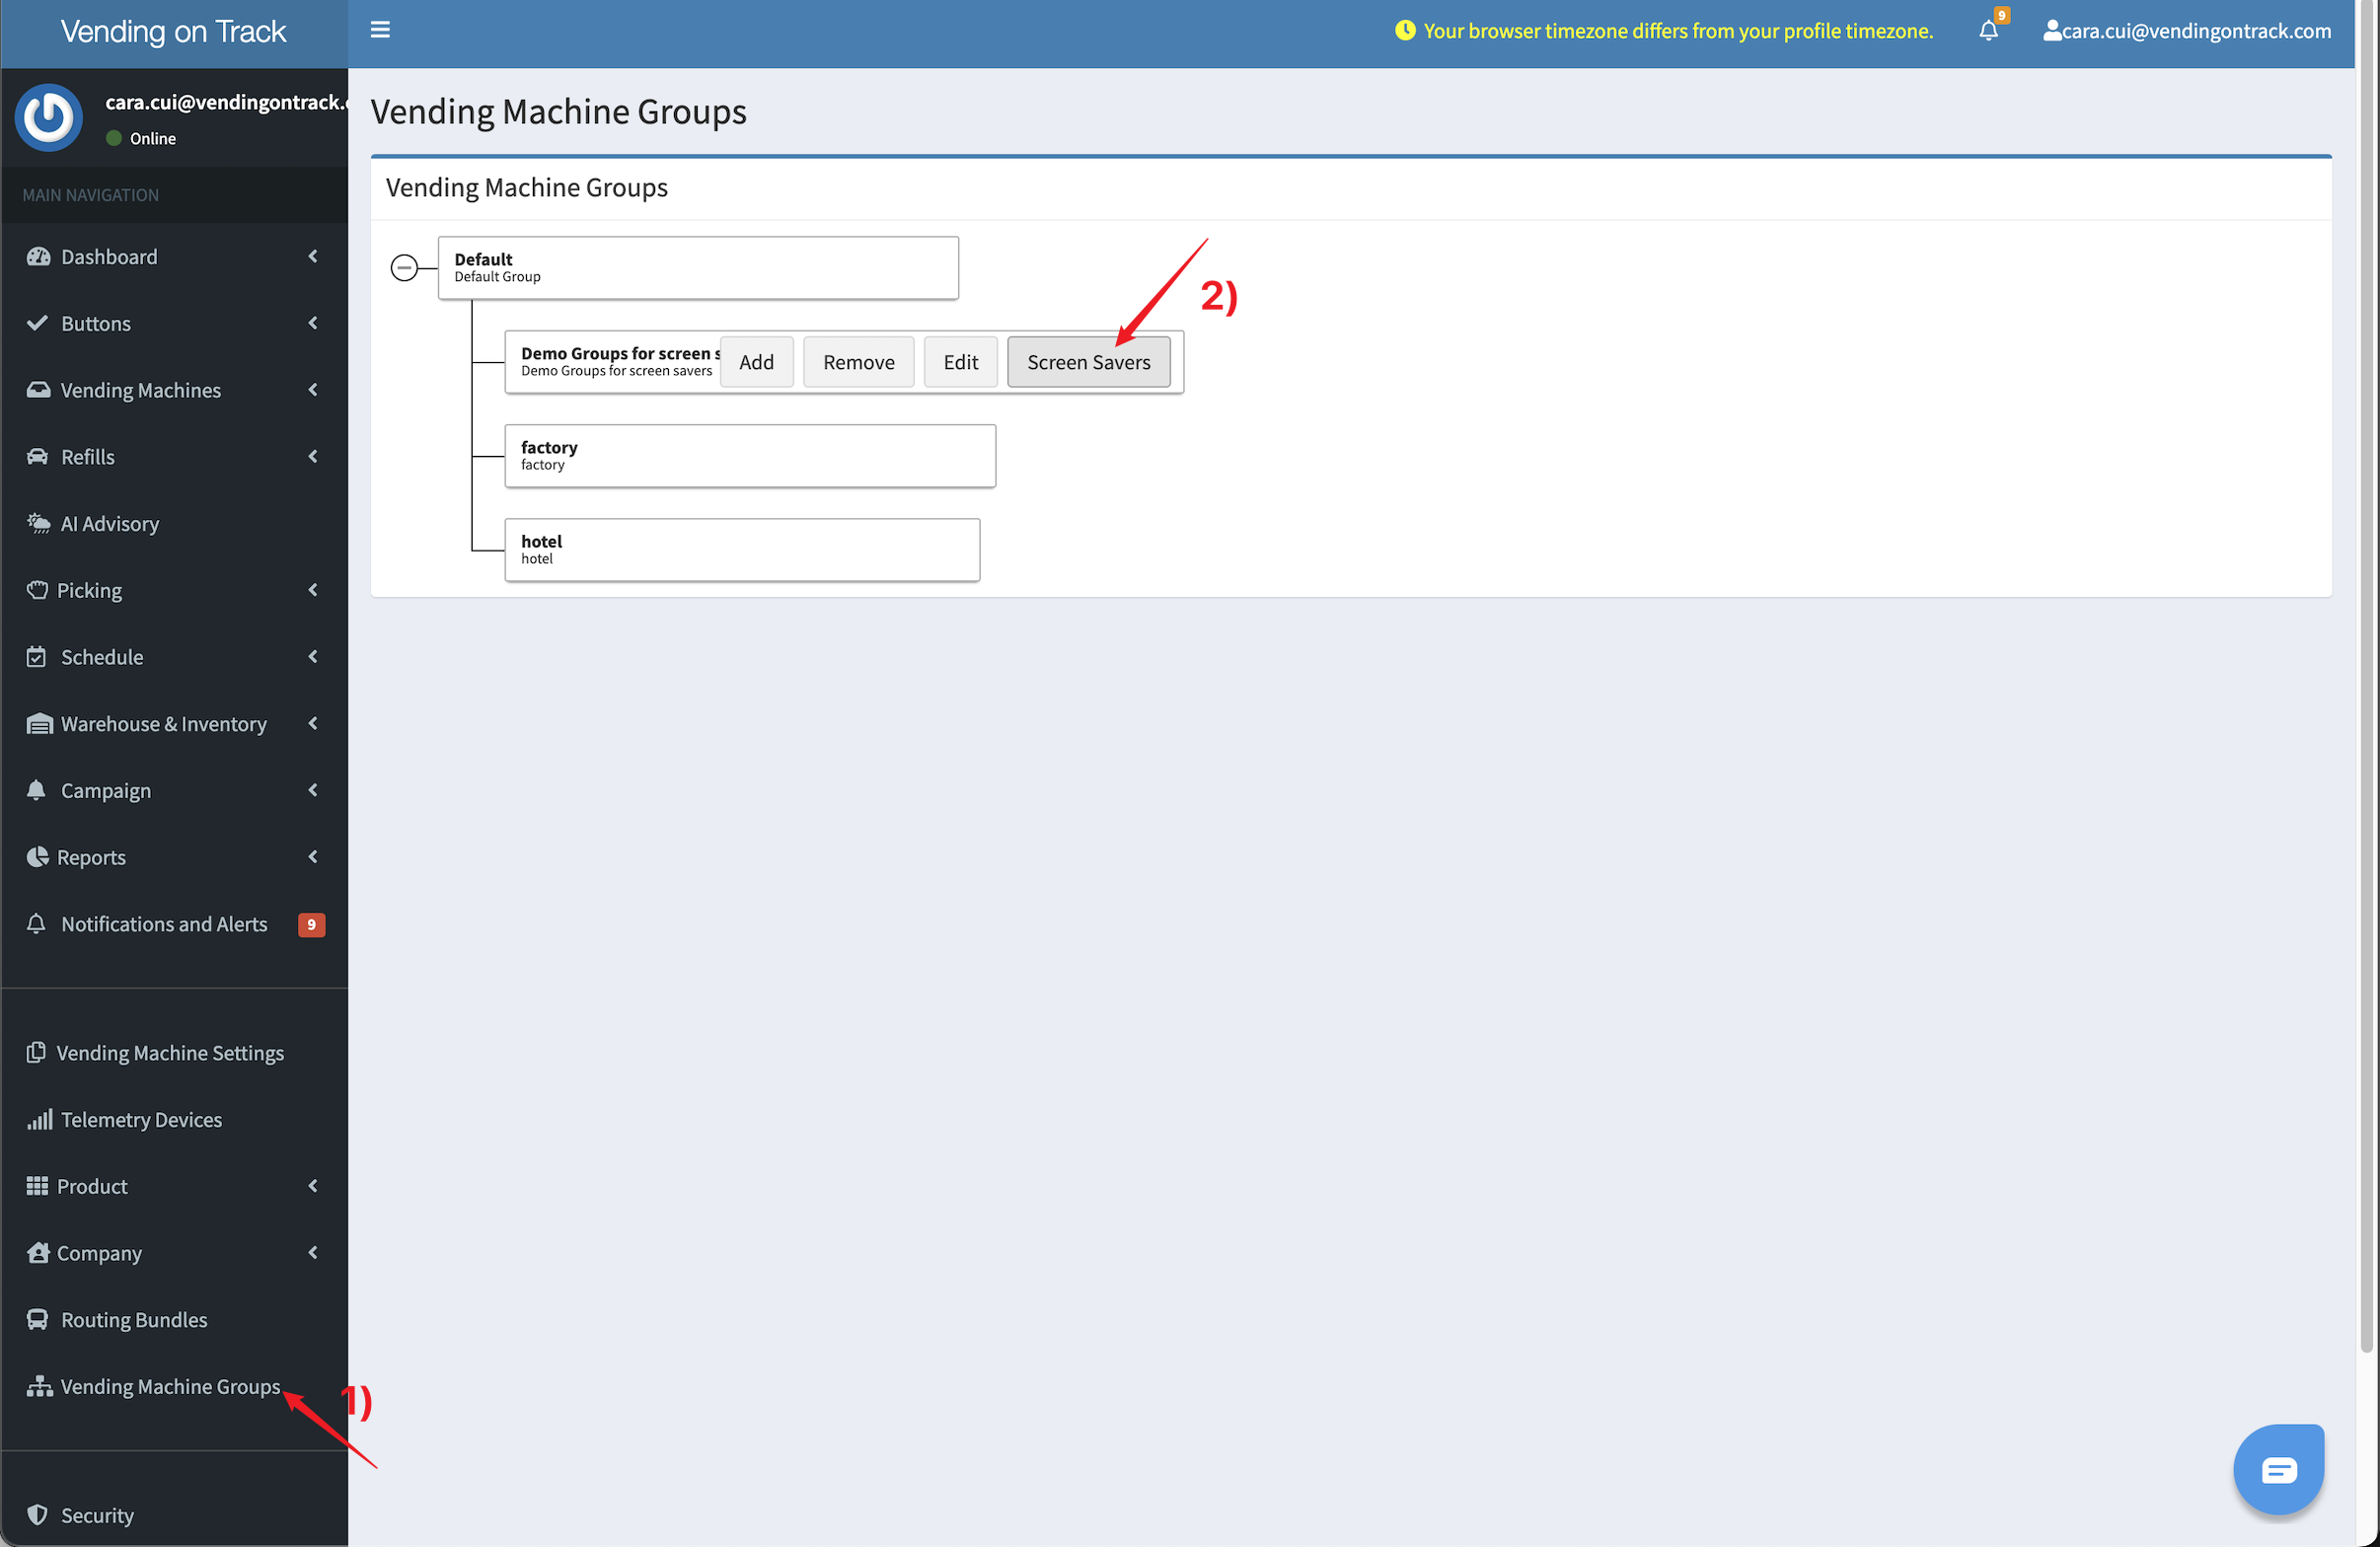
- 2. Can I Remove the Screen Saver Feature?
- 3. How to Enter the Admin Interface from the Vending Machine?
- 4. Can I Change the Default Homepage?
- 5. How to Add Products?
- 6. How to Upload the Product Photo?
- 7. How to Add Product Mappings?
- 8. What’s the Difference Between Current Stock, Capacity, and Restock Capacity?
- 9. How to Refill the Machine Stock?
- 10. Can I Receive a Low Stock Alert?
- 11. What if I Forget my Password?
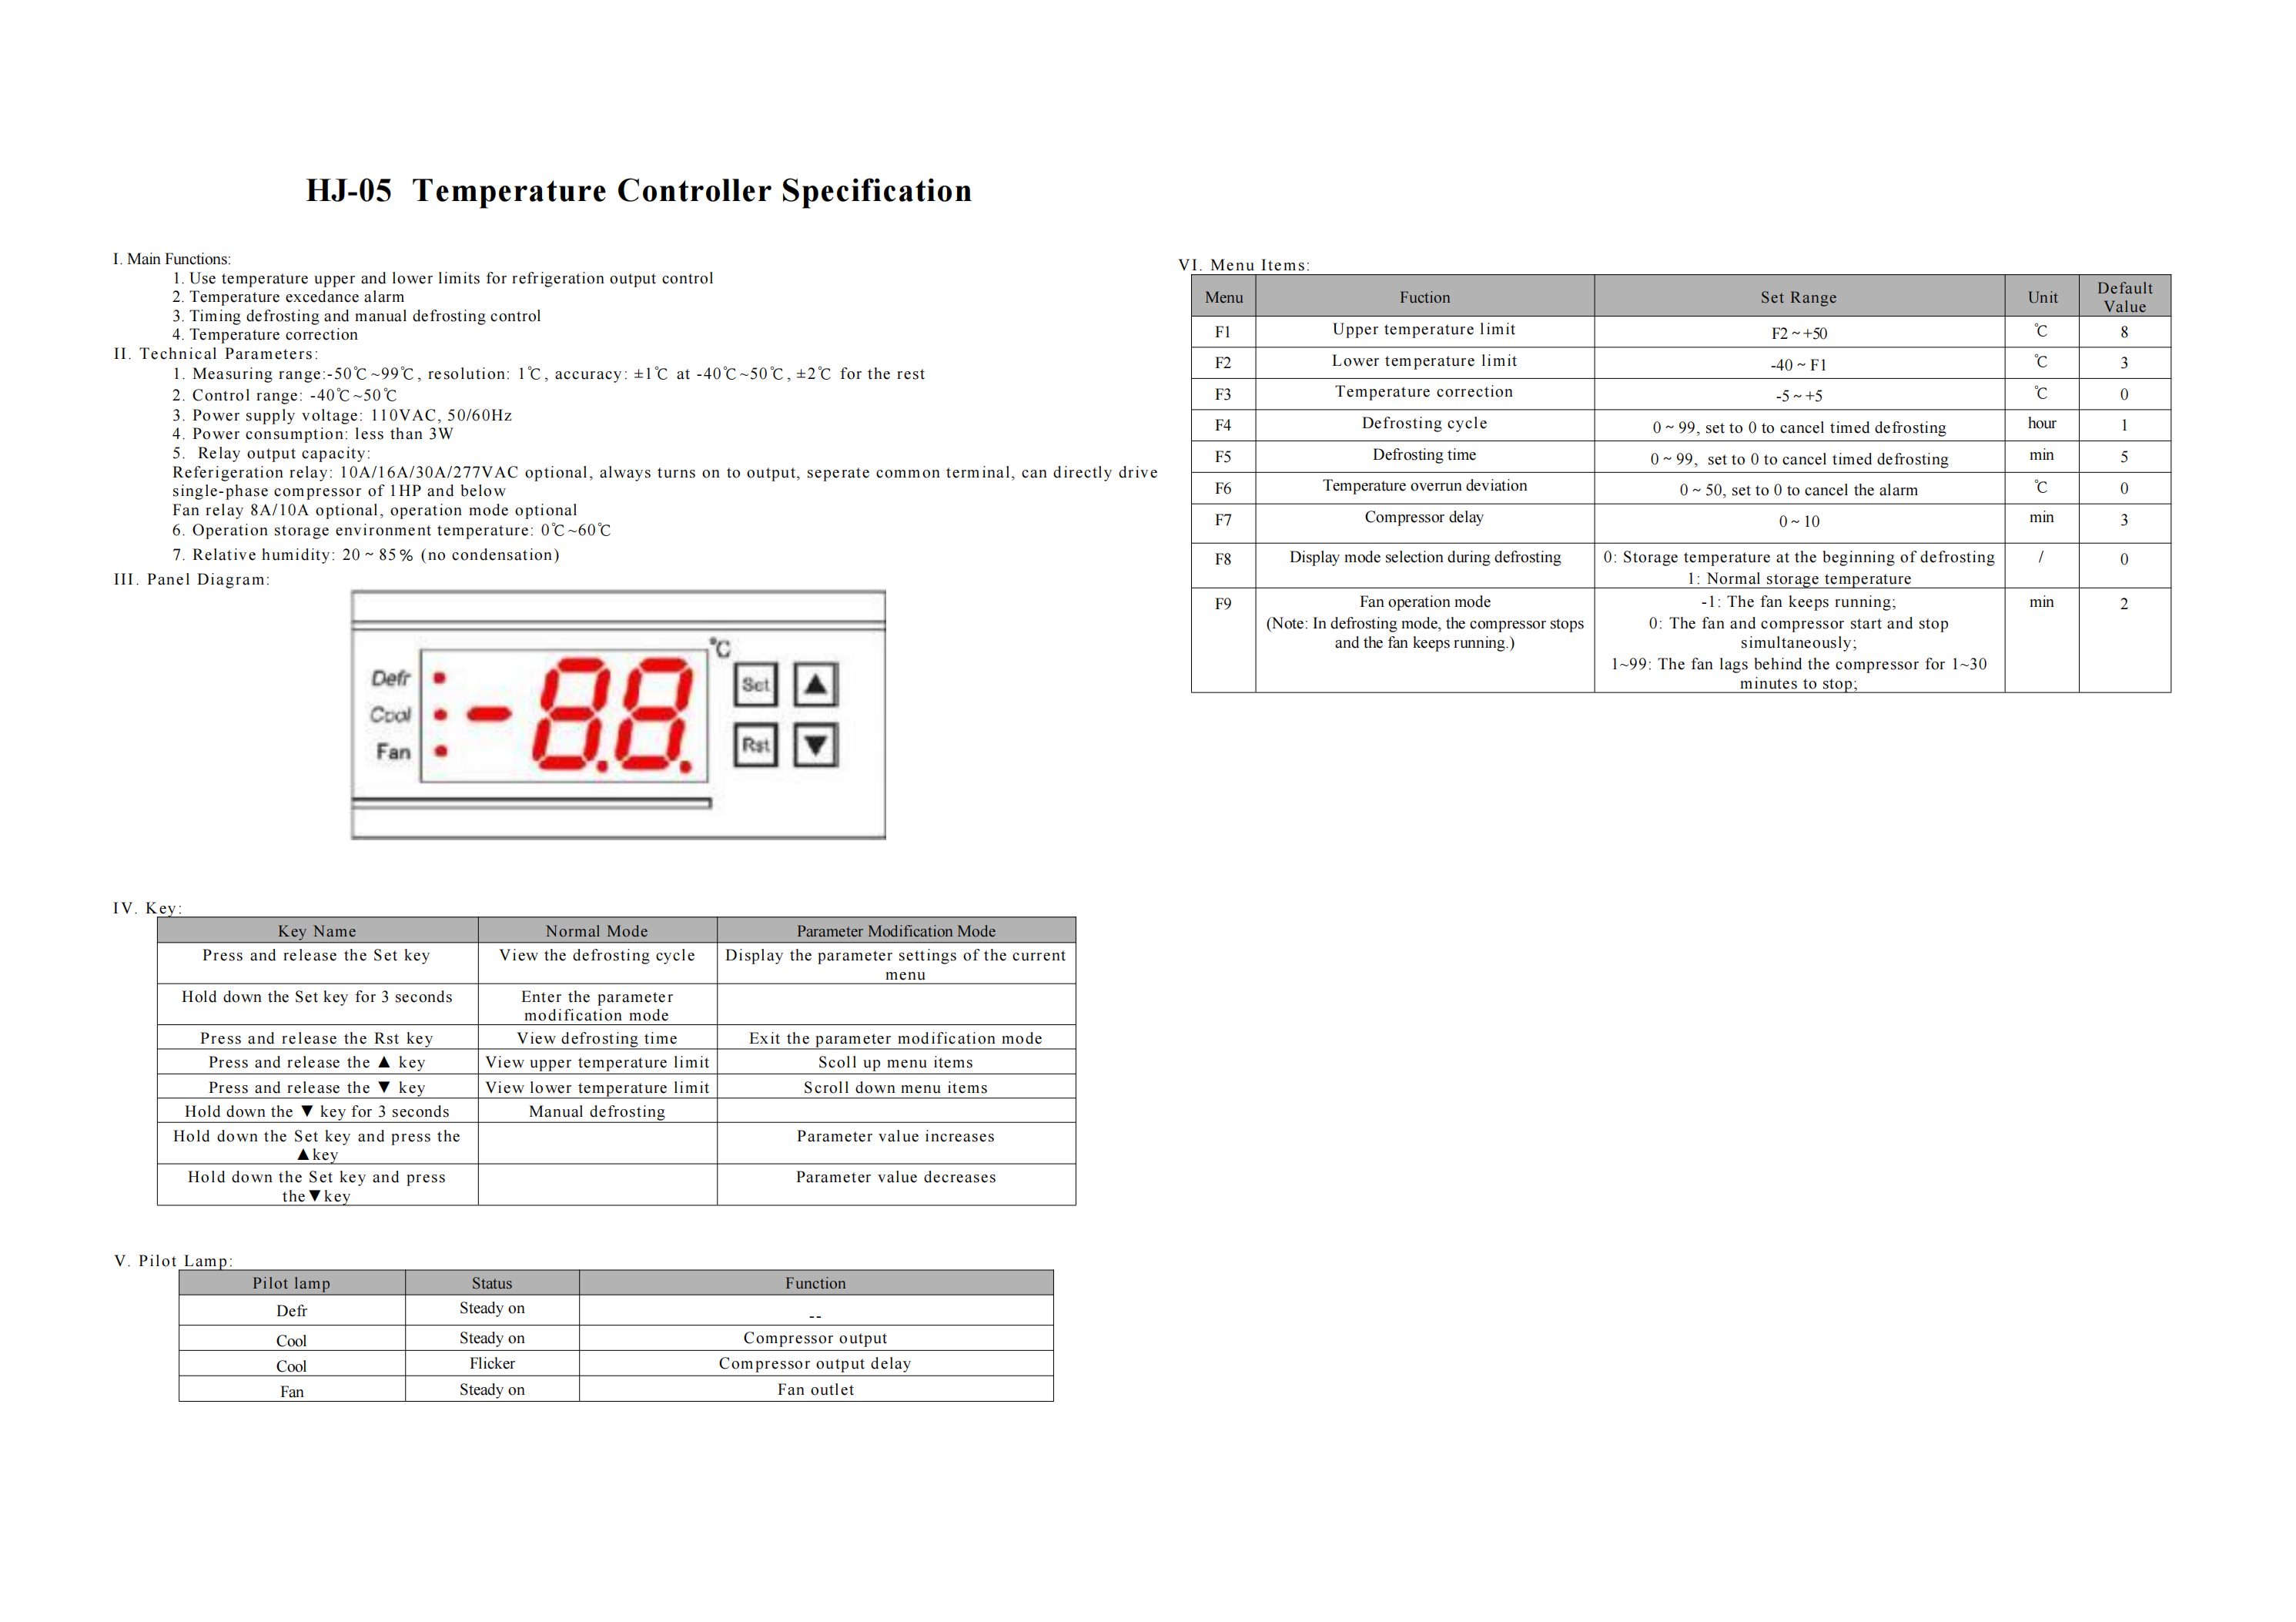
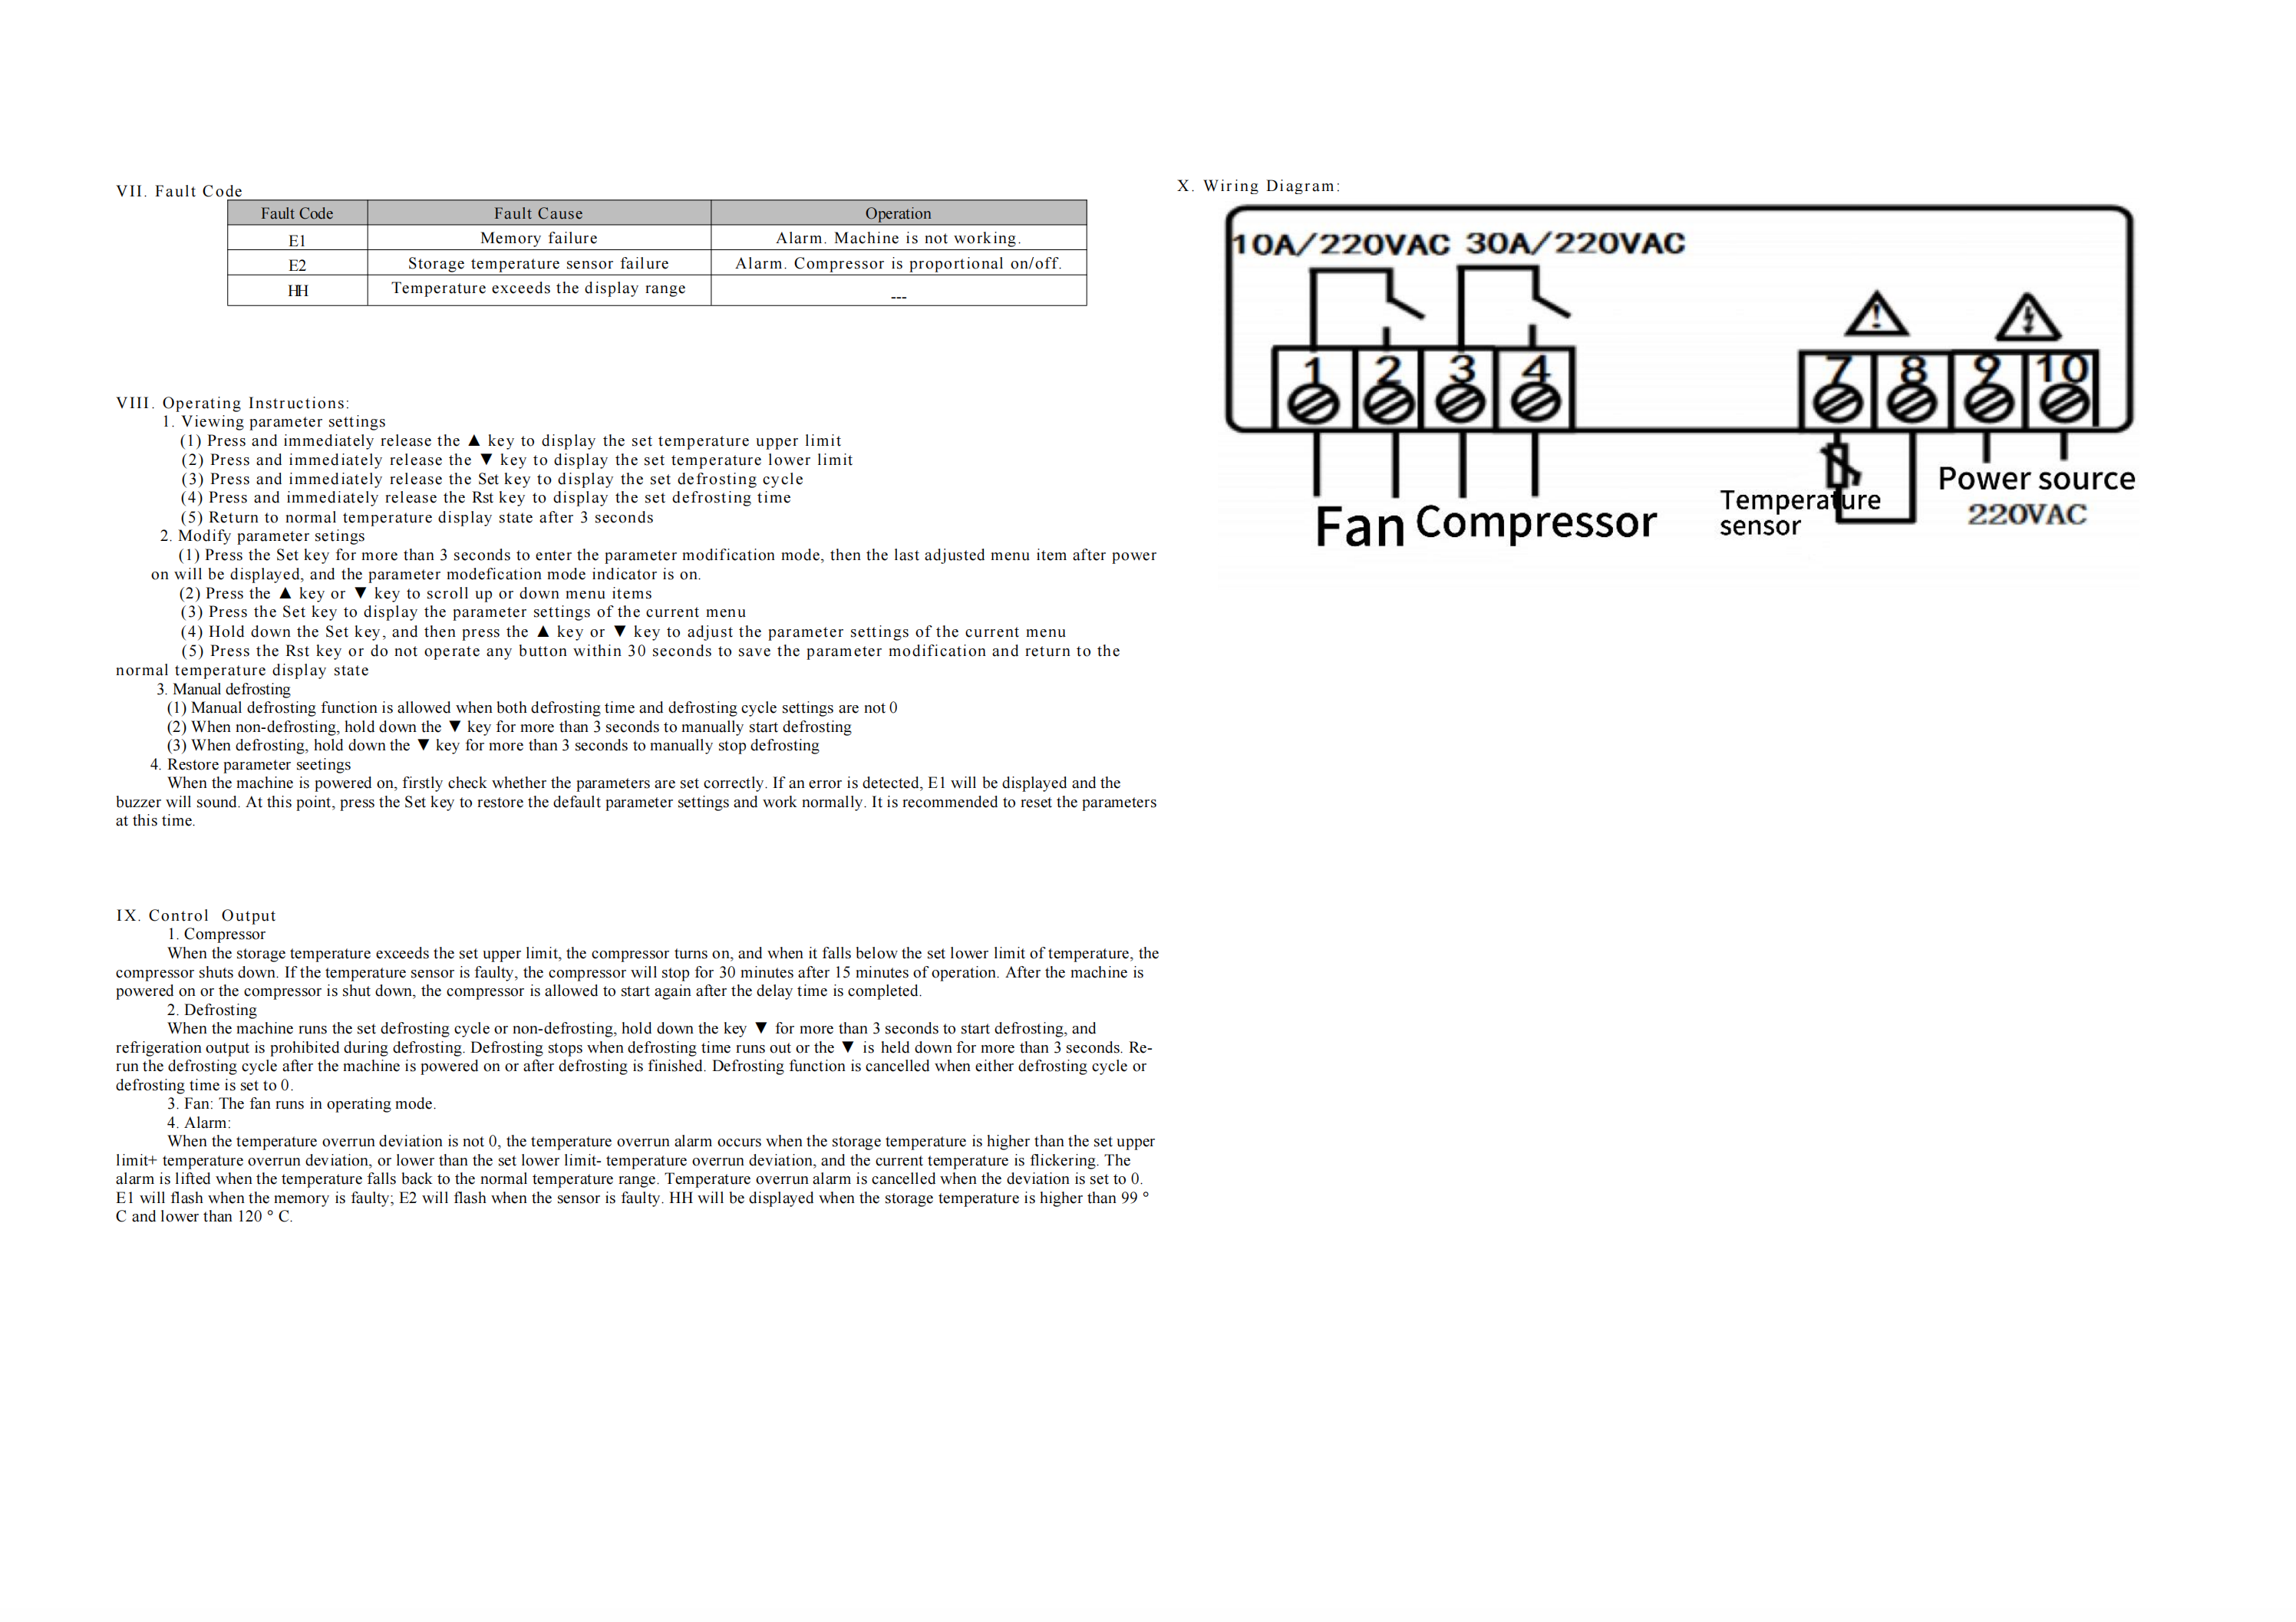
1. How to Adjust the Temperature Settings?
Usually, for KioskForce vending machines with a sidecar, the temperature controller can be found in the side drawer. You can press the up and down keys to view the upper temperature limit(F1) and lower temperature limit(F2), which are usually set to 8 and 3 degrees by default. To view the video tutorial, please click here.
To change the temperature range, please follow this procedure:
- Press the set key for more than 3 seconds to enter the parameter modification mode
- F1 is the menu to set the upper temperature limit. Hold down the set key while pressing the up/down key change the number as your requirement
- Release the set key and press the up key to switch to menu F2 to set the lower temperature limit. Hold down the set key once again and at the same time press the up/down key to change the lower temperature limit number as your requirement
- Press the Reset button to get back to the internal machine temperature display
2. Can I Remove the Screen Saver Feature?
No, the screen saver feature was designed to protect the screen. It cannot be removed.
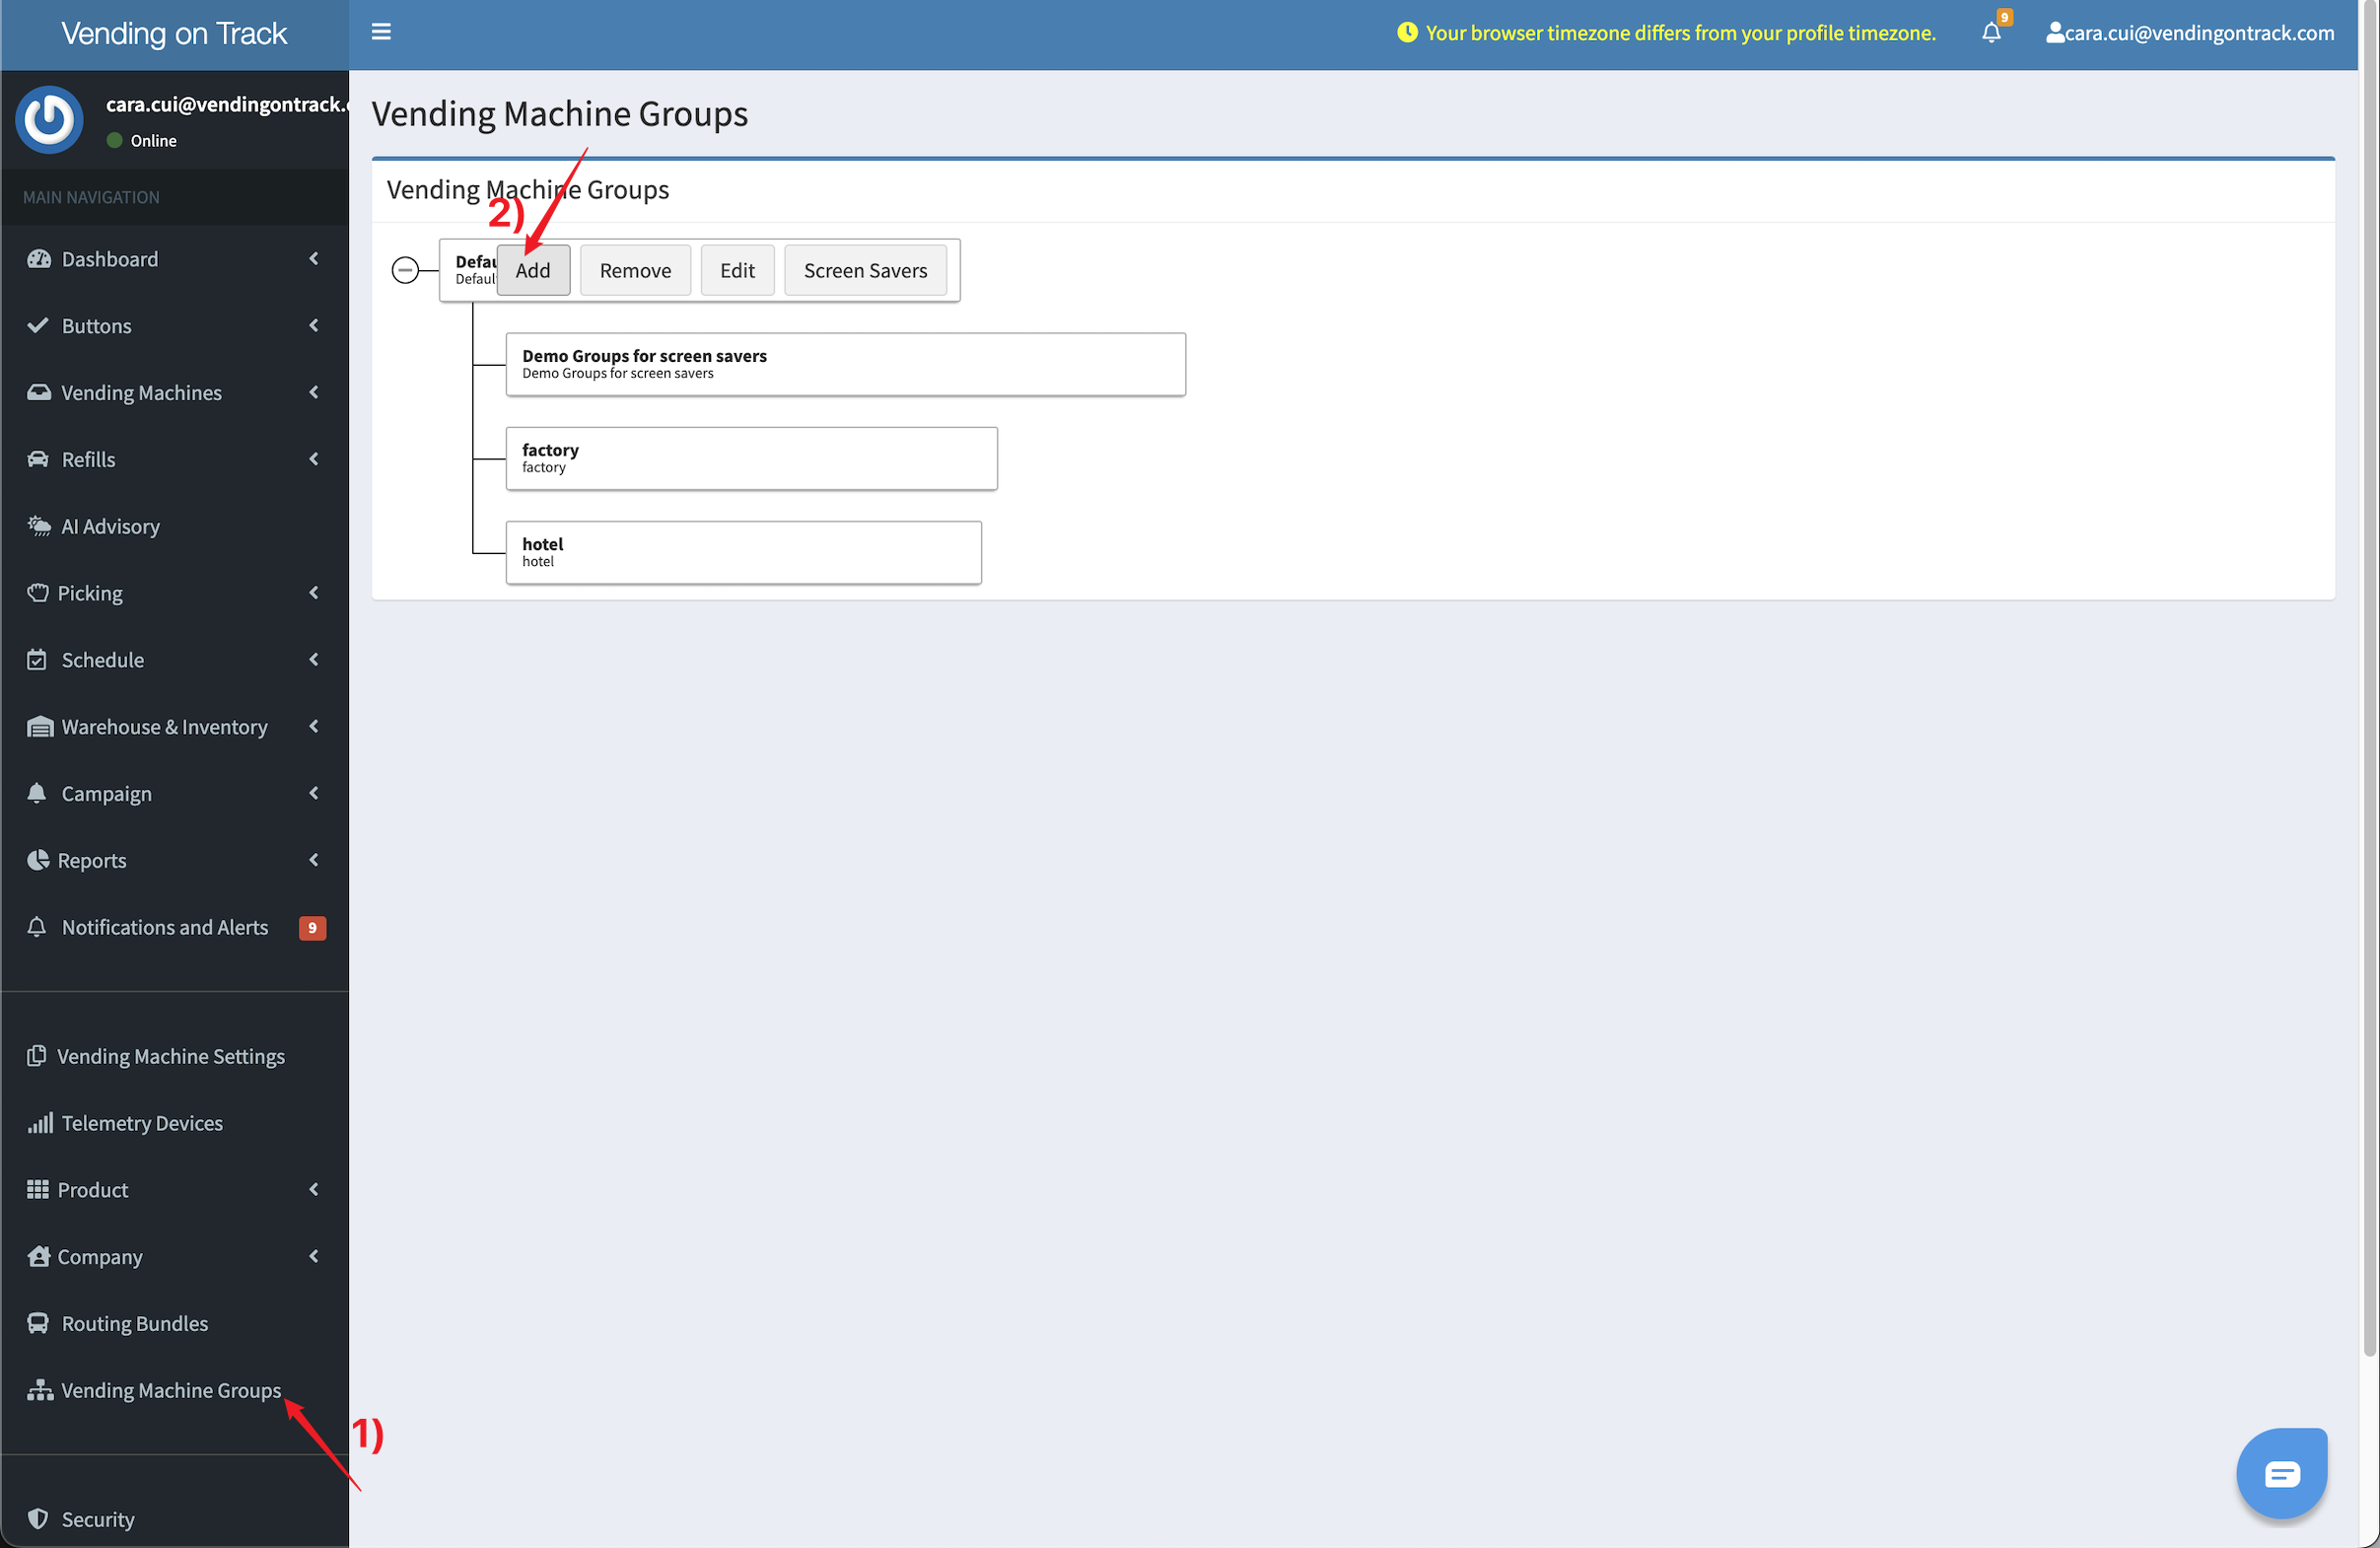
How to Add a Screen Saver?
To add a screen saver, please follow this procedure:
- In the telemetry system, go to the Vending Machine Groups page
- Click the Add button on the Default tab to add a new vending machine group
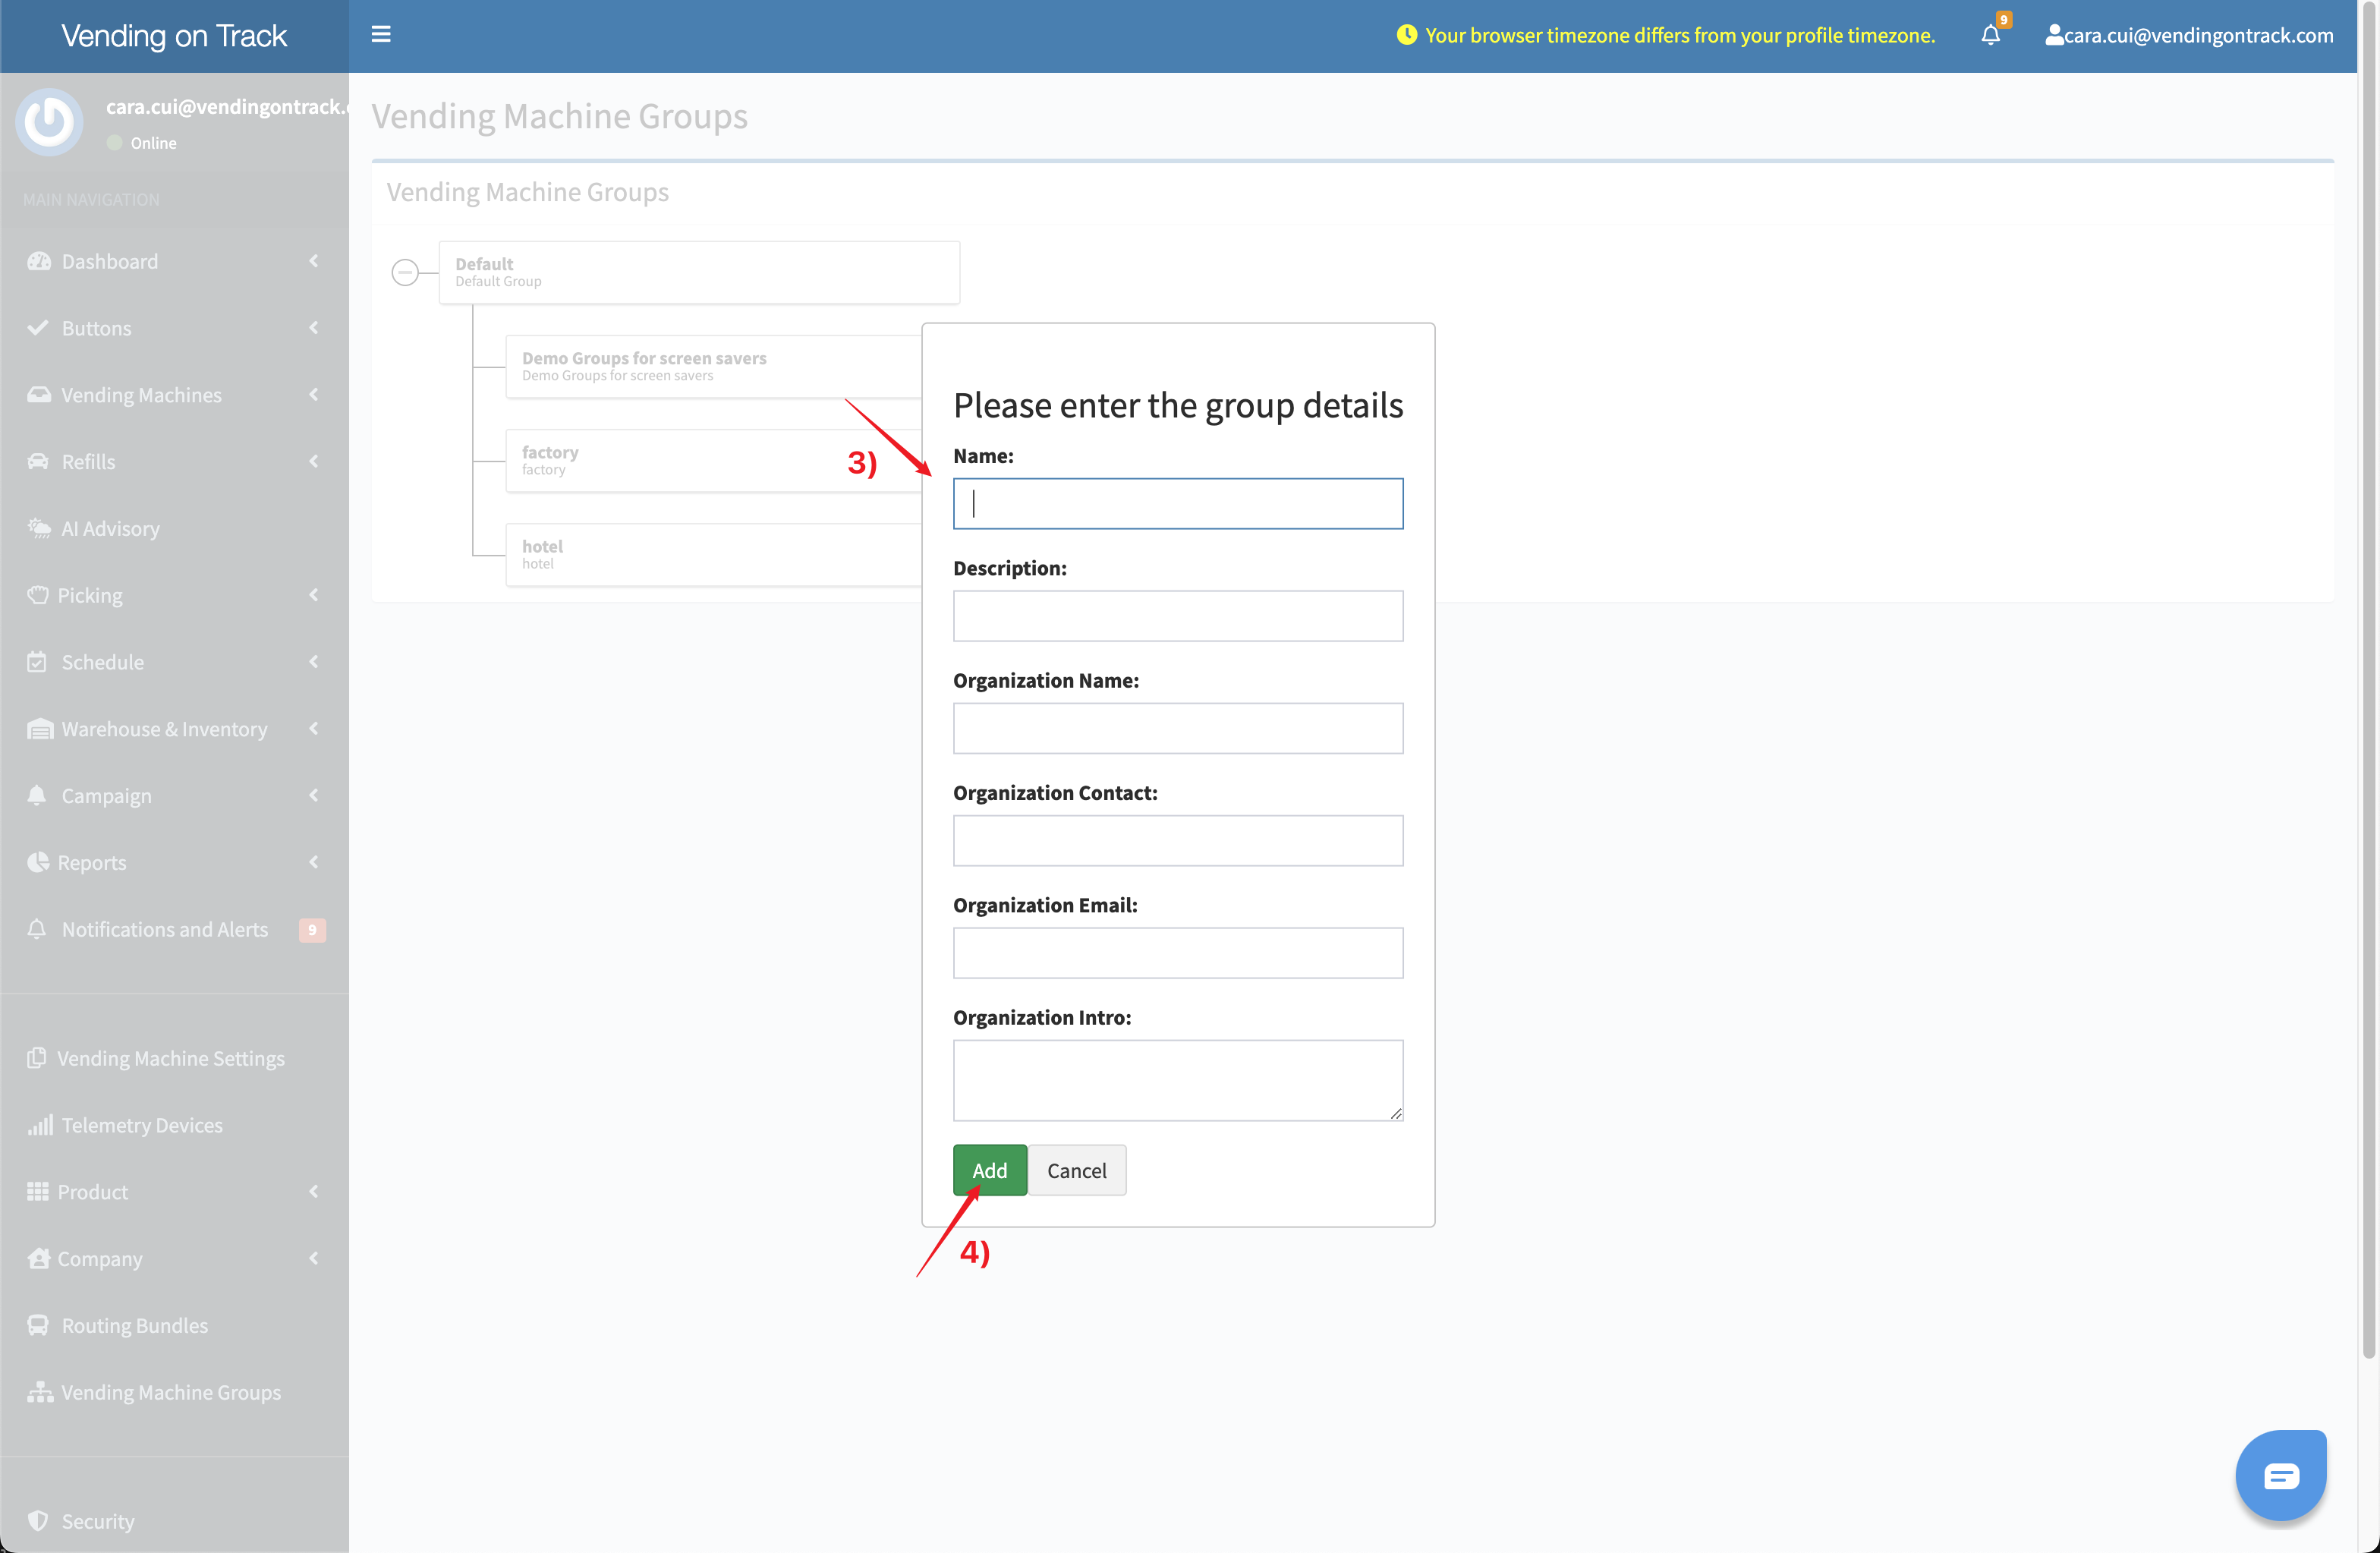
- Fill in the group details
- Click the Add button to save
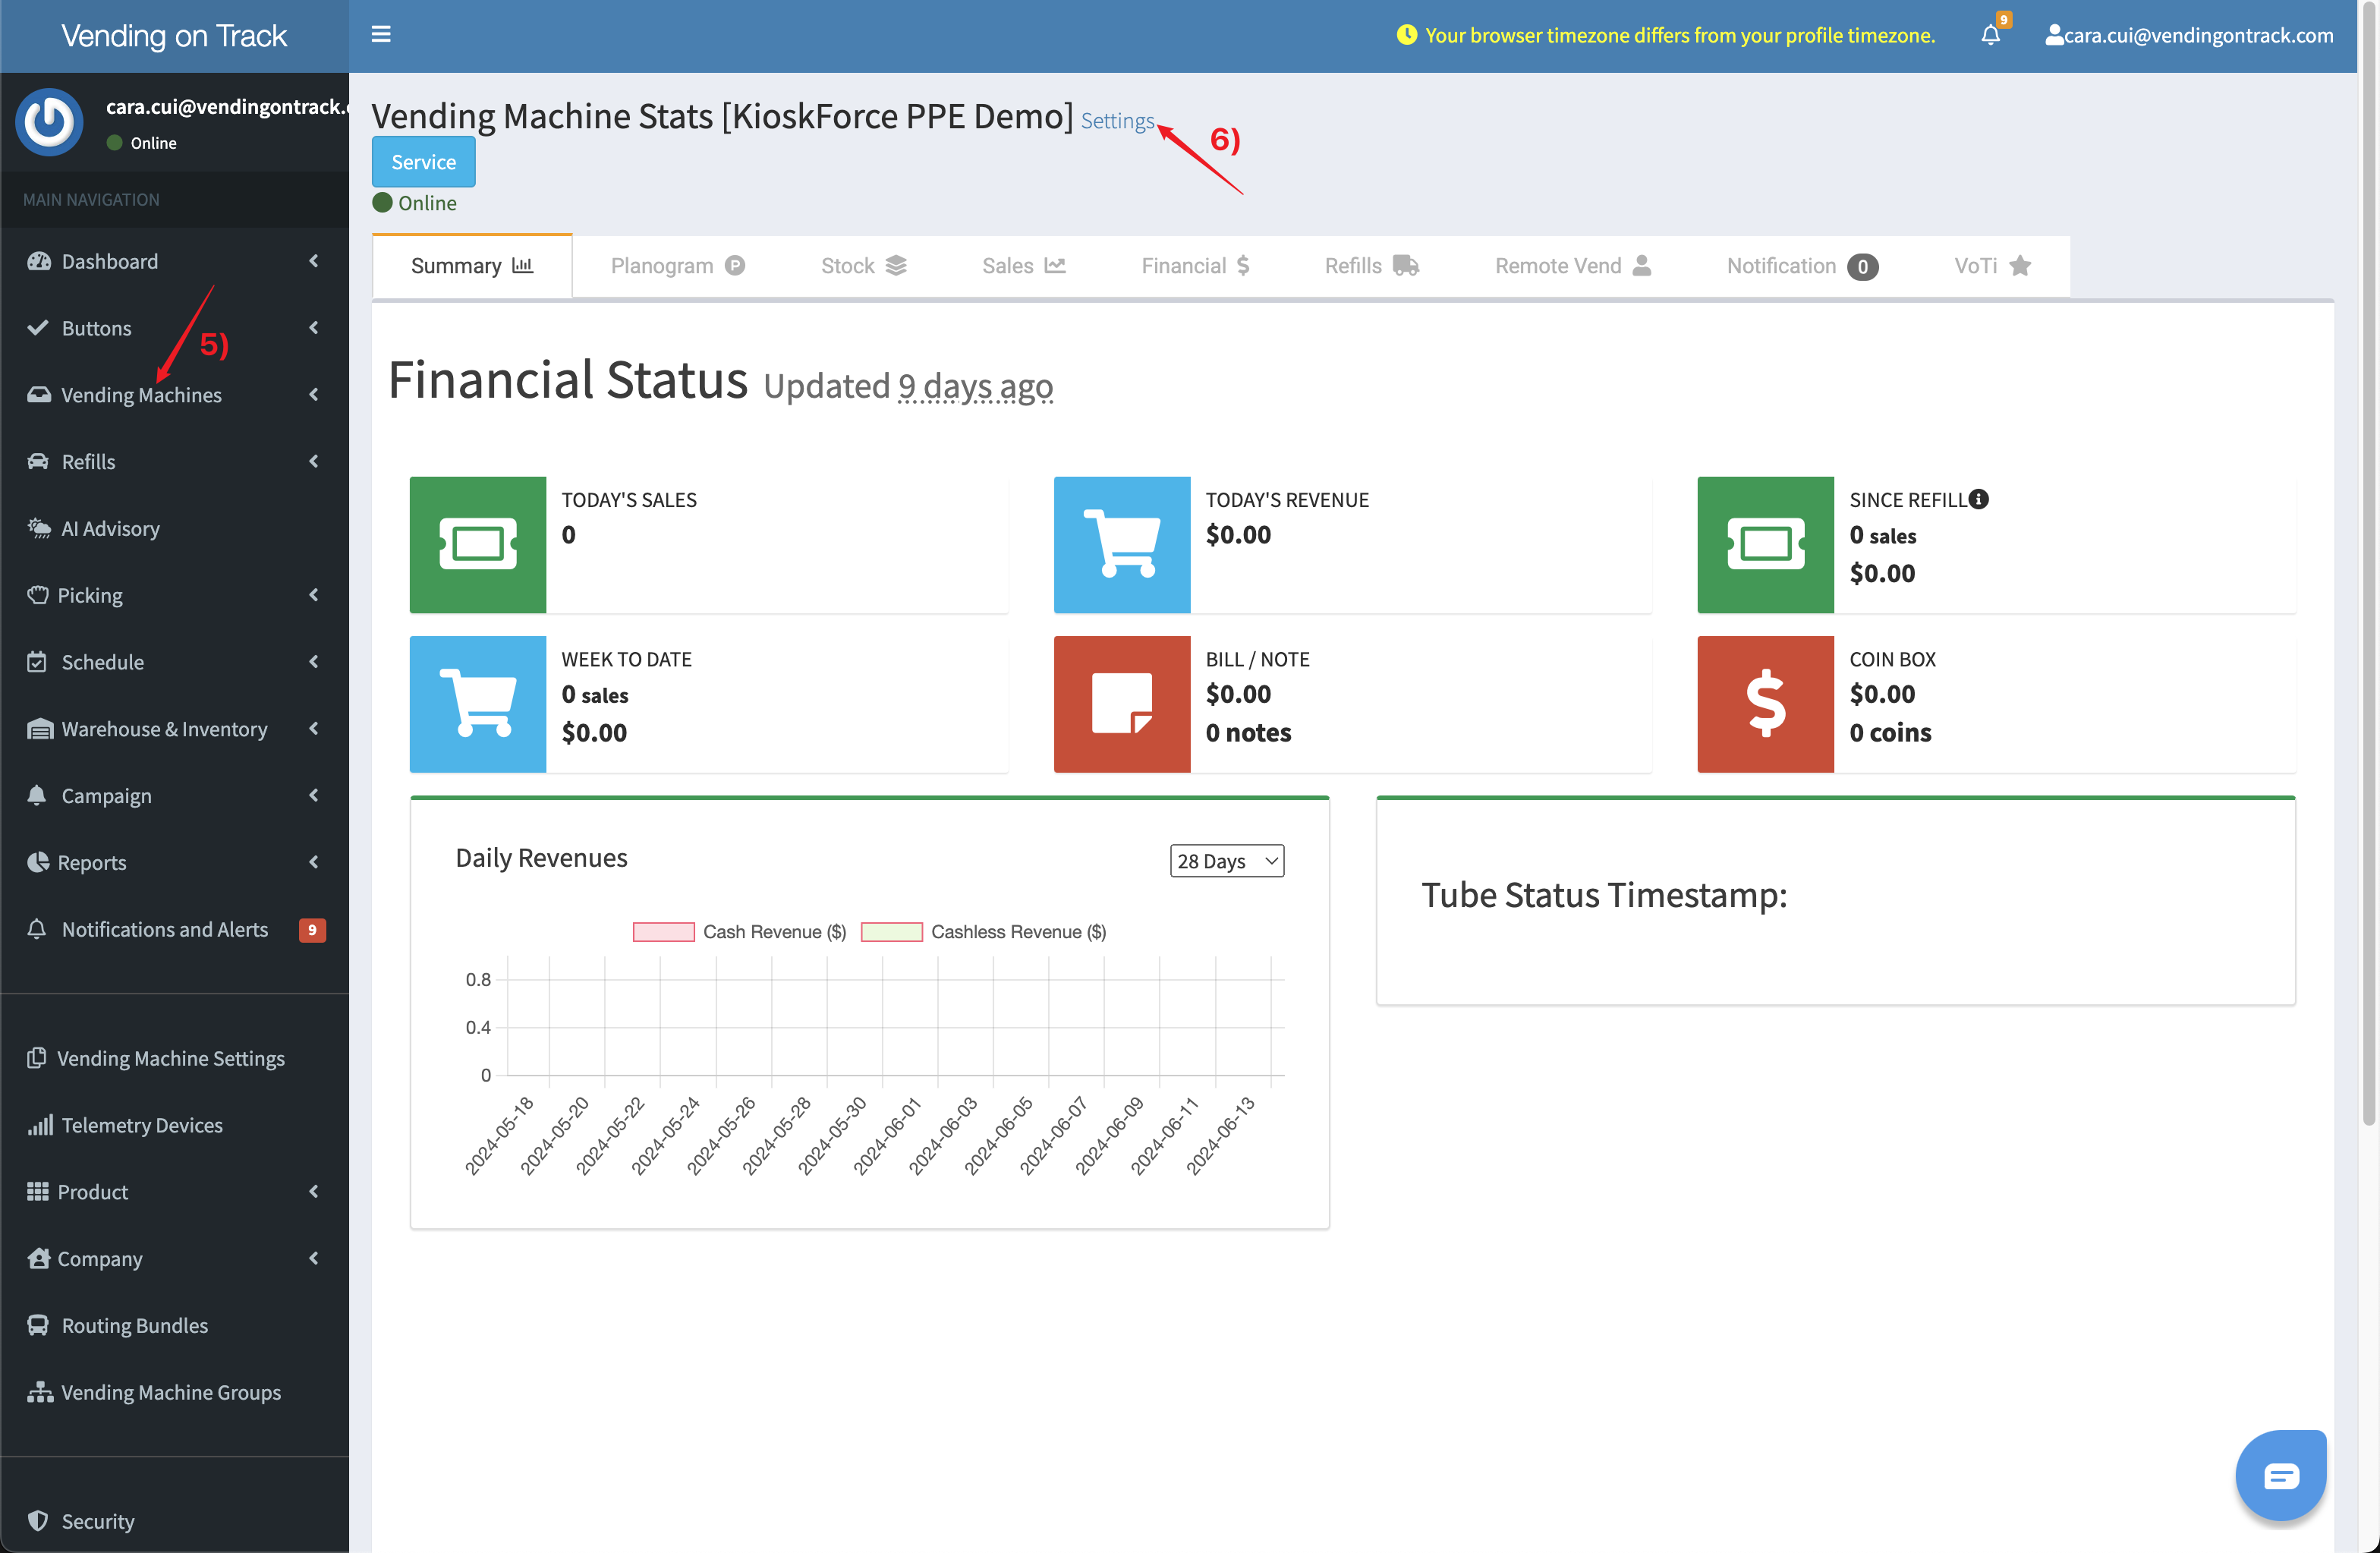
- Go to the Vending Machines page, find the target vending machine and click on the machine name
- Go to the Settings page
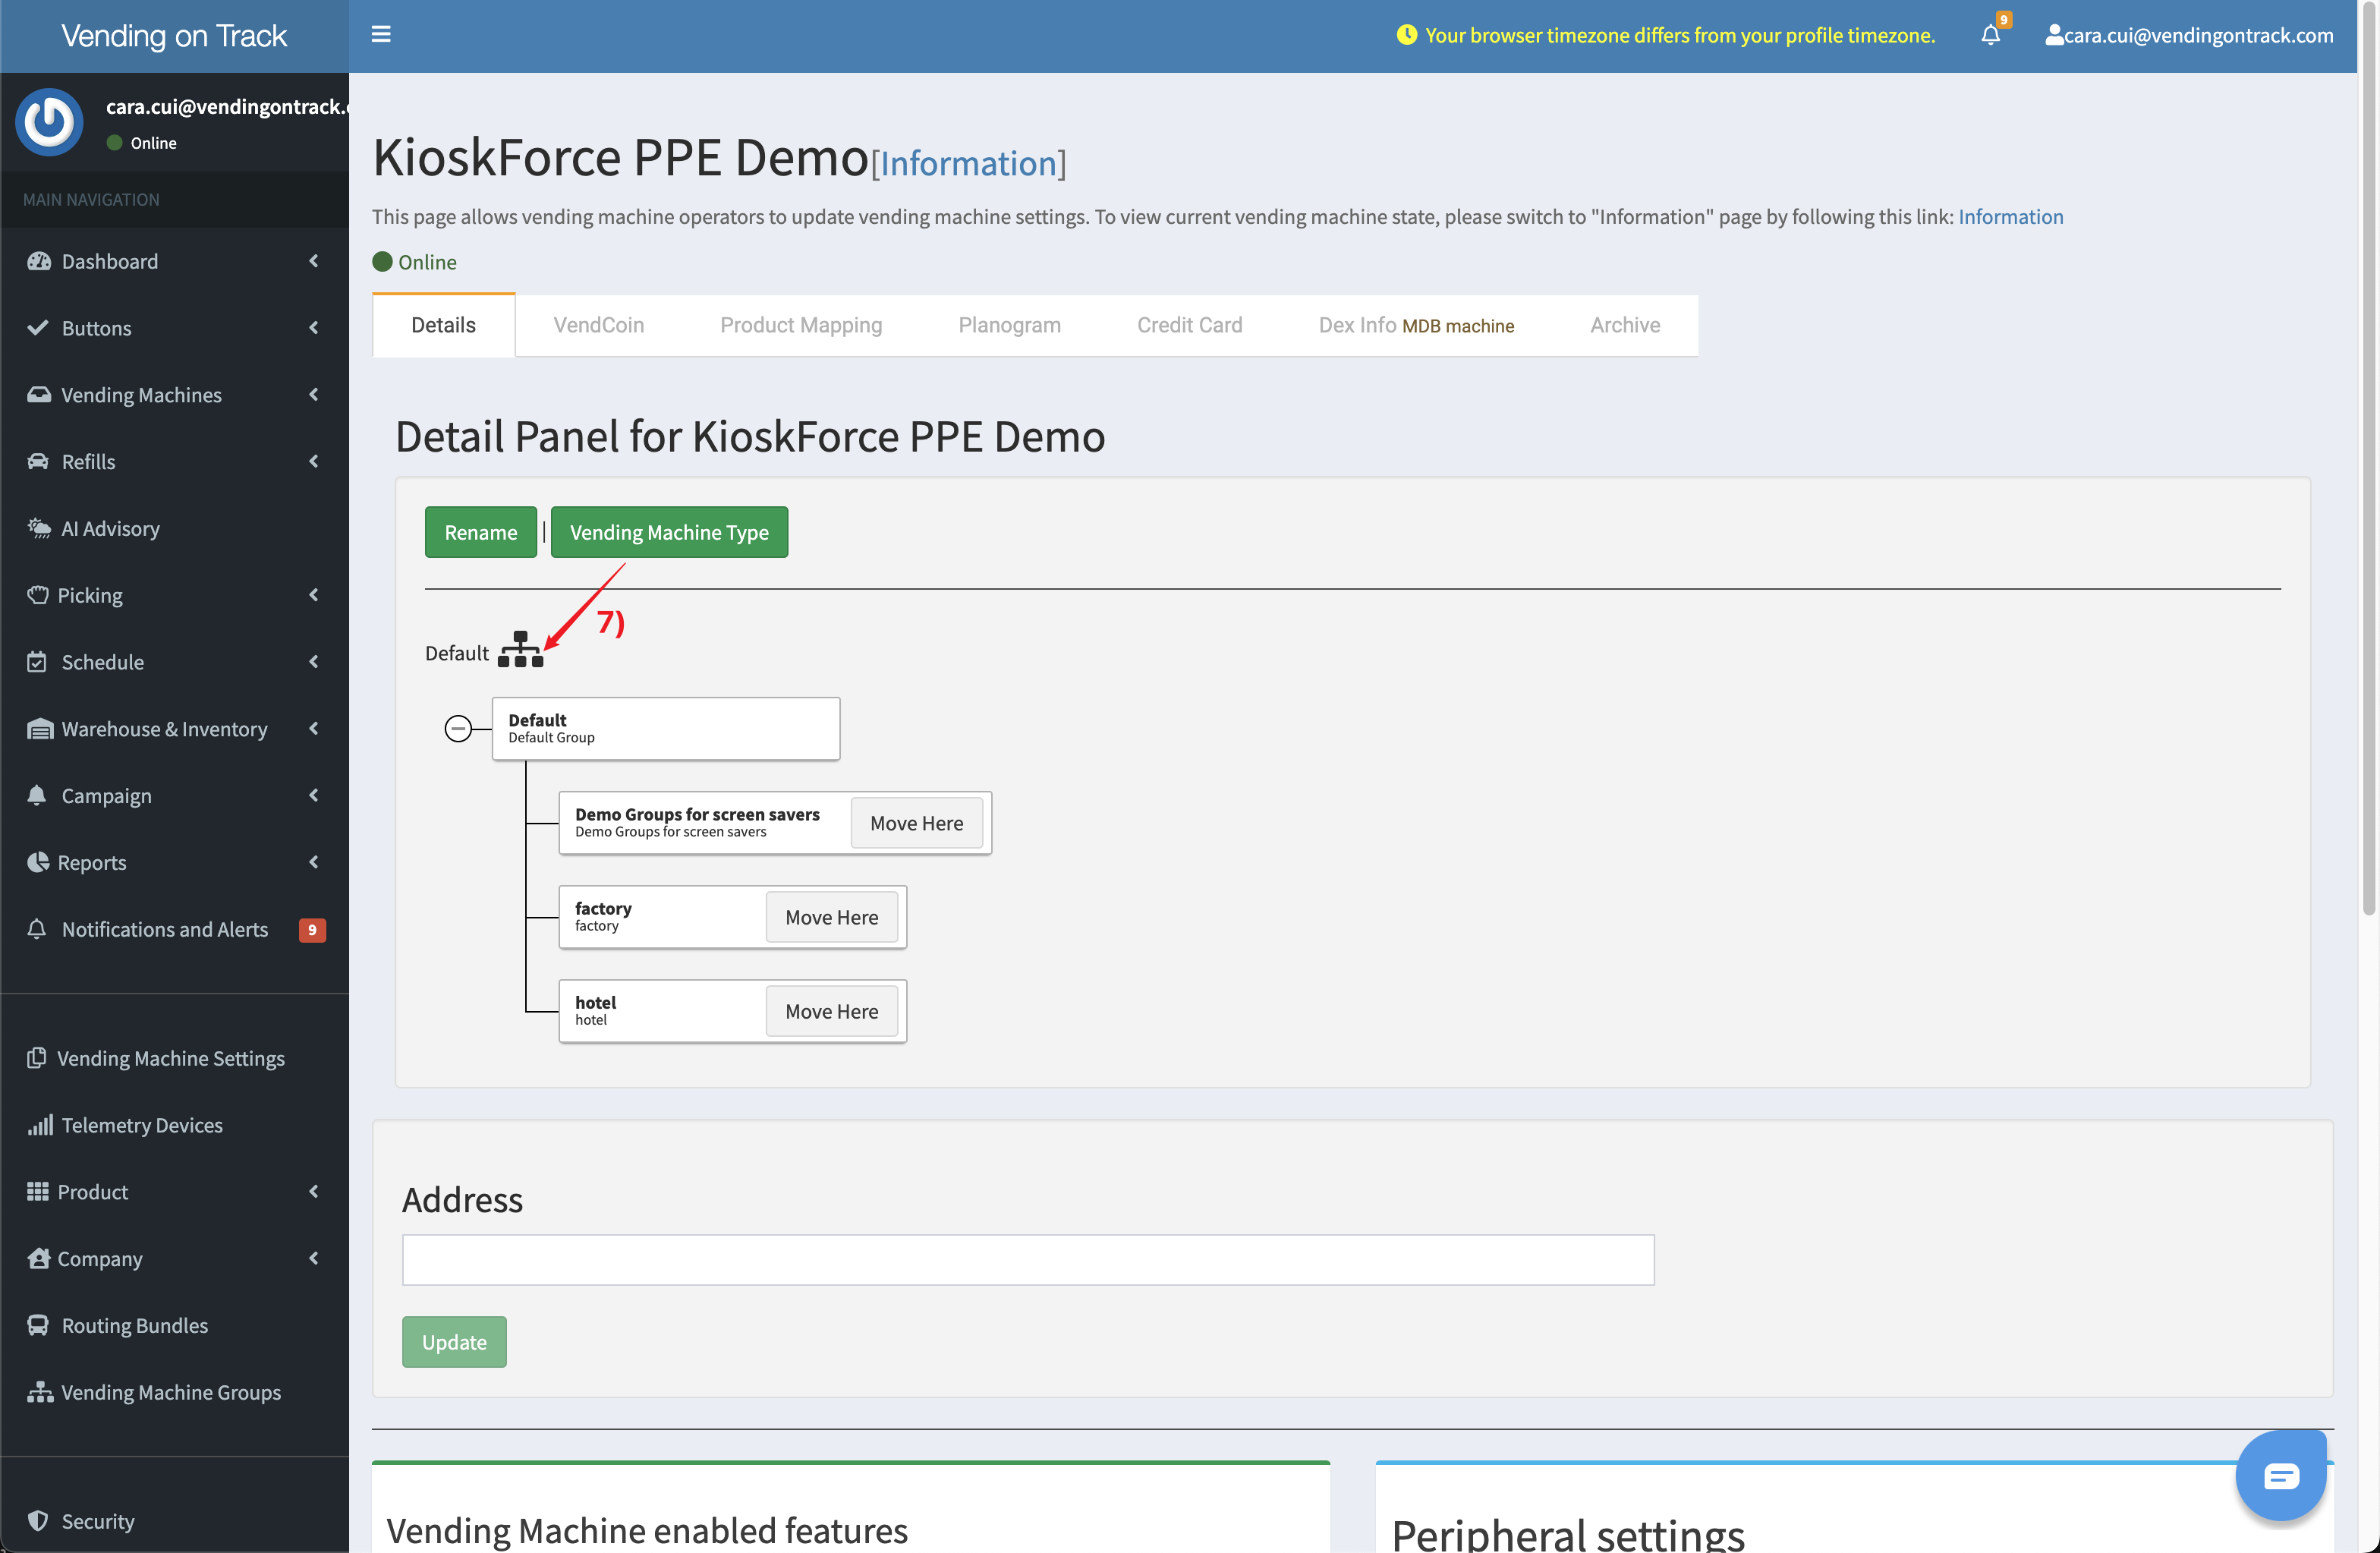
- On the Settings - Details page, click the Default button, find the new group and click Move Here to move this machine to the new group
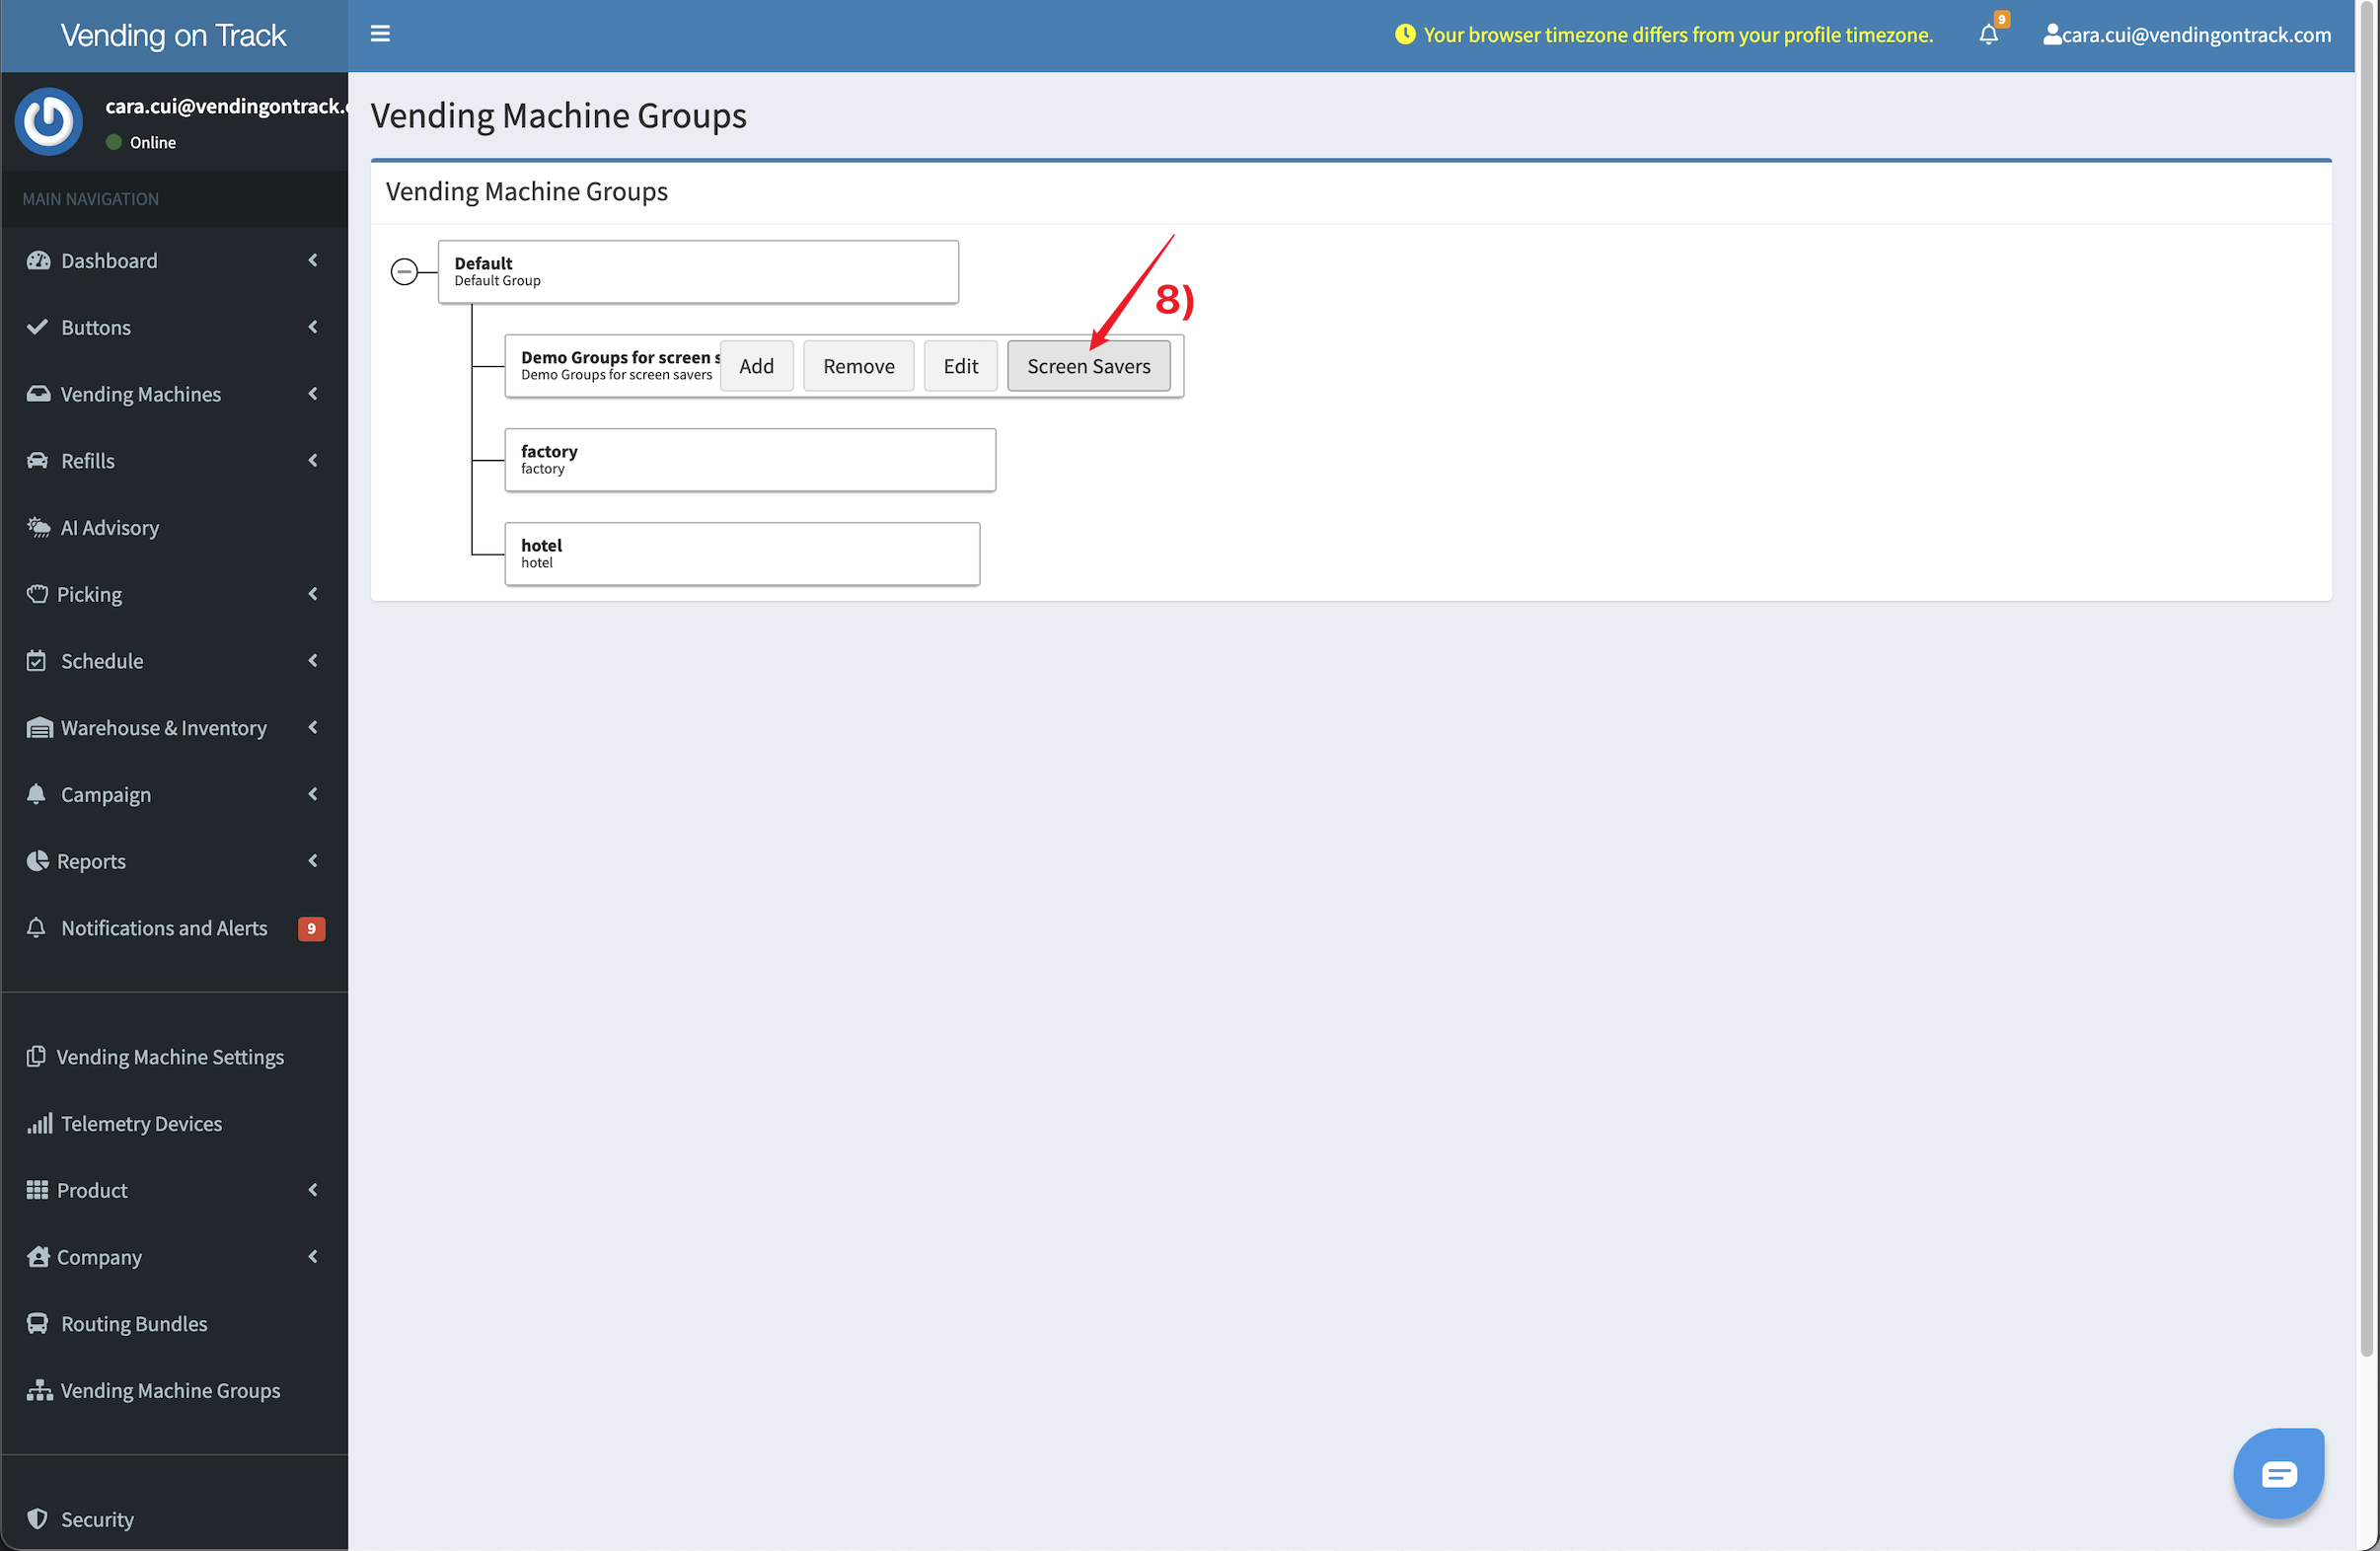
- Go back to the Vending Machine Groups page, on the new vending machine group tab, click the Screen Savers button
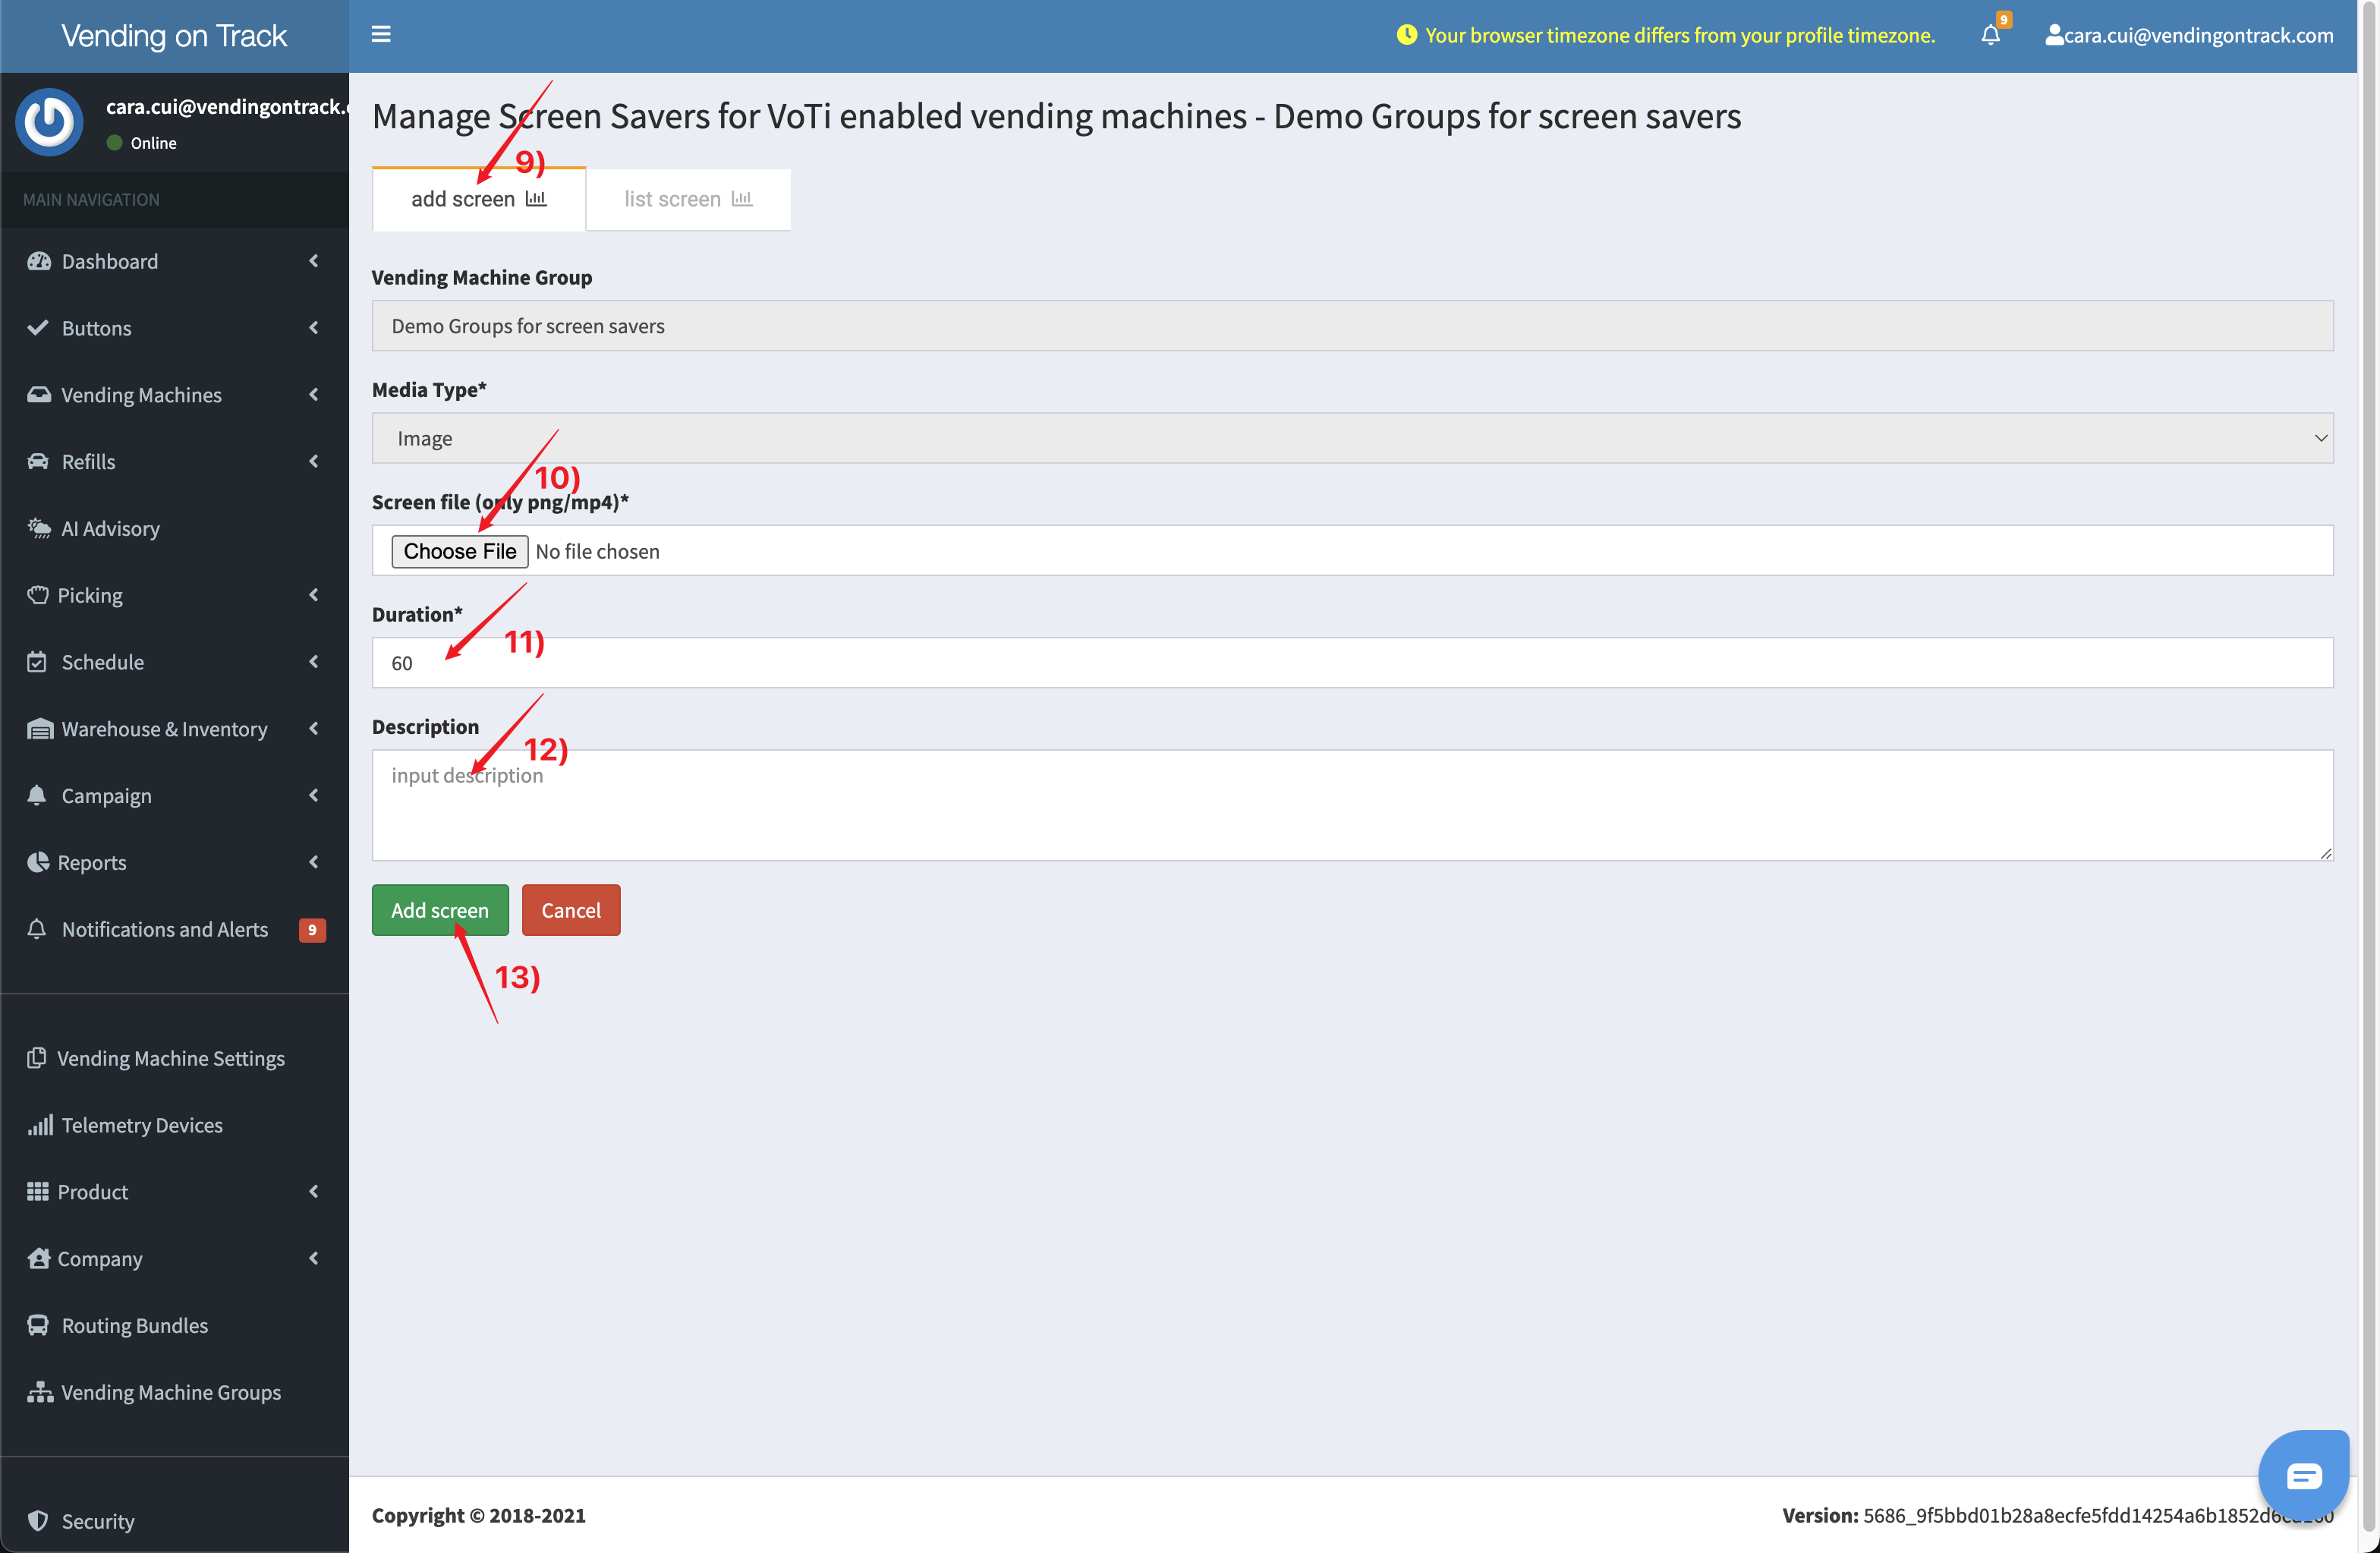
- Click the Add Screen button
- Upload your image(.png) or video(.mp4). (recommended size: vertical 1280x800) (The Media Type will automatically change according to the updated file.)
- Specify the Duration. (The video duration will automatically change after the video is uploaded; the default image duration is 60 seconds, you can change according to your needs.)
- Add a Description as needed. (Once a description is saved, a QR code will display on the machine screen after the consumer clicks the screen. The consumer can check the description text by scanning the QR code.)
- Click the Add screen button to finish the process
How to Edit or Remove a Screen Saver?
To edit or remove a screen saver, please follow this procedure:
- In the telemetry system, go to the Vending Machine Groups page
- Select the target vending machine group, click the Screen Savers button
- Click the List Screen button
- In the Action column, click the Edit button to modify the Duration or Description of the screen saver; click the Remove button to delete the screen saver
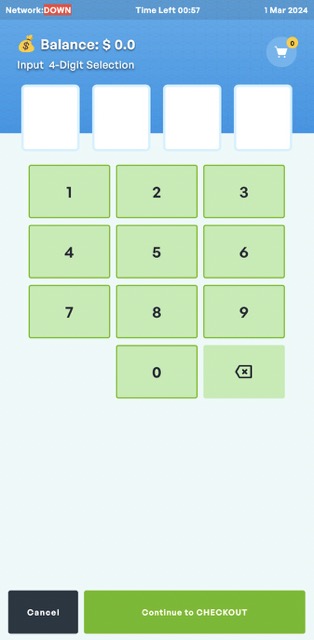
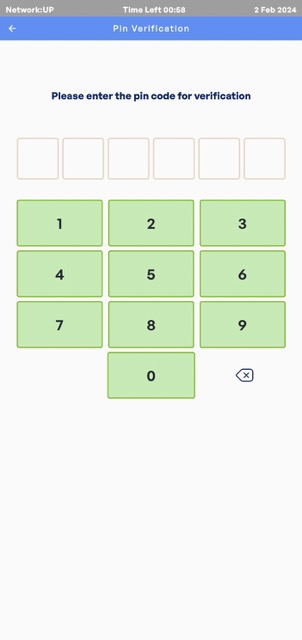
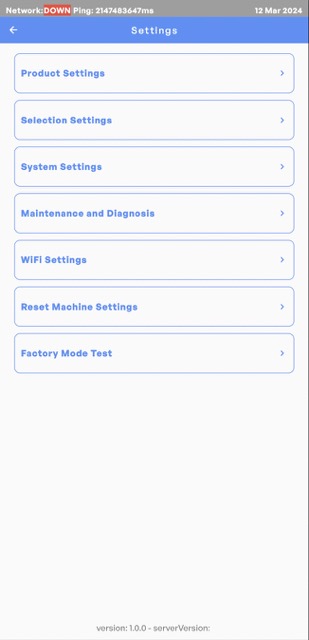
3. How to Enter the Admin Interface from the Vending Machine?
Only authorized personnel have access to KioskForce vending machines’ admin system.
To enter the admin interface from the vending machine, please follow this procedure:
- On the code input page, enter a predefined activation code to approach the PIN Verification page
- On the PIN Verification interface, input the assigned pin code for identity verification
- Multiple settings can be performed on this Settings page
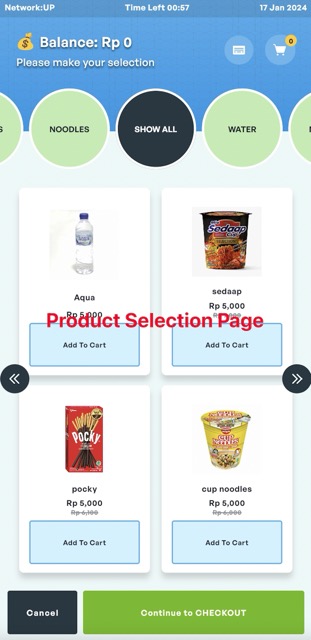
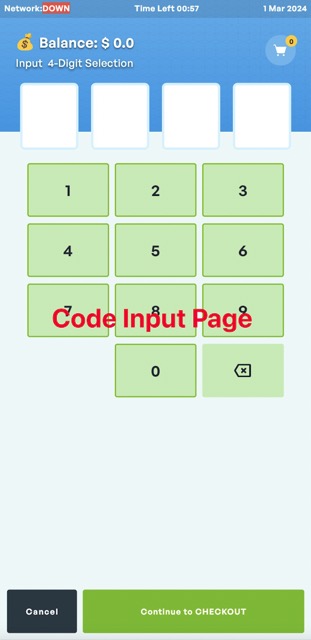
4. Can I Change the Default Homepage?
We allow the admin to set KioskForce vending machines’ default homepage to either the product selection page or the code input page. The operation can be performed both from the vending machine and from the telemetry system.
How to Switch the Default Homepage?
To switch the homepage from the vending machine, please follow this procedure:
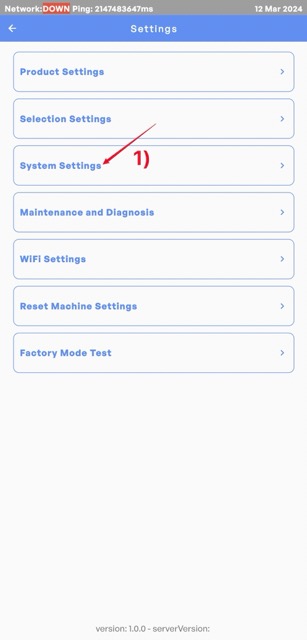
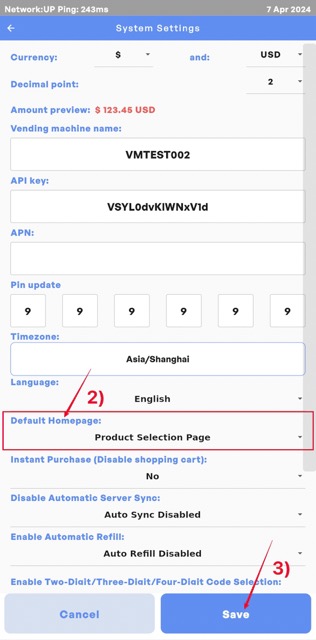
- Enter the admin interface (please refer to Question 4) and go to the System Settings page
- Find the Default Homepage settings, switch the homepage according to your requirements (If you cannot find the Default Homepage part on this page, your system should be outdated. Please contact KioskForce team for system upgrade.)
- Click Save to finish the process
To switch the homepage from the telemetry system, please follow this procedure:
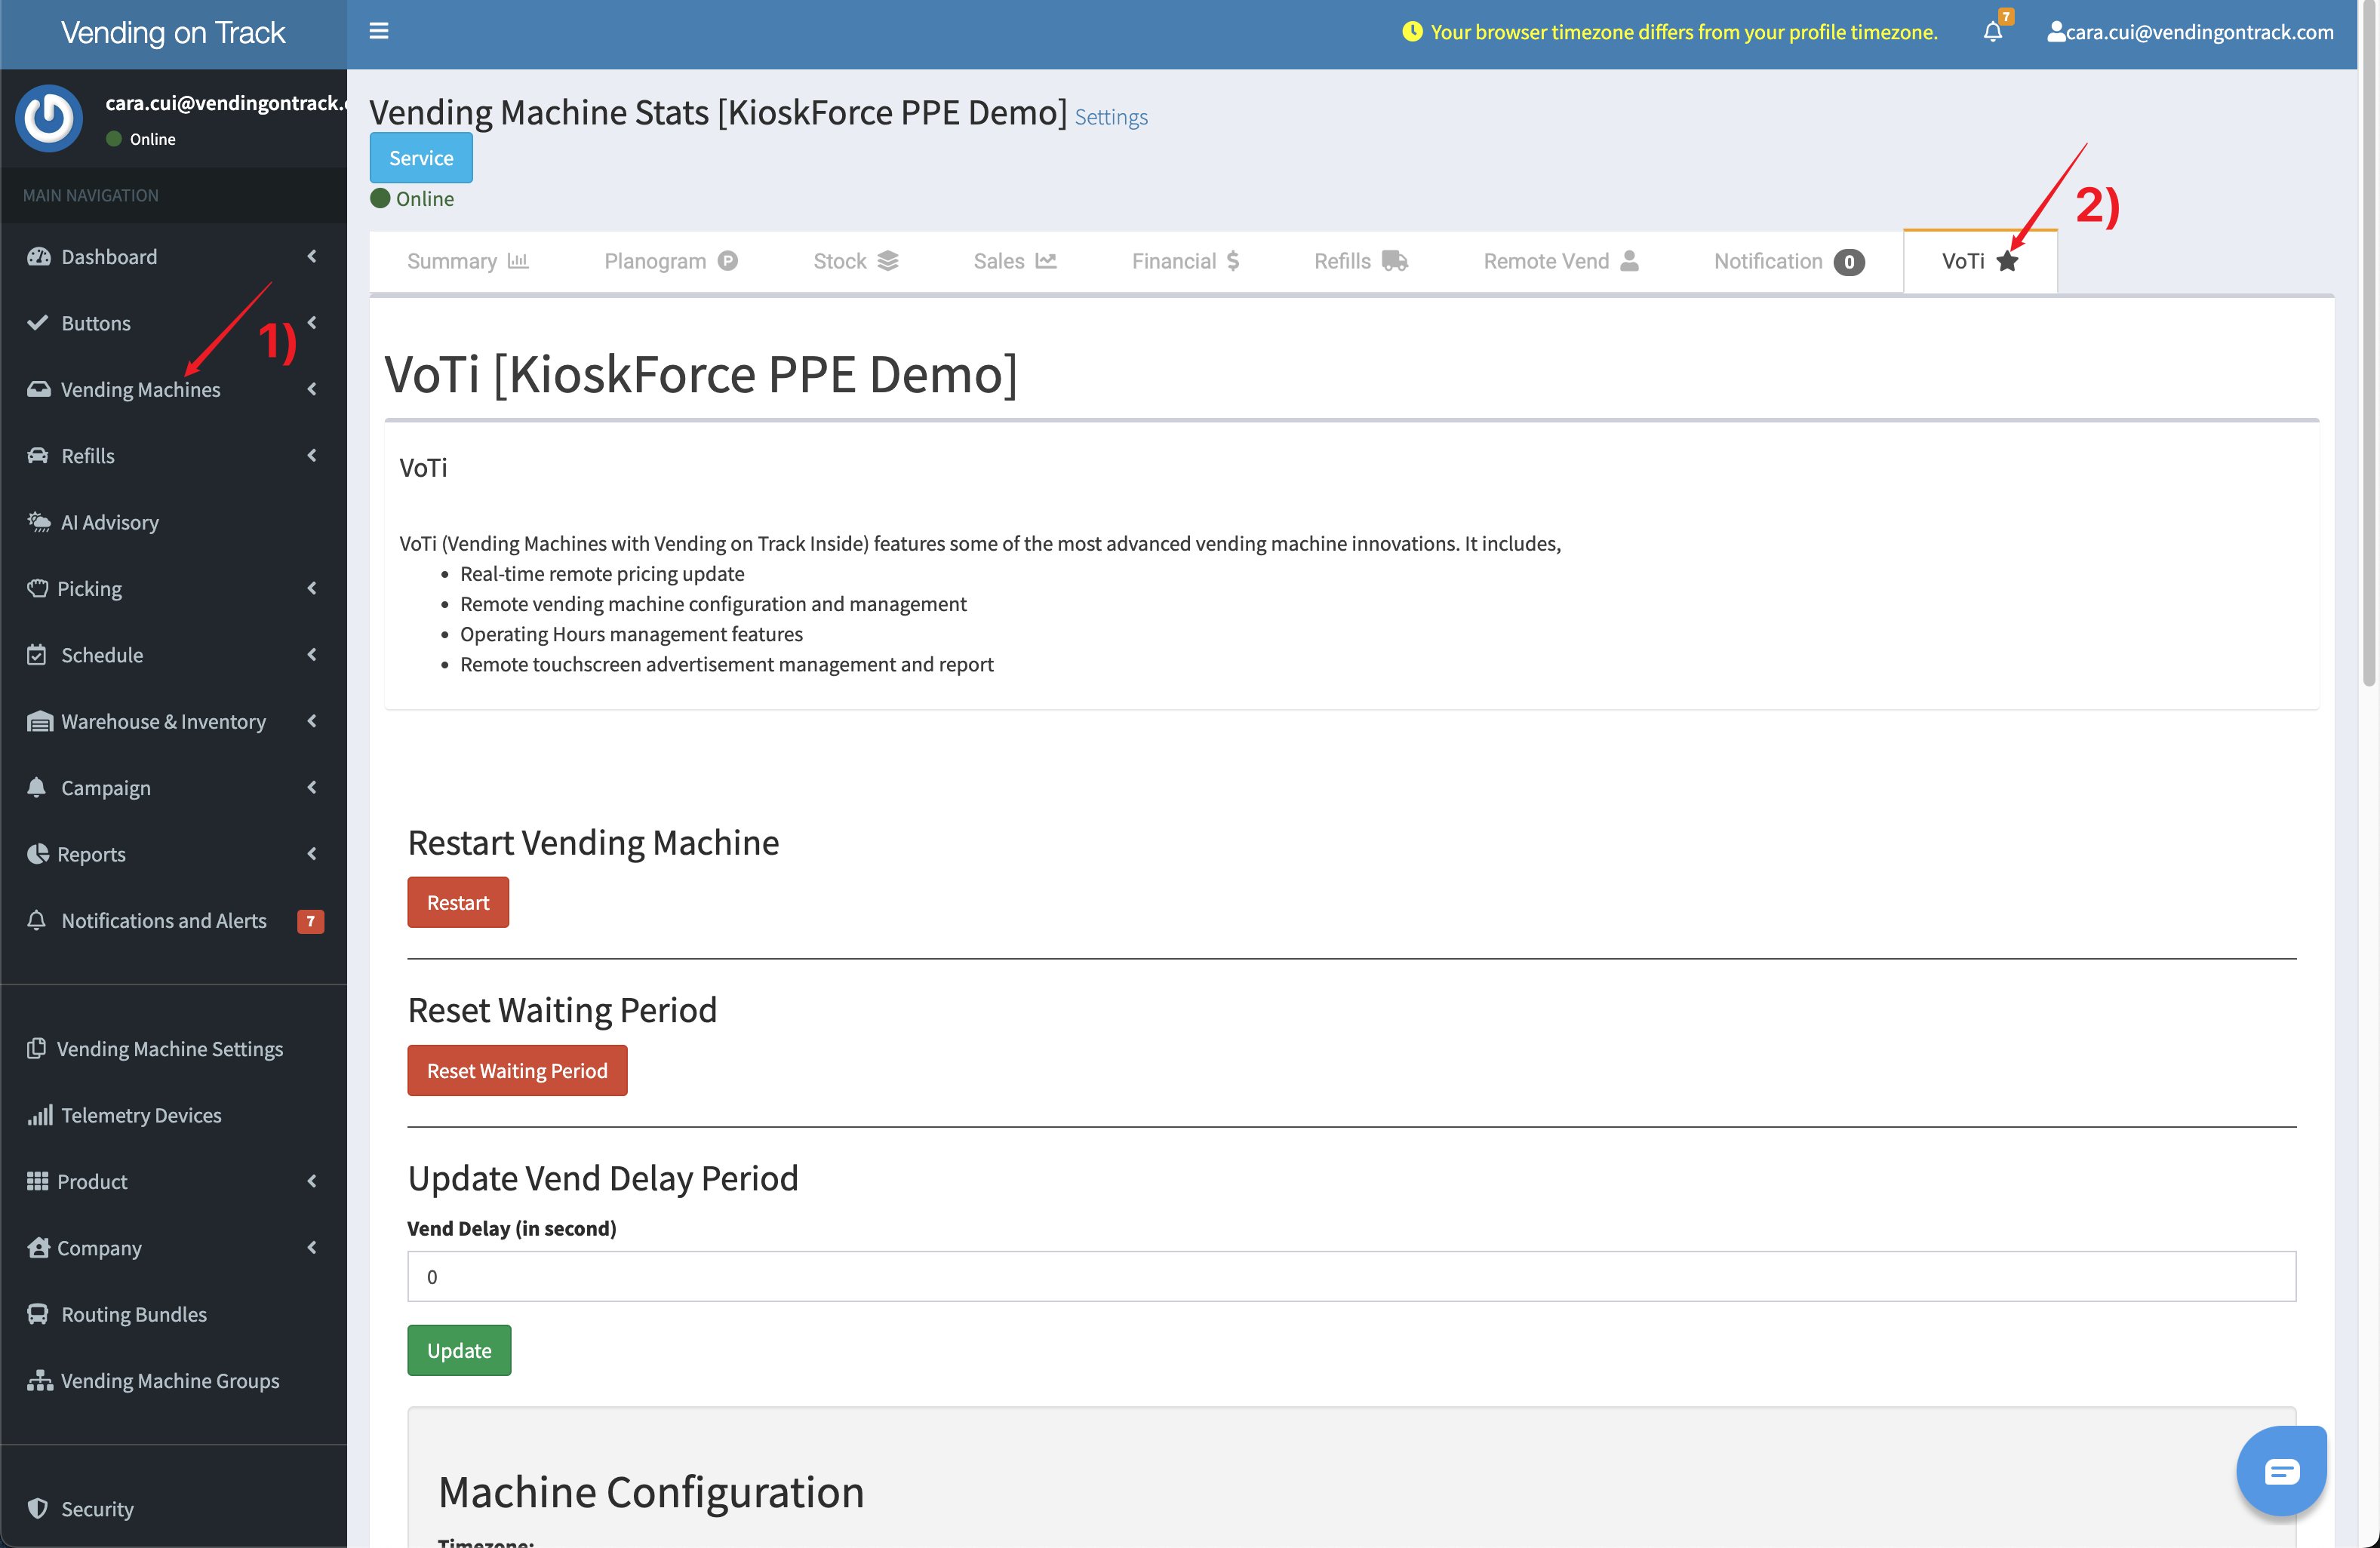
- In the telemetry system, go to the Vending Machines page, find the target vending machine and click on the machine name
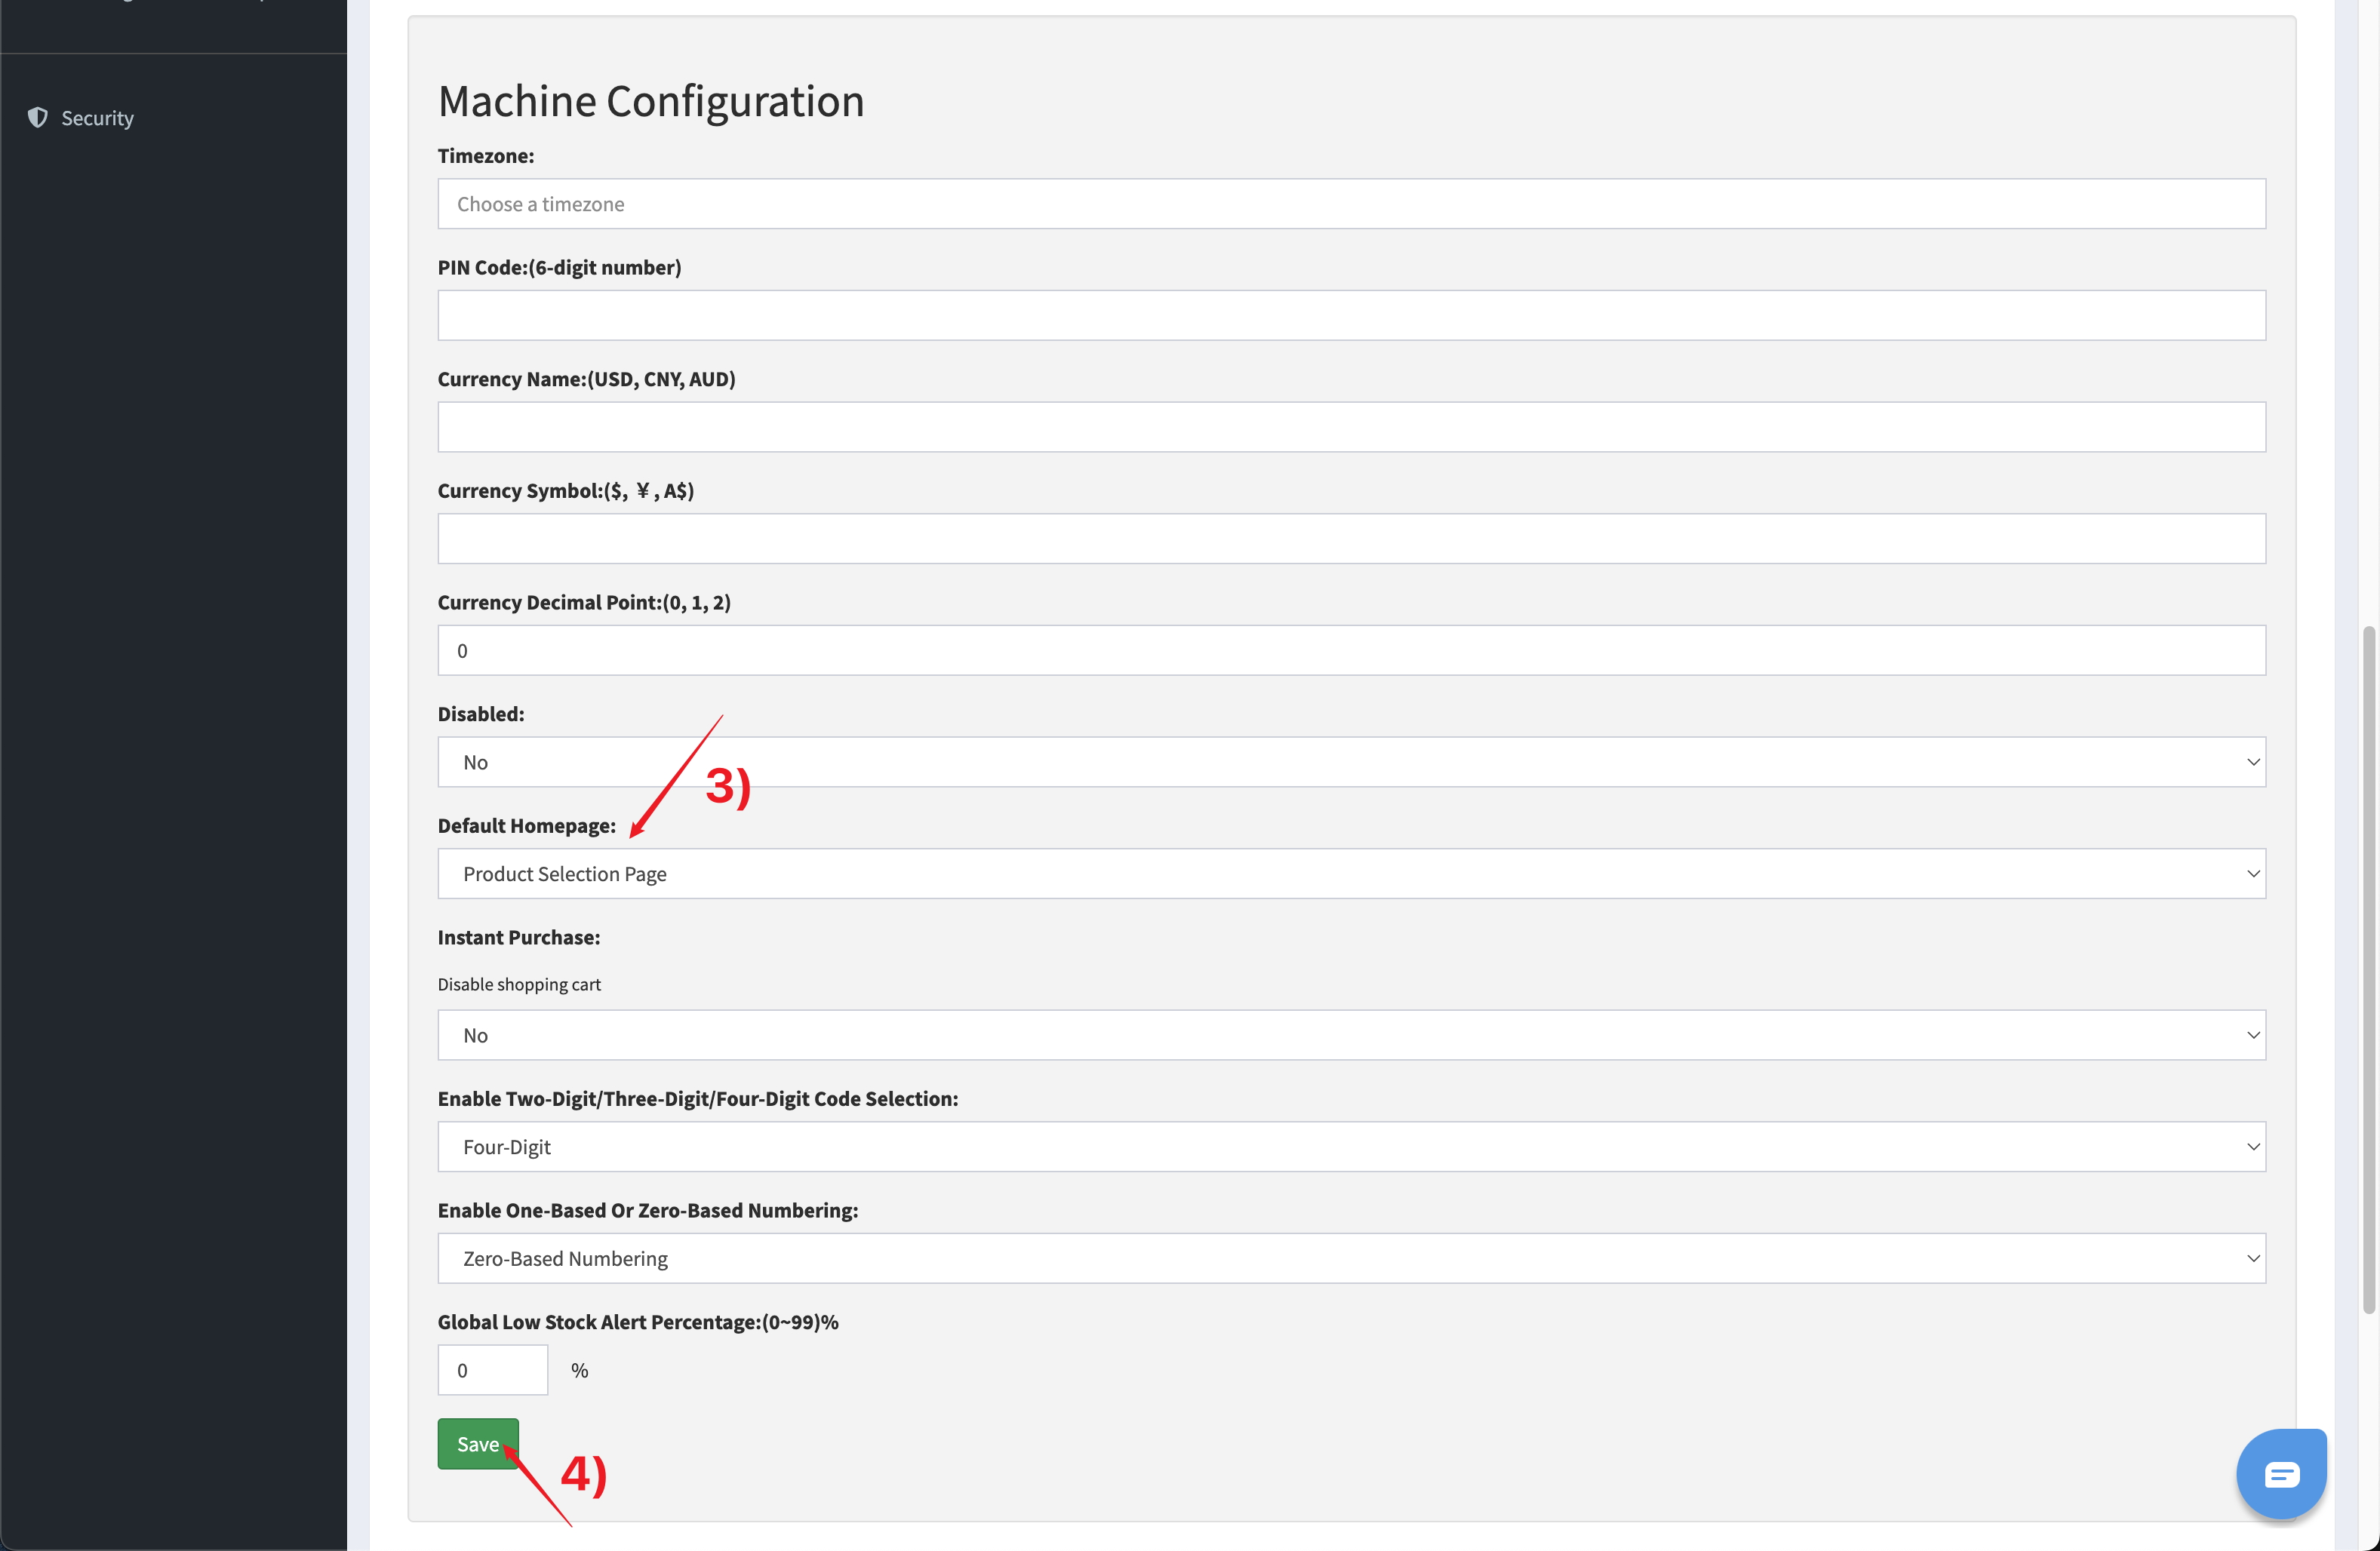
- On the machine information page, click the VoTi tab
- In the Machine Configuration section, find the Default Homepage settings, switch the homepage according to your requirements
- Click Save the finish the process
5. How to Add Products?
To add a product, please follow this procedure:
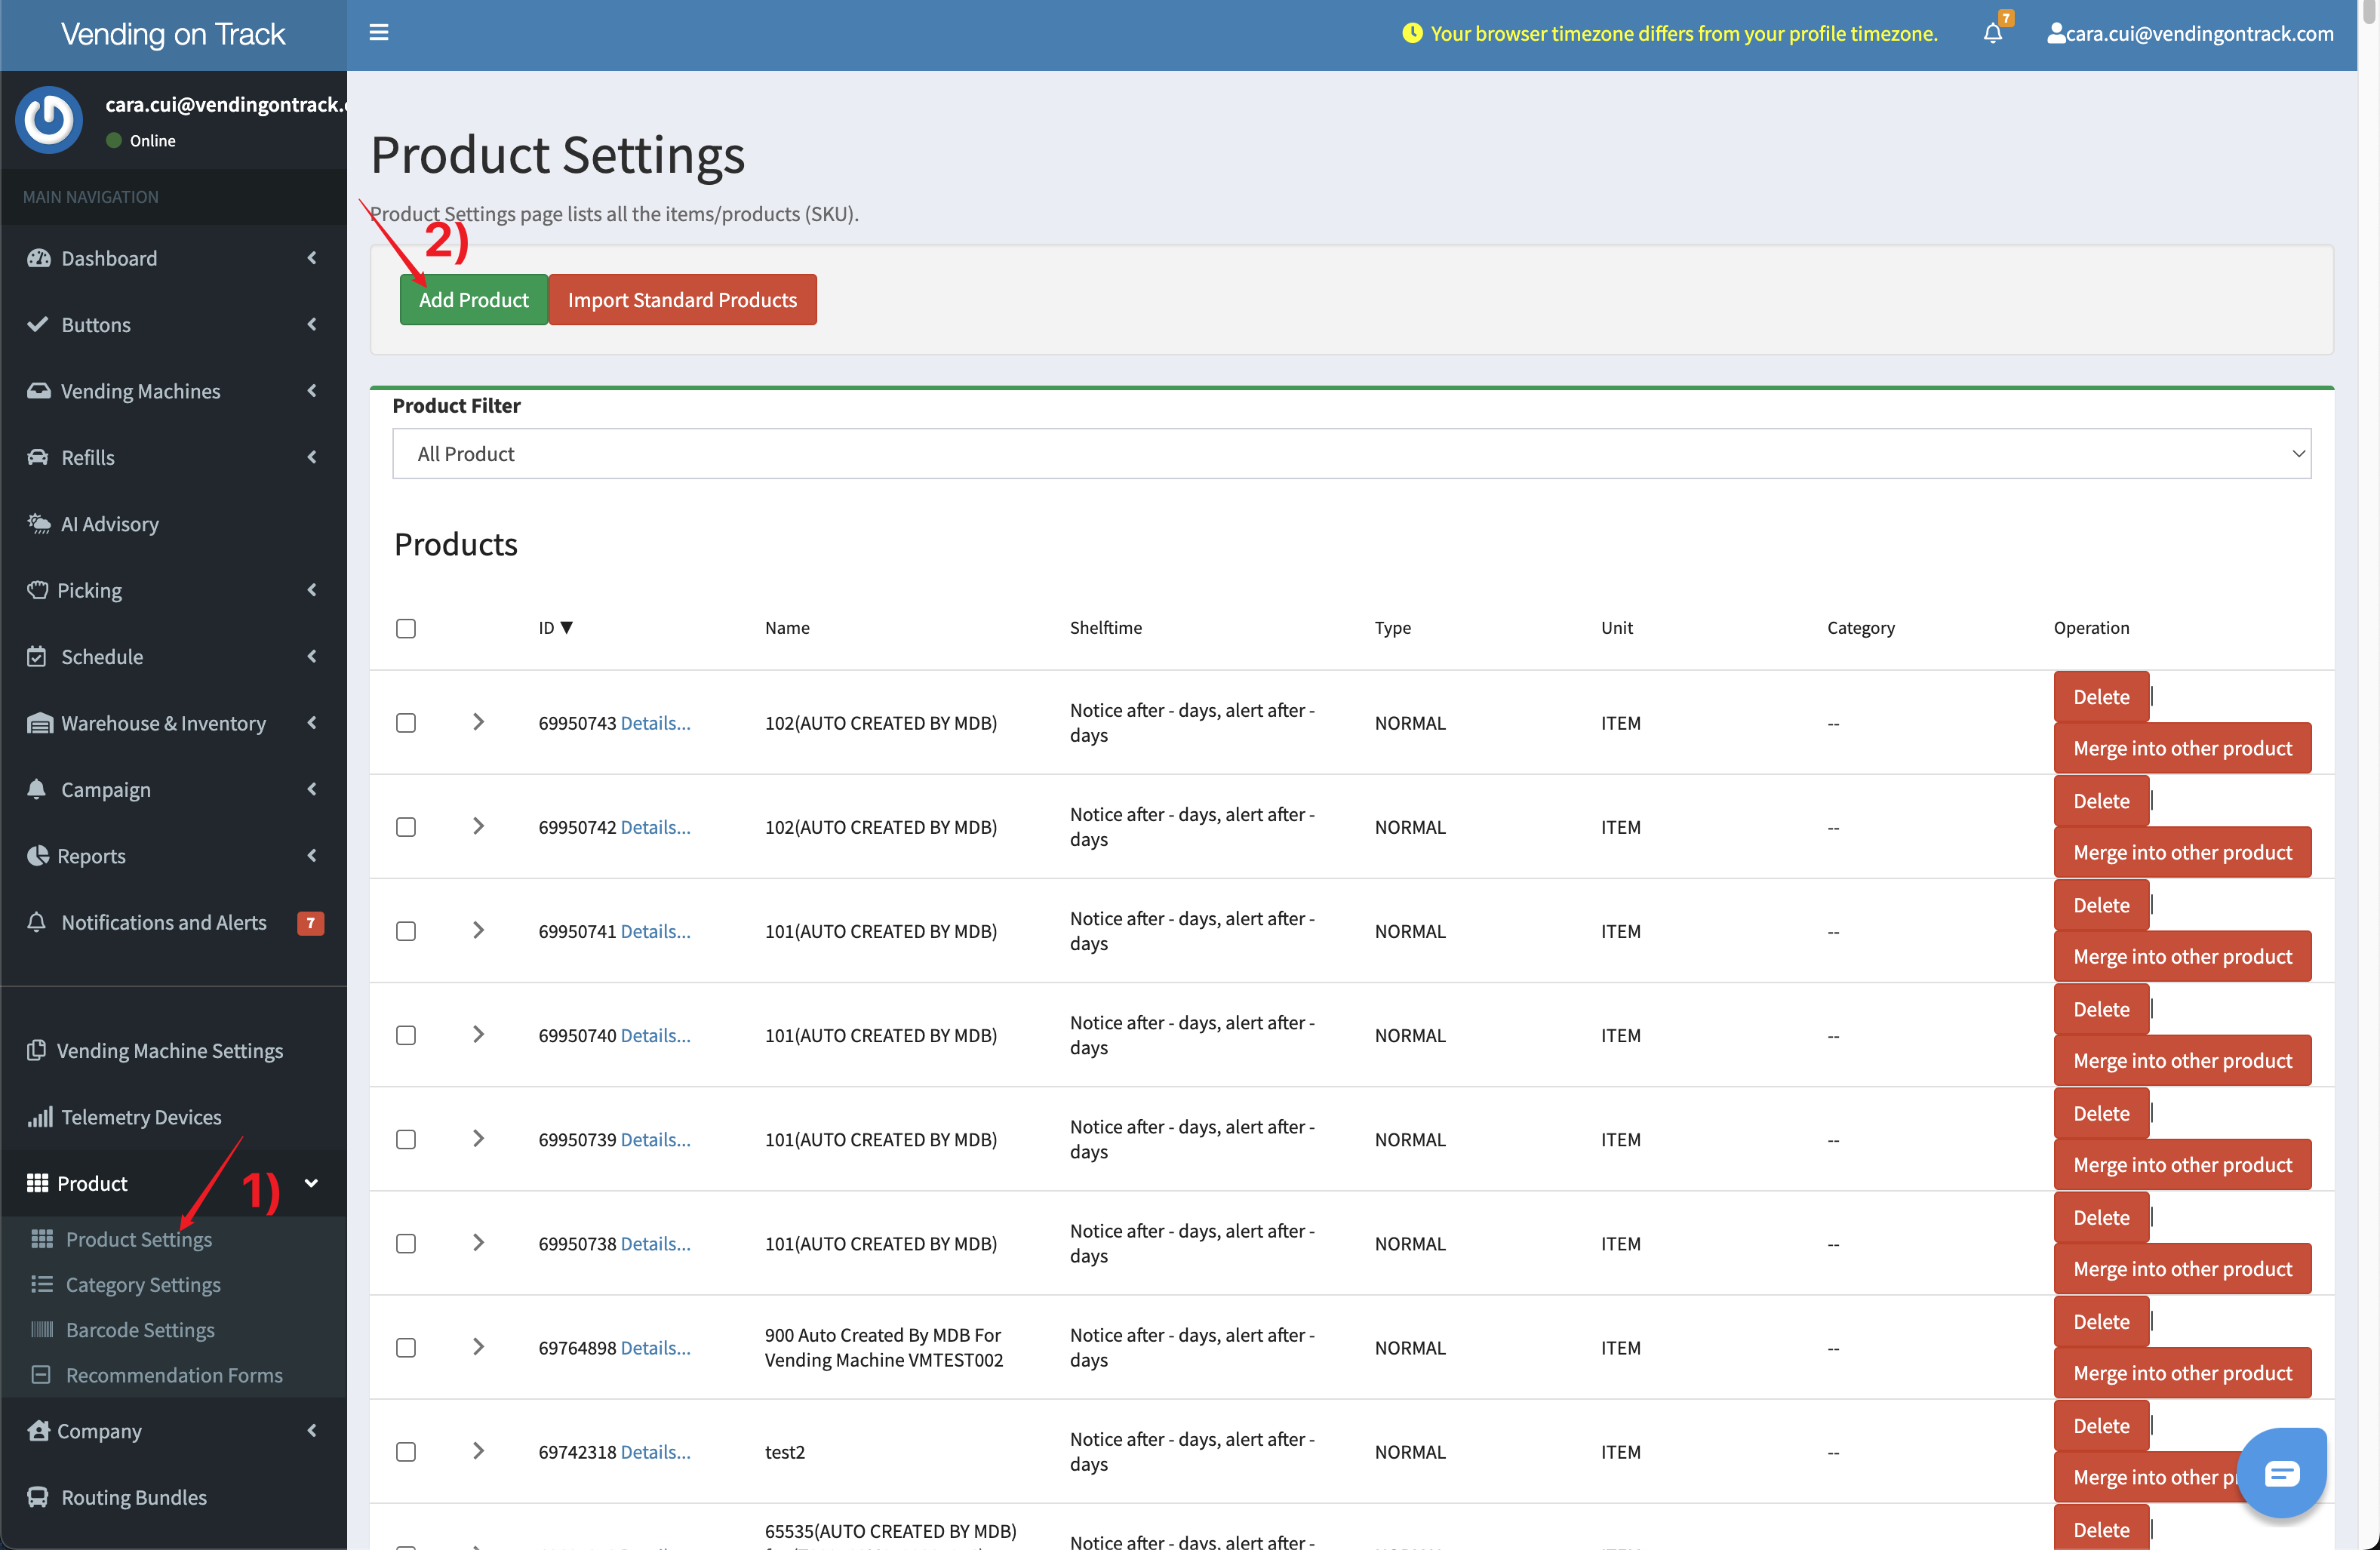
- In the telemetry system, go to the Product Settings page
- Click the Add Product button
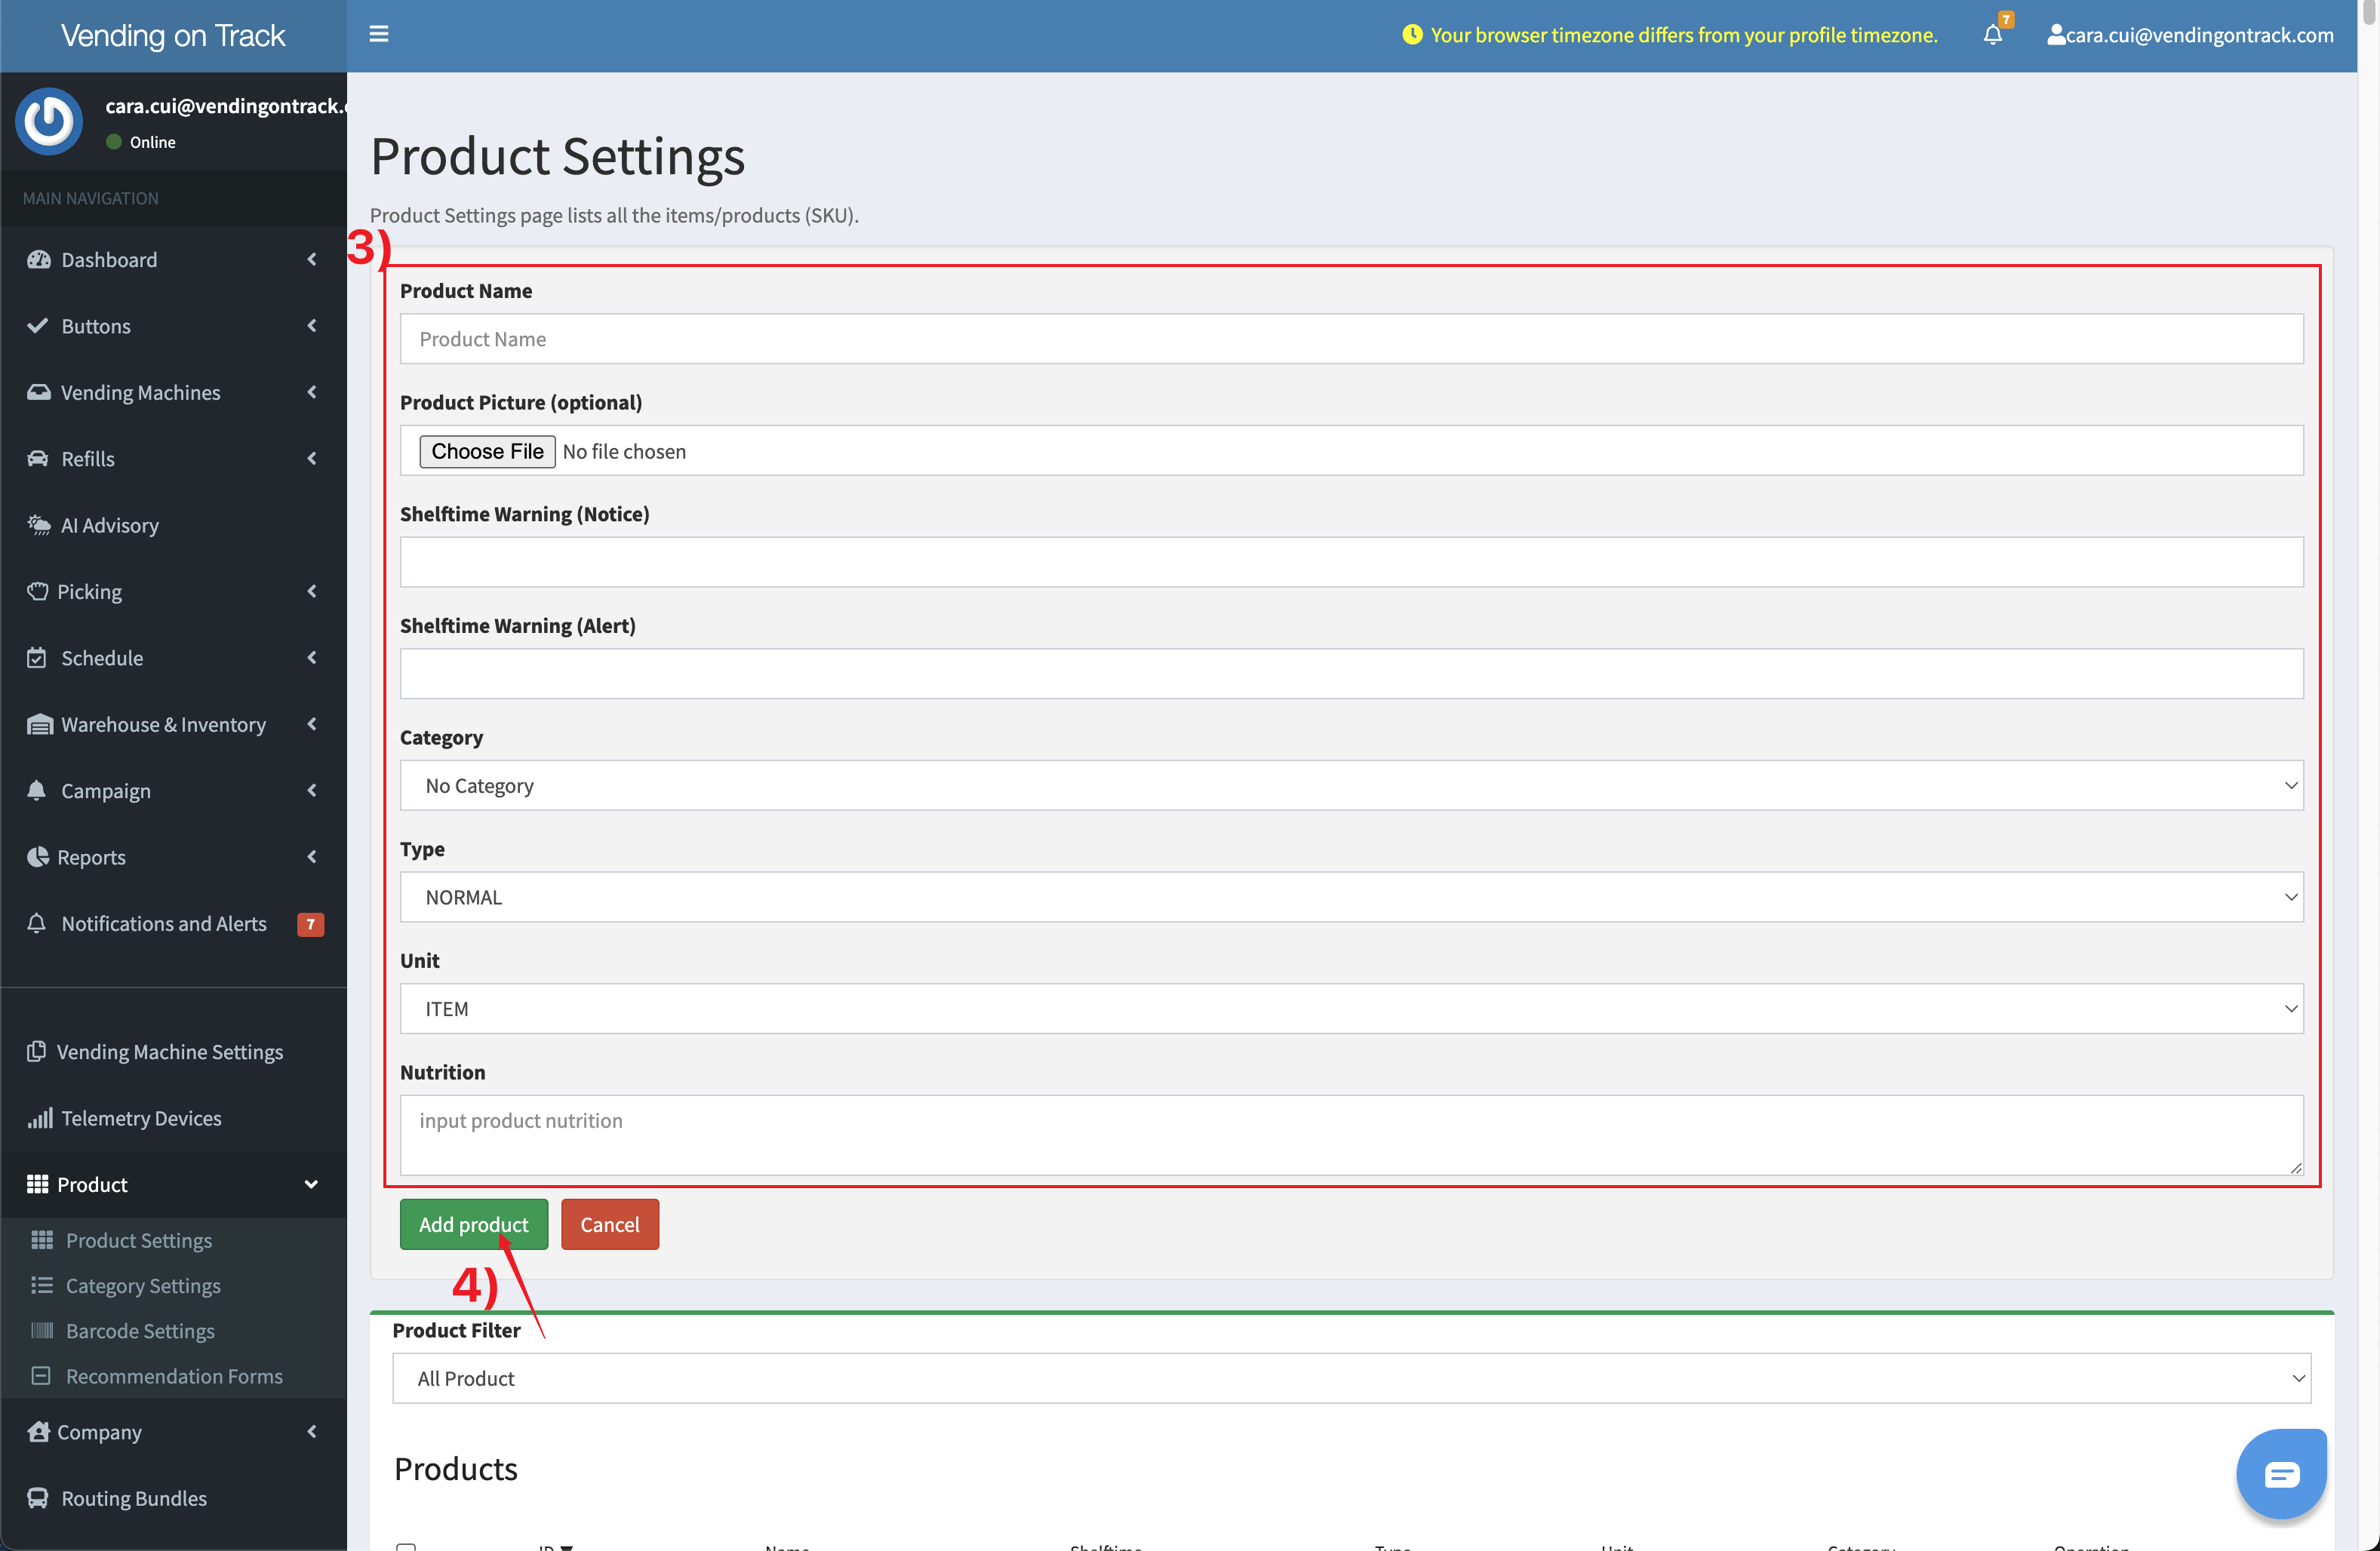
- On the pop-up window, input the relevant product information
- Click the Add product button to finish the process
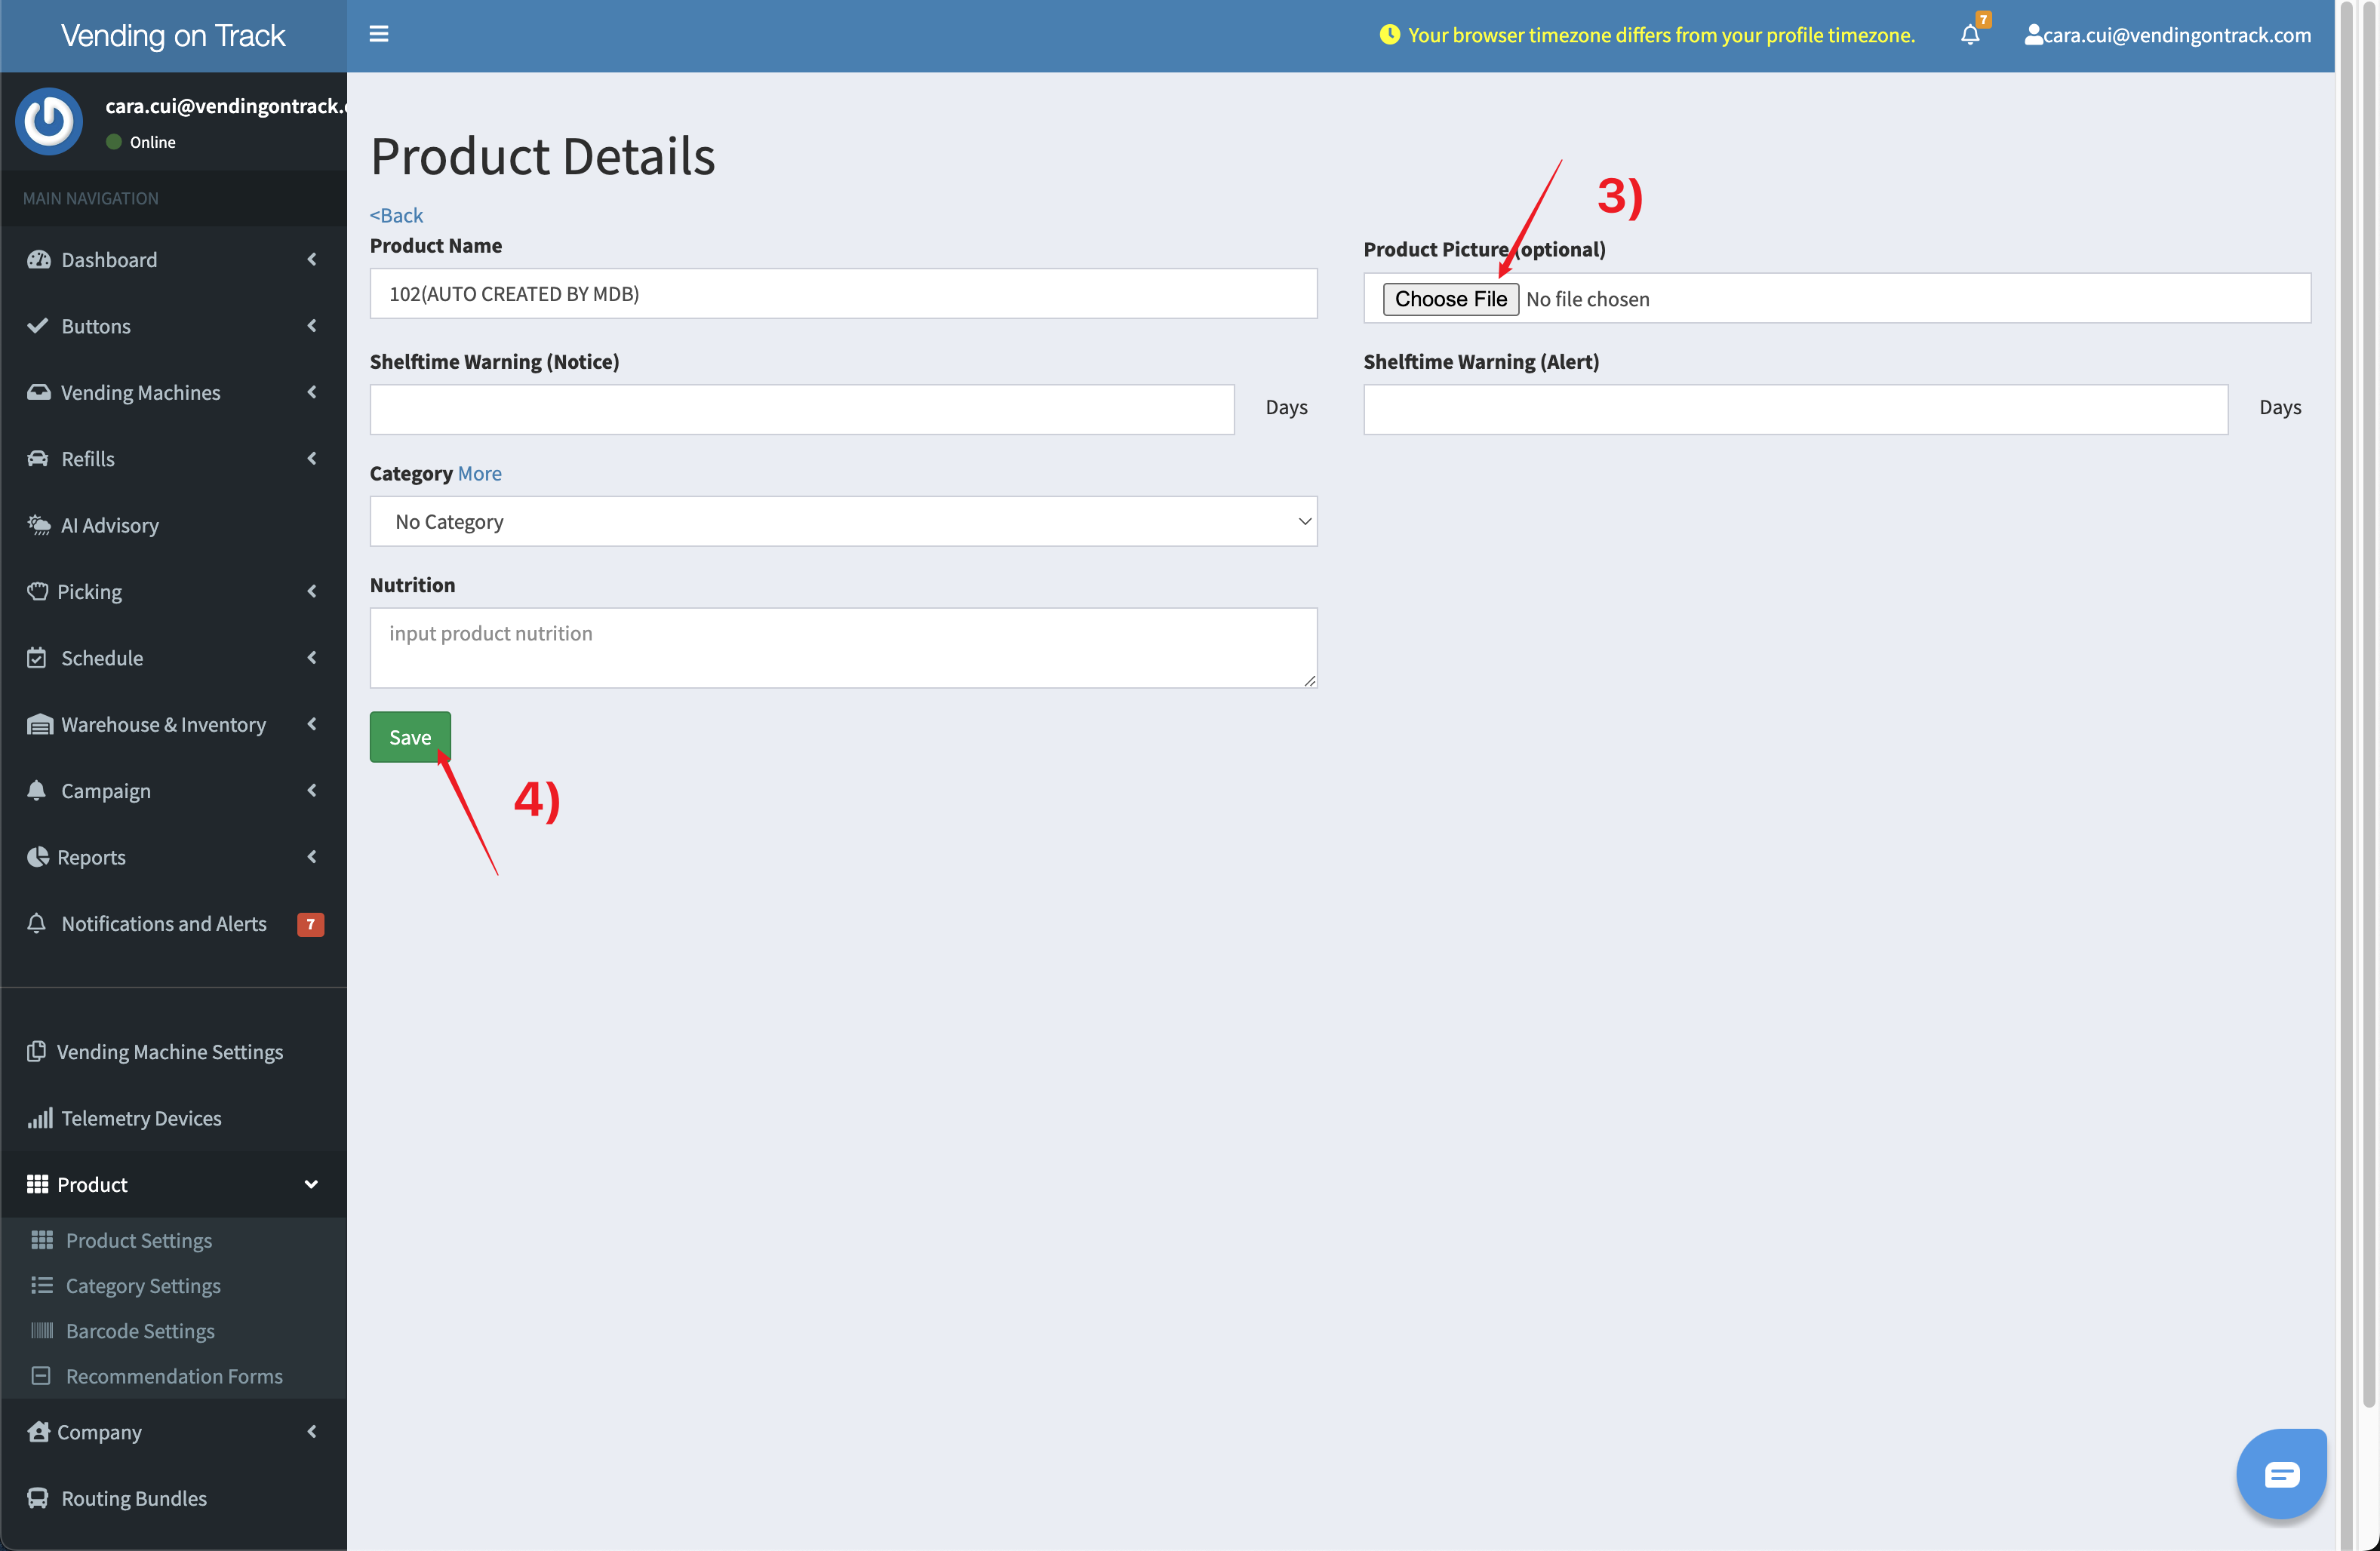
6. How to Upload the Product Photo?
The product photo can only be uploaded from the telemetry system.
To upload the product photo, please follow this procedure:
- In the telemetry system, go to the Product Settings page
- Find the target product and click the Details button
- On the Product Details page, click Choose File to upload the product picture
- Click Save to finish the process

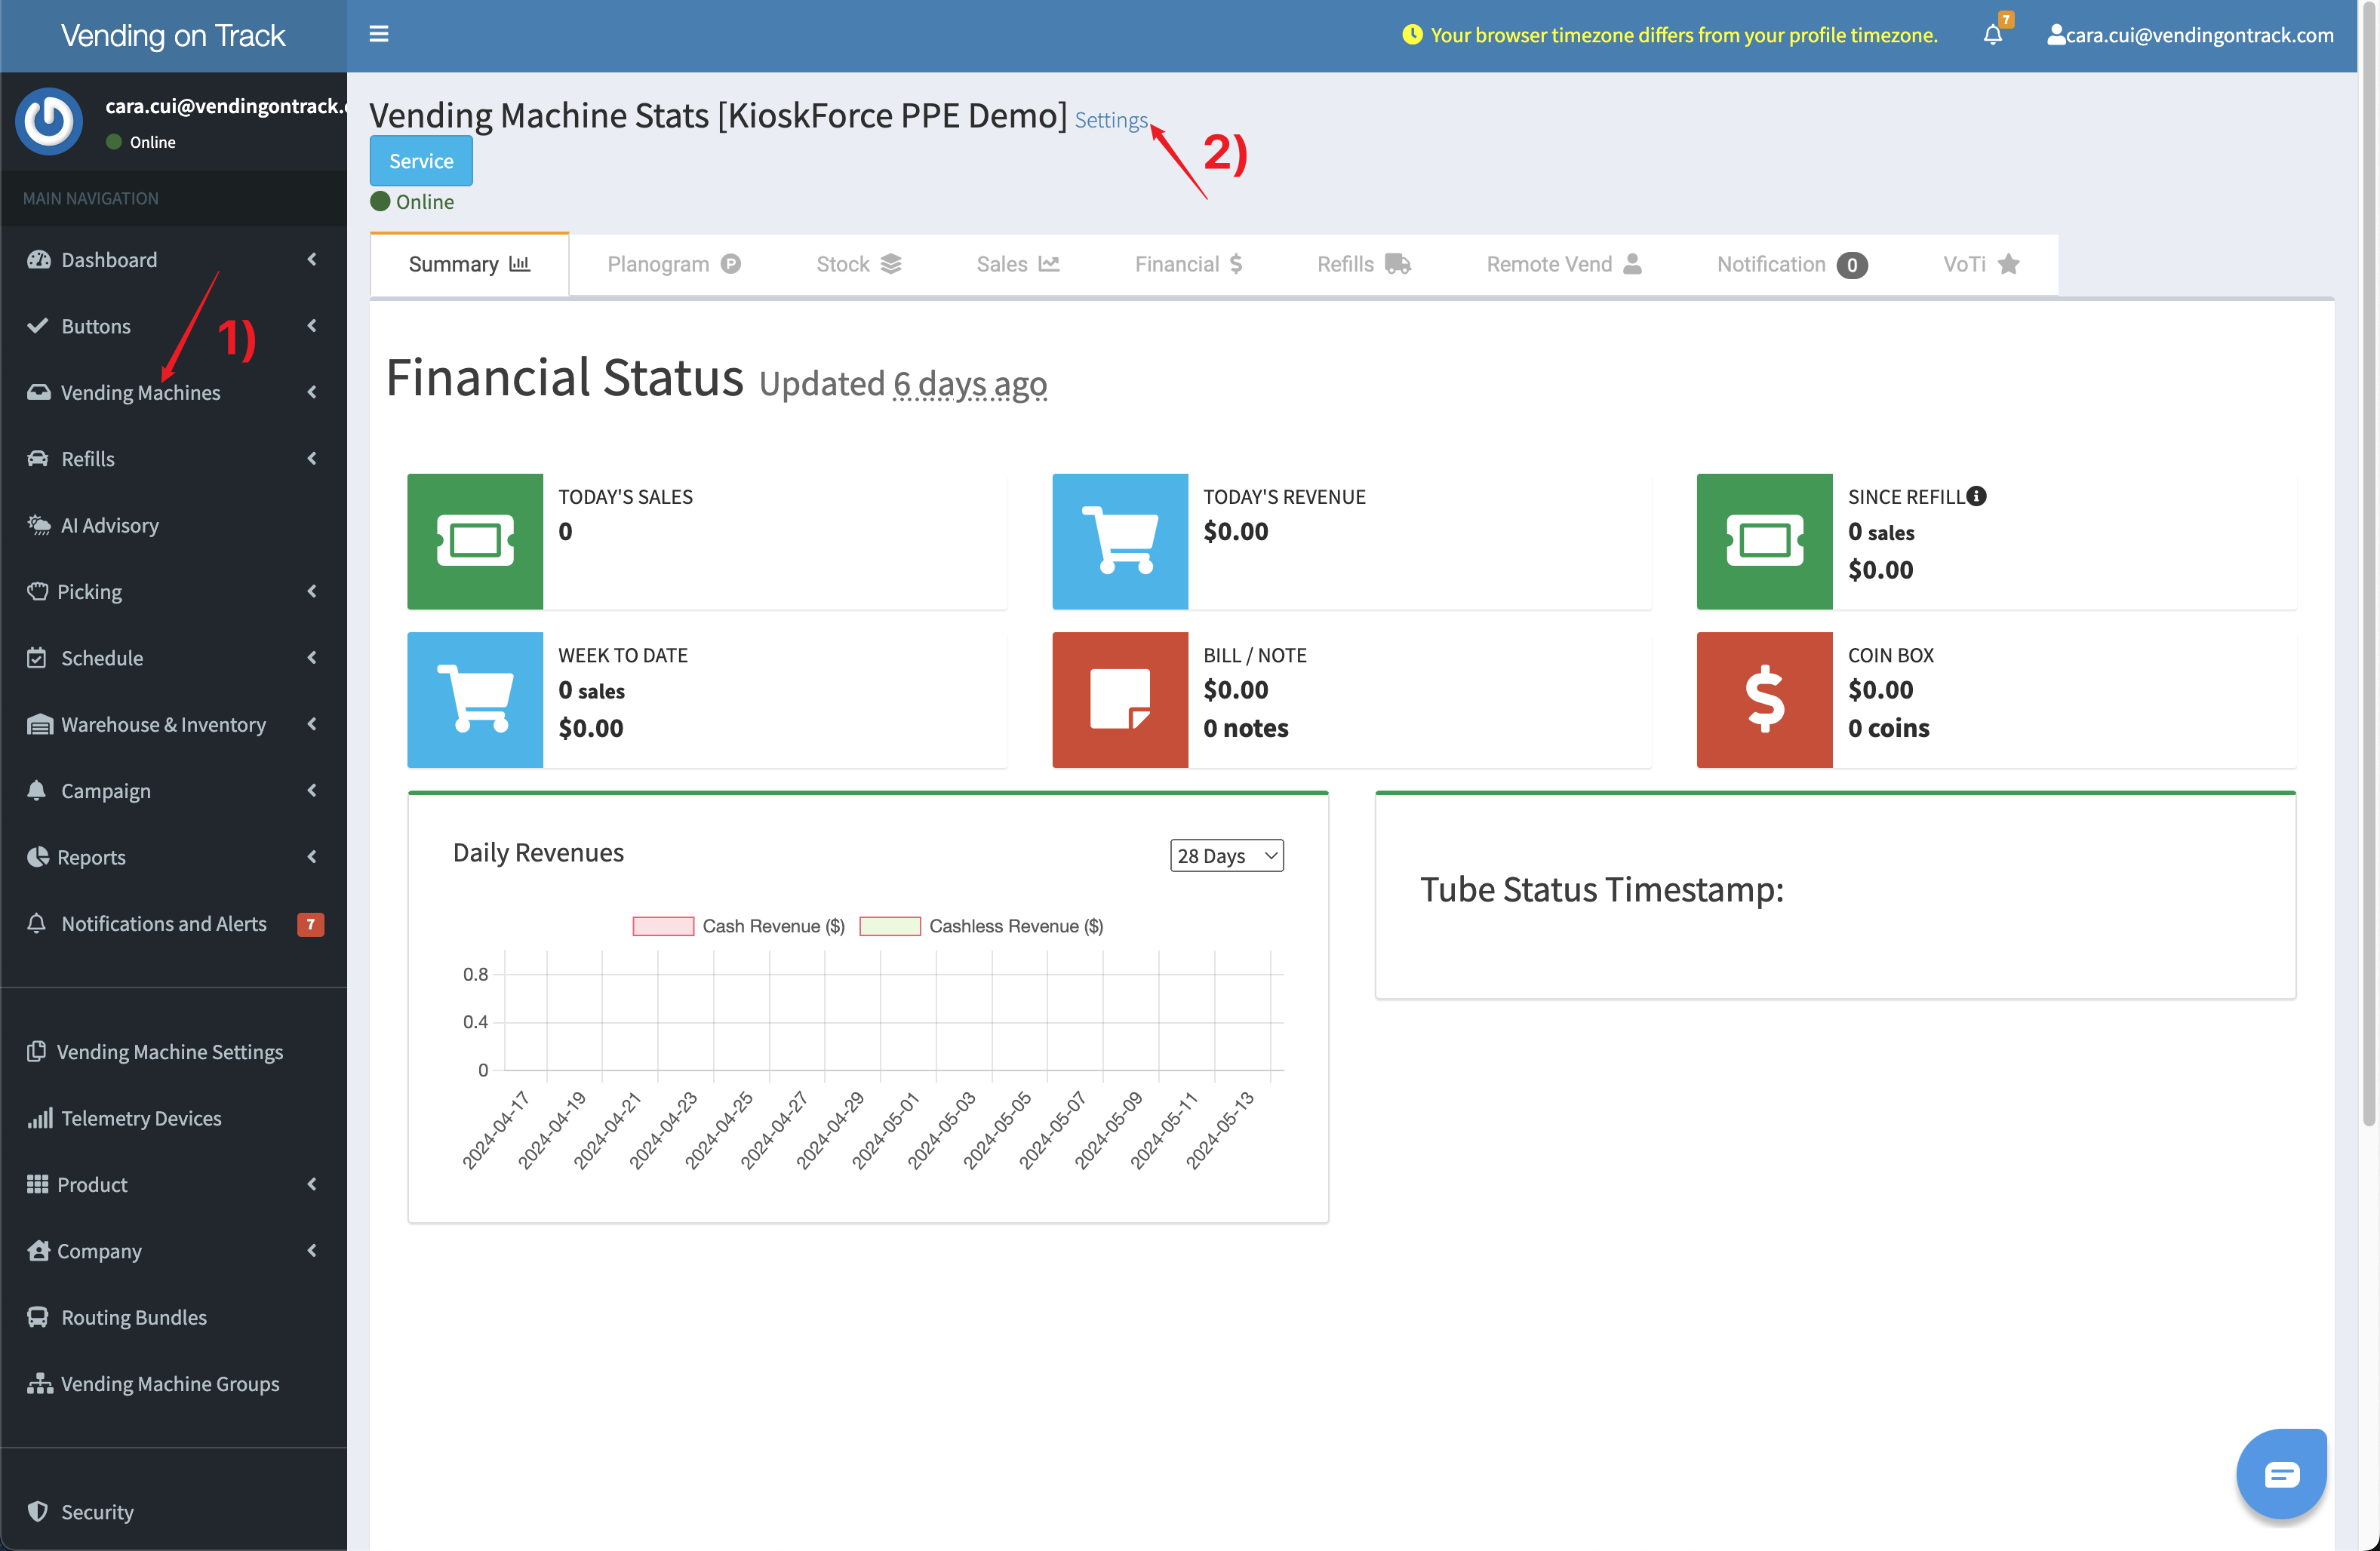
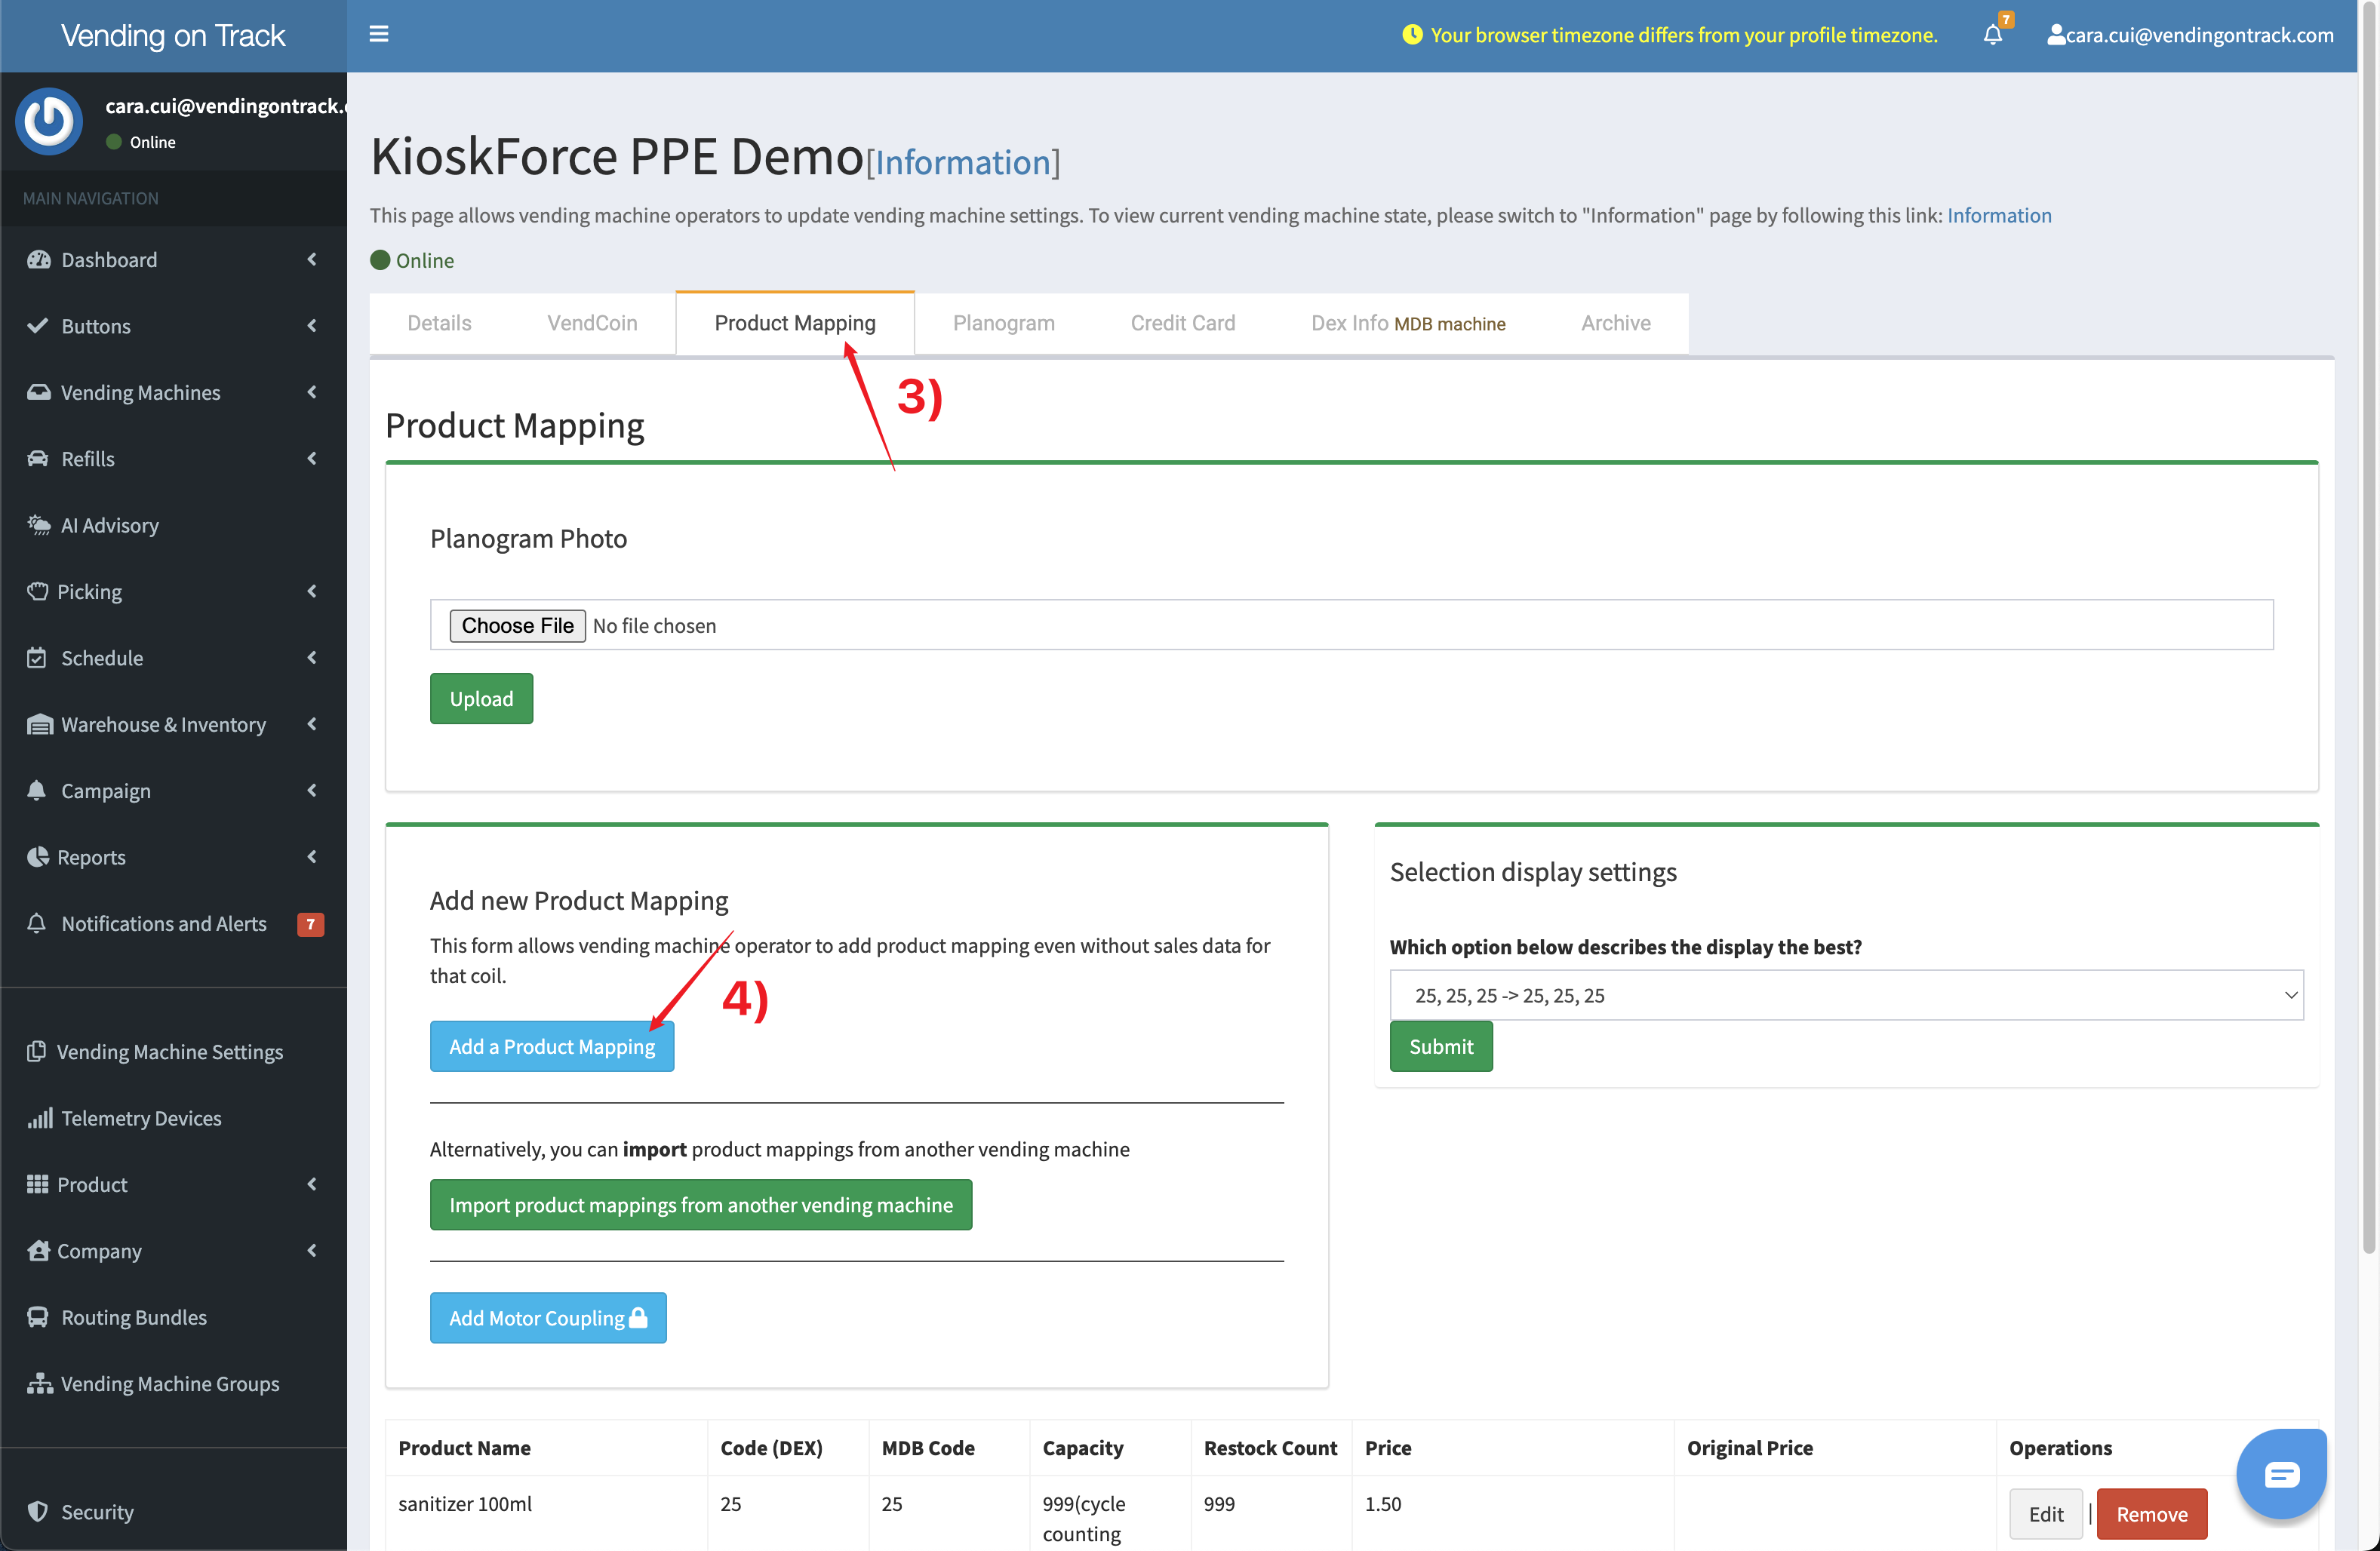
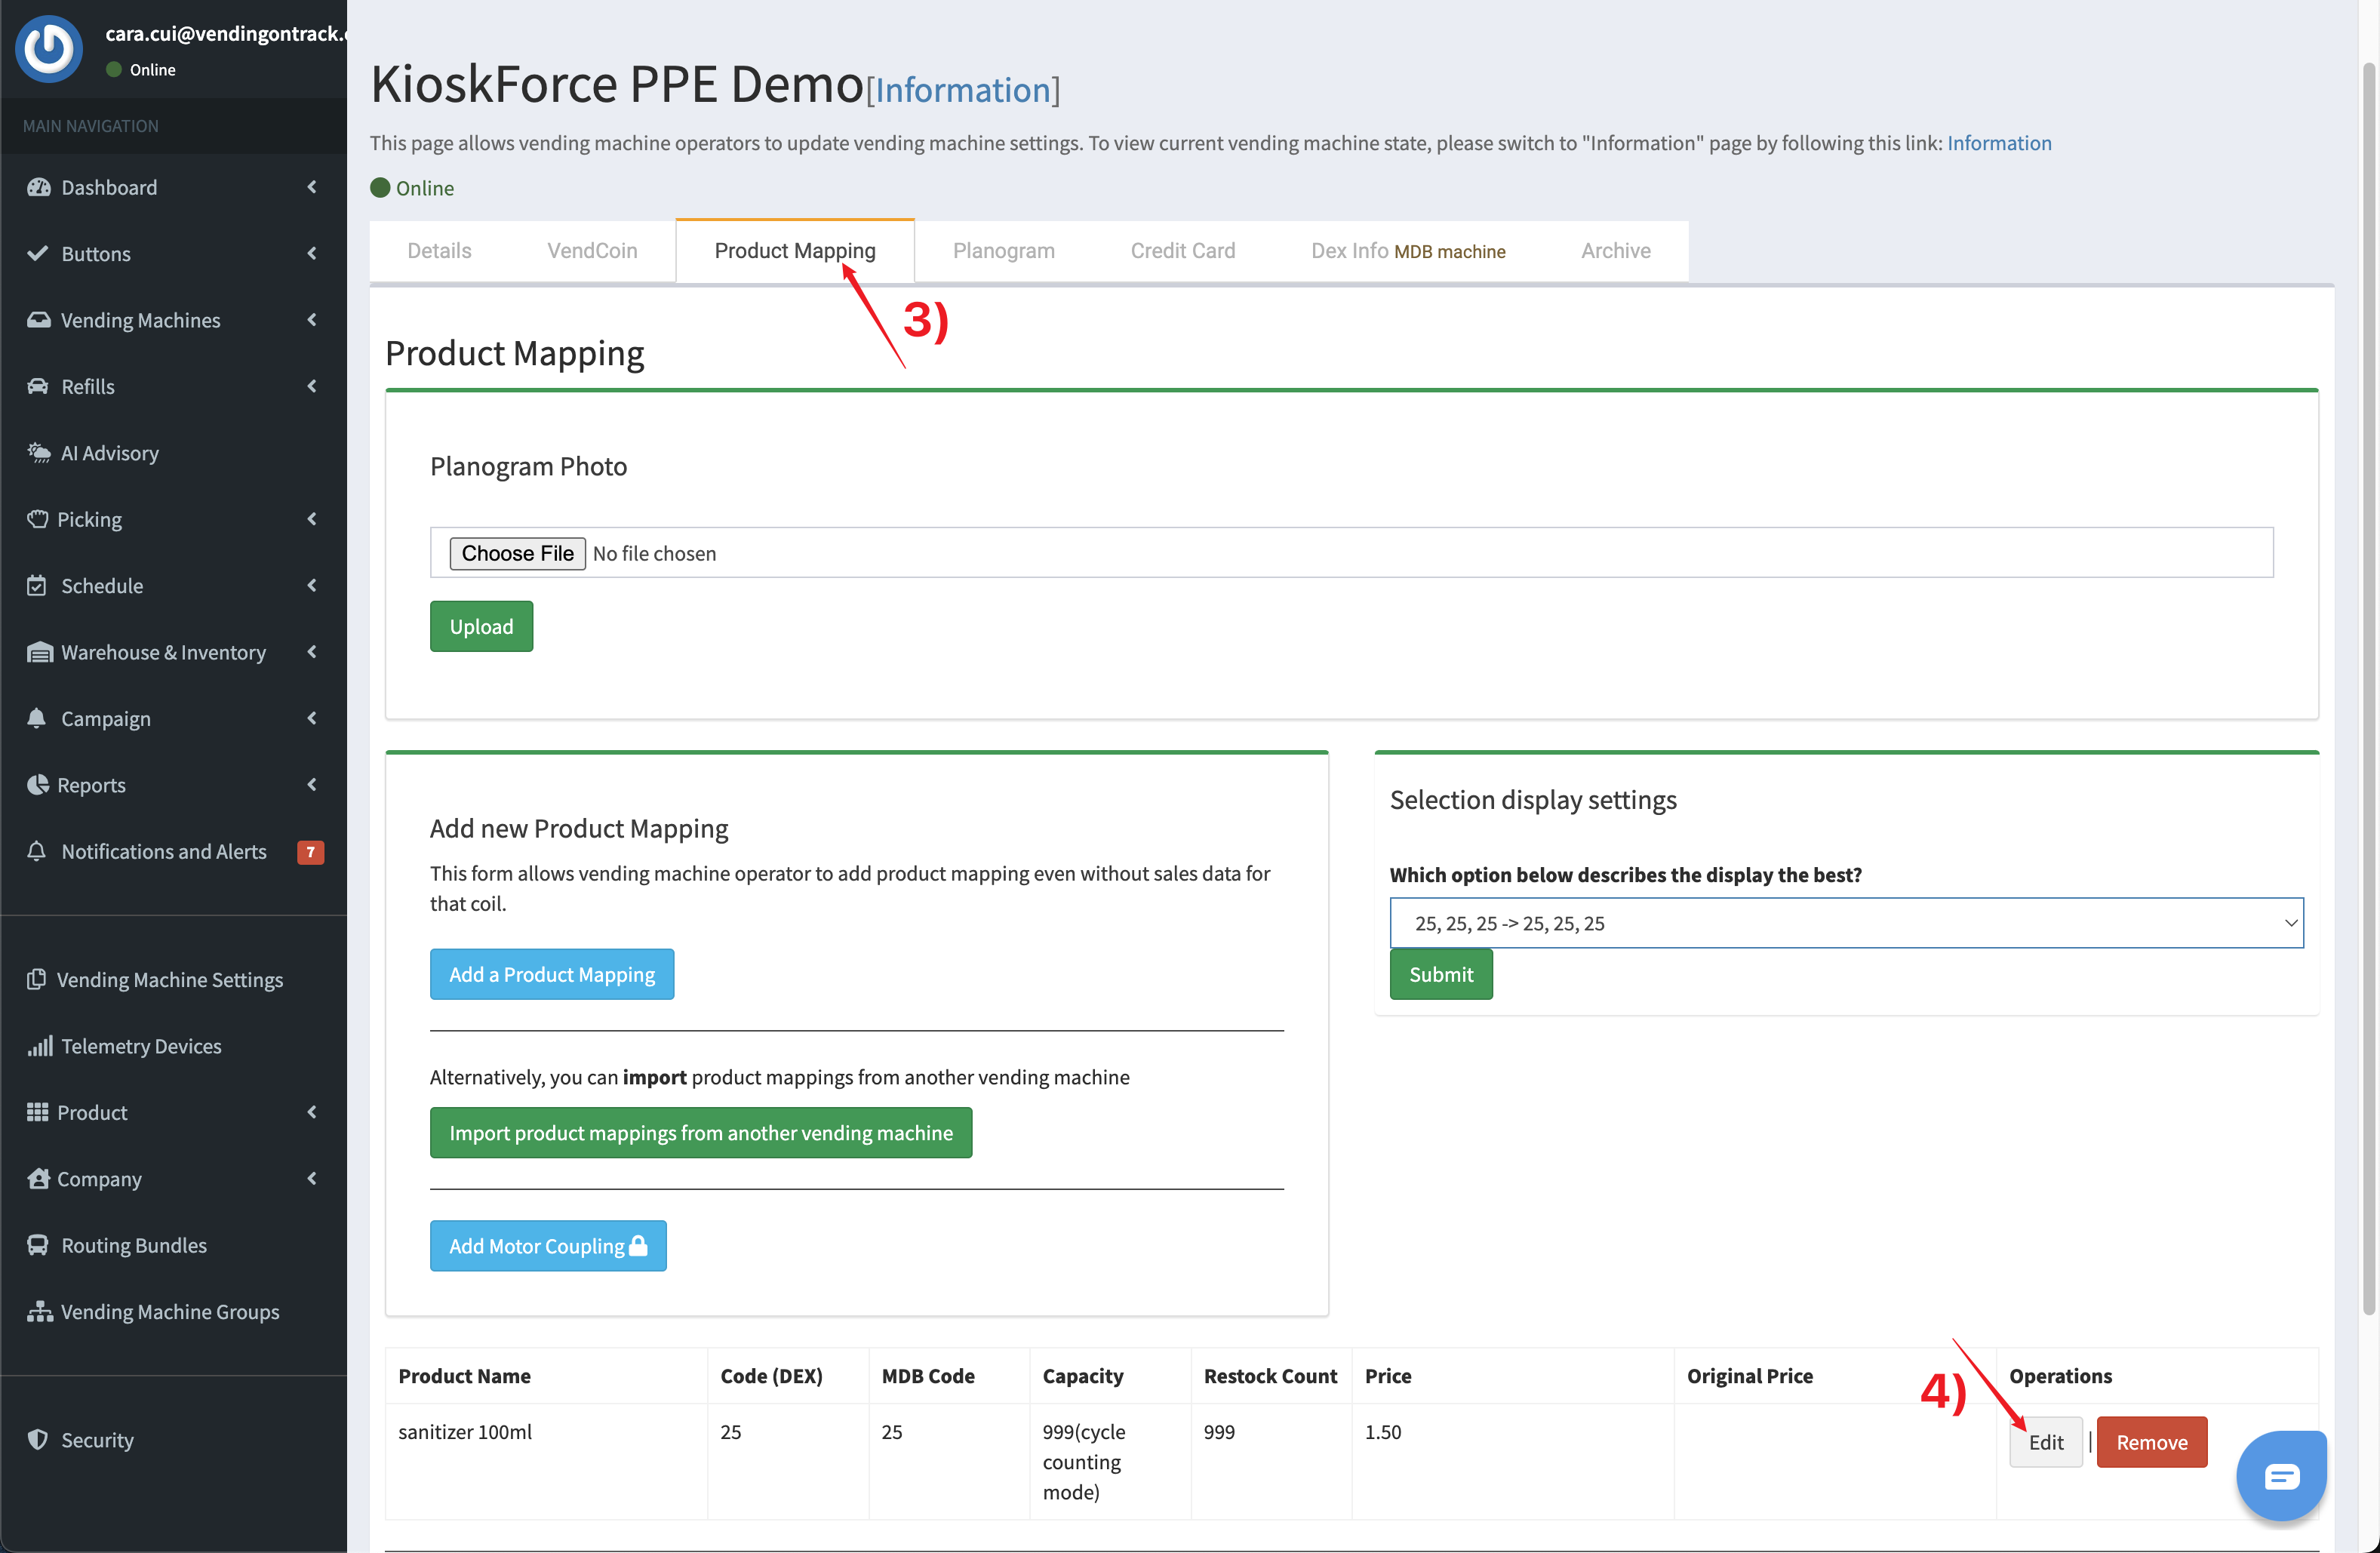
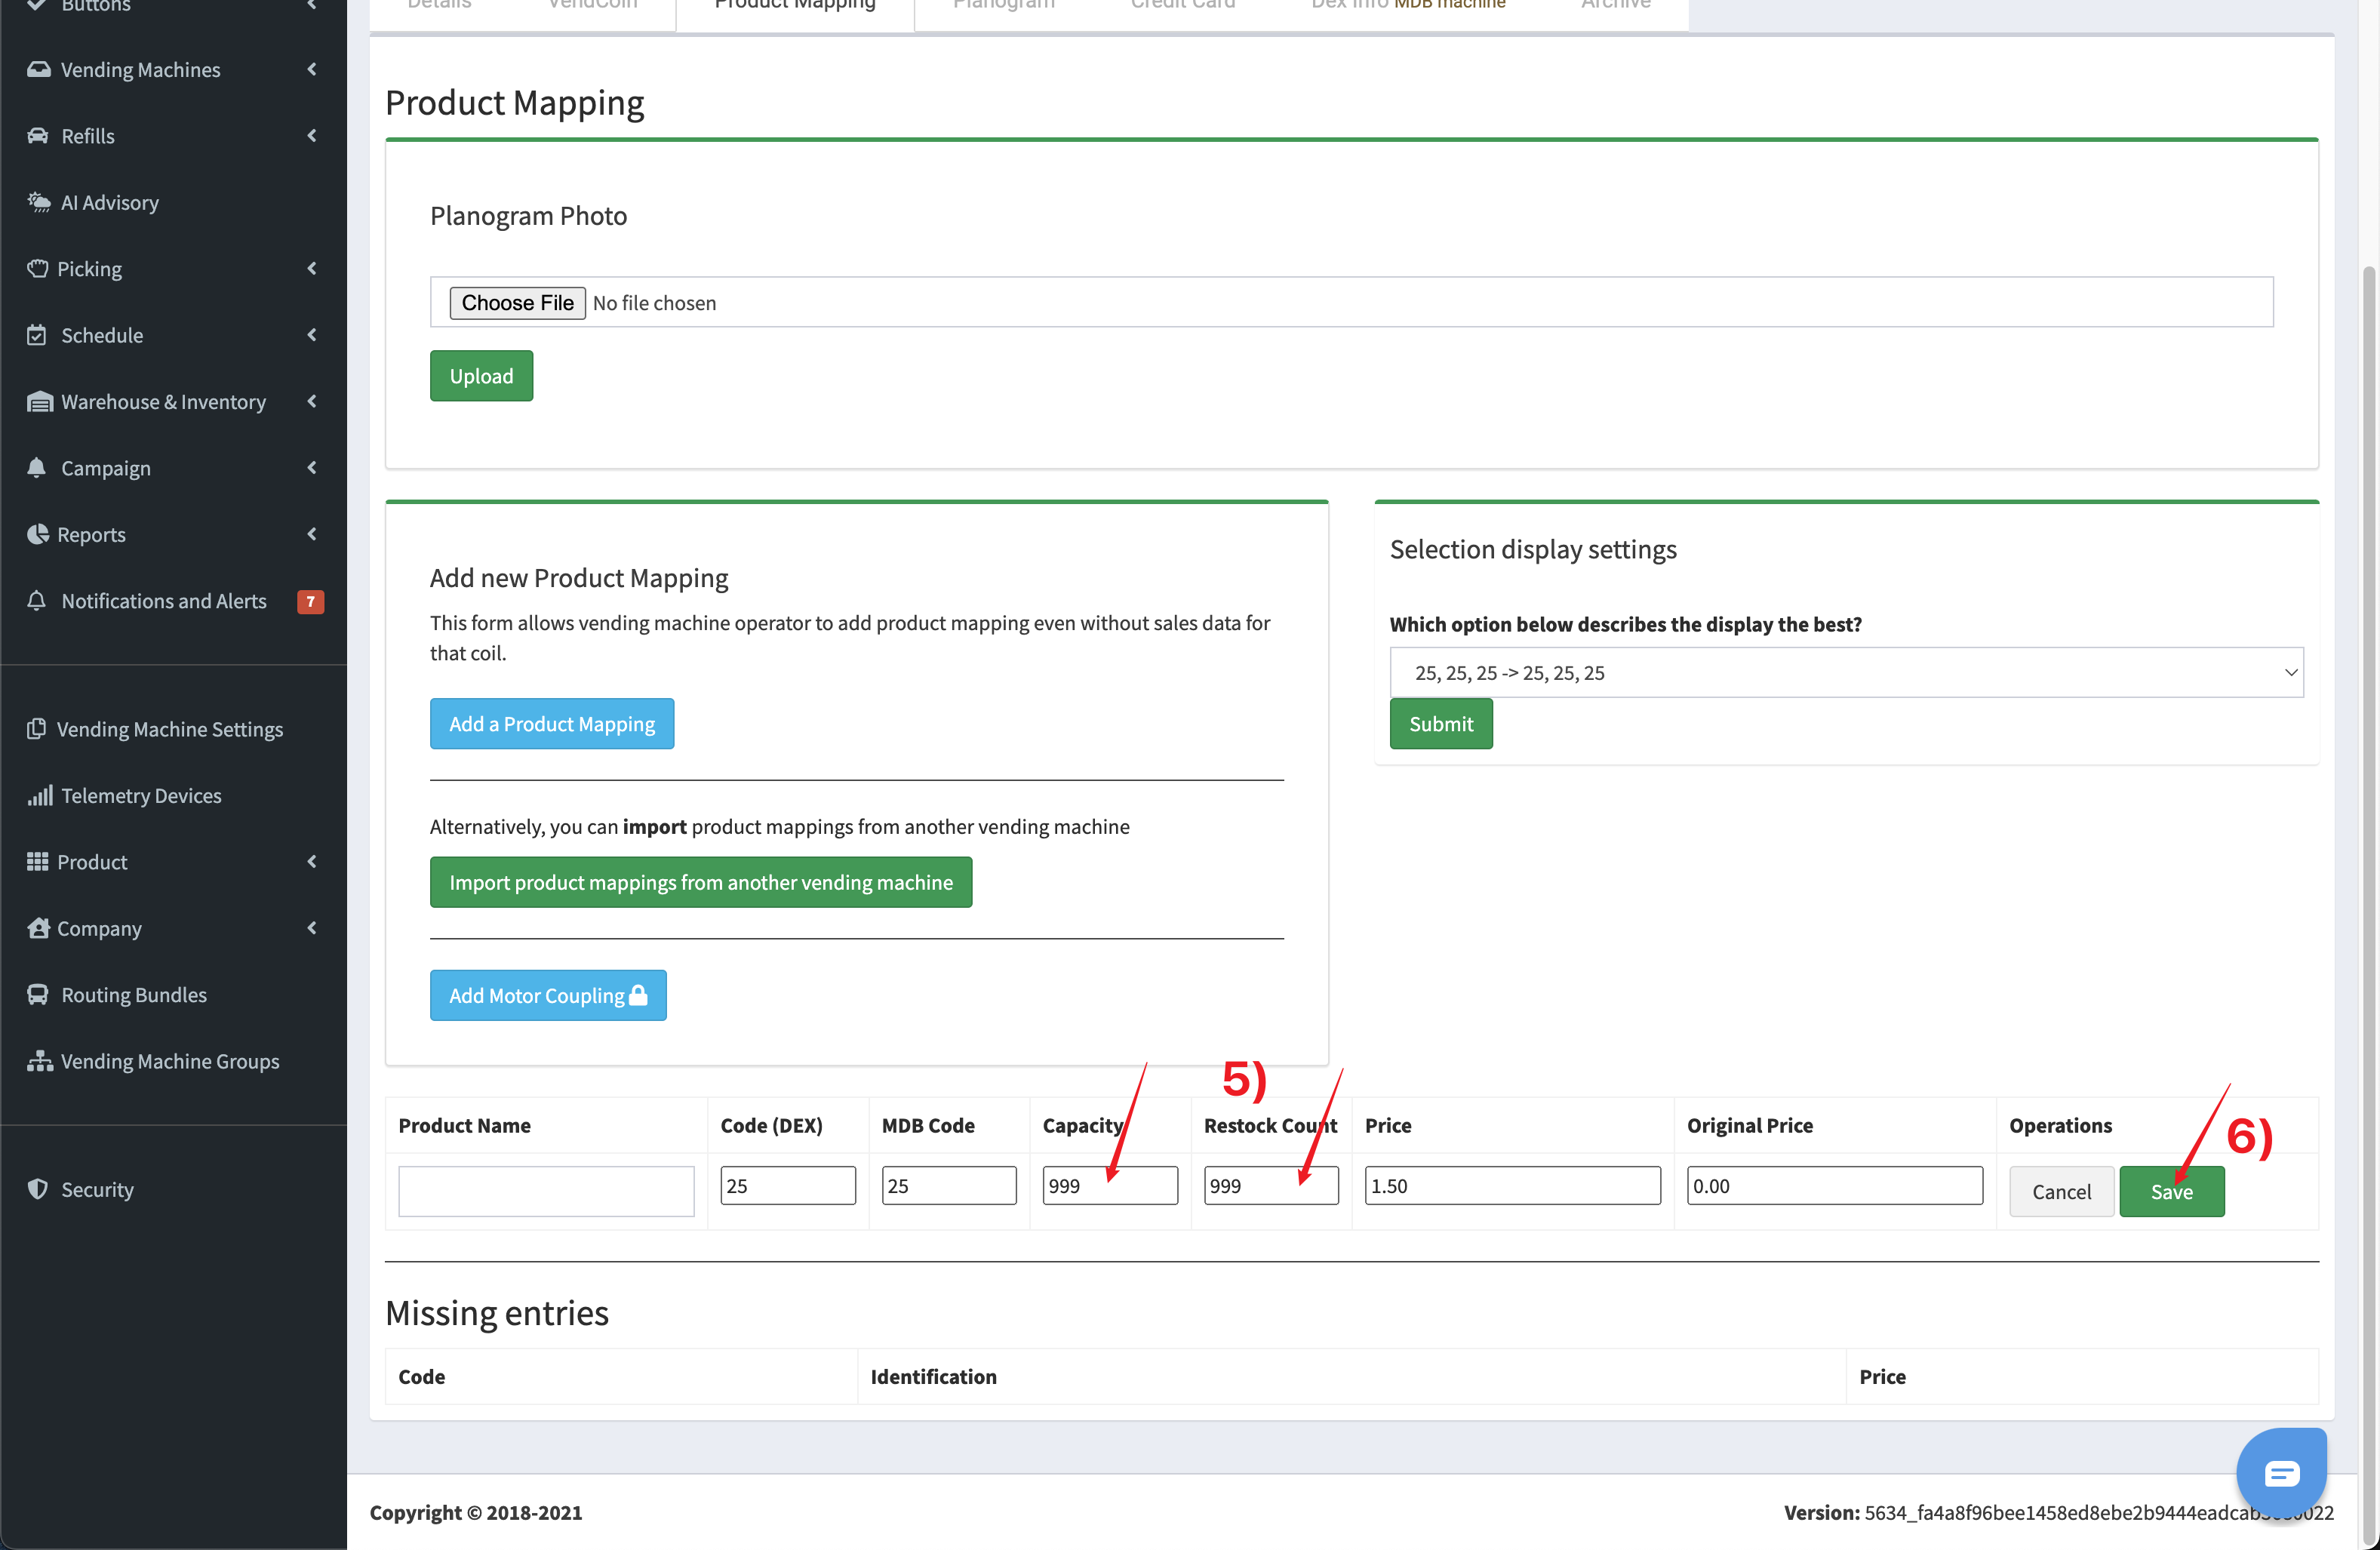
7. How to Add Product Mappings?
To add a product mapping, please follow this procedure:
- In the telemetry system, go to the Vending Machines page, find the target vending machine and click on the machine name
- Go to the Settings page
- Click the Product Mapping tab
- Click the Add a Product Mapping button
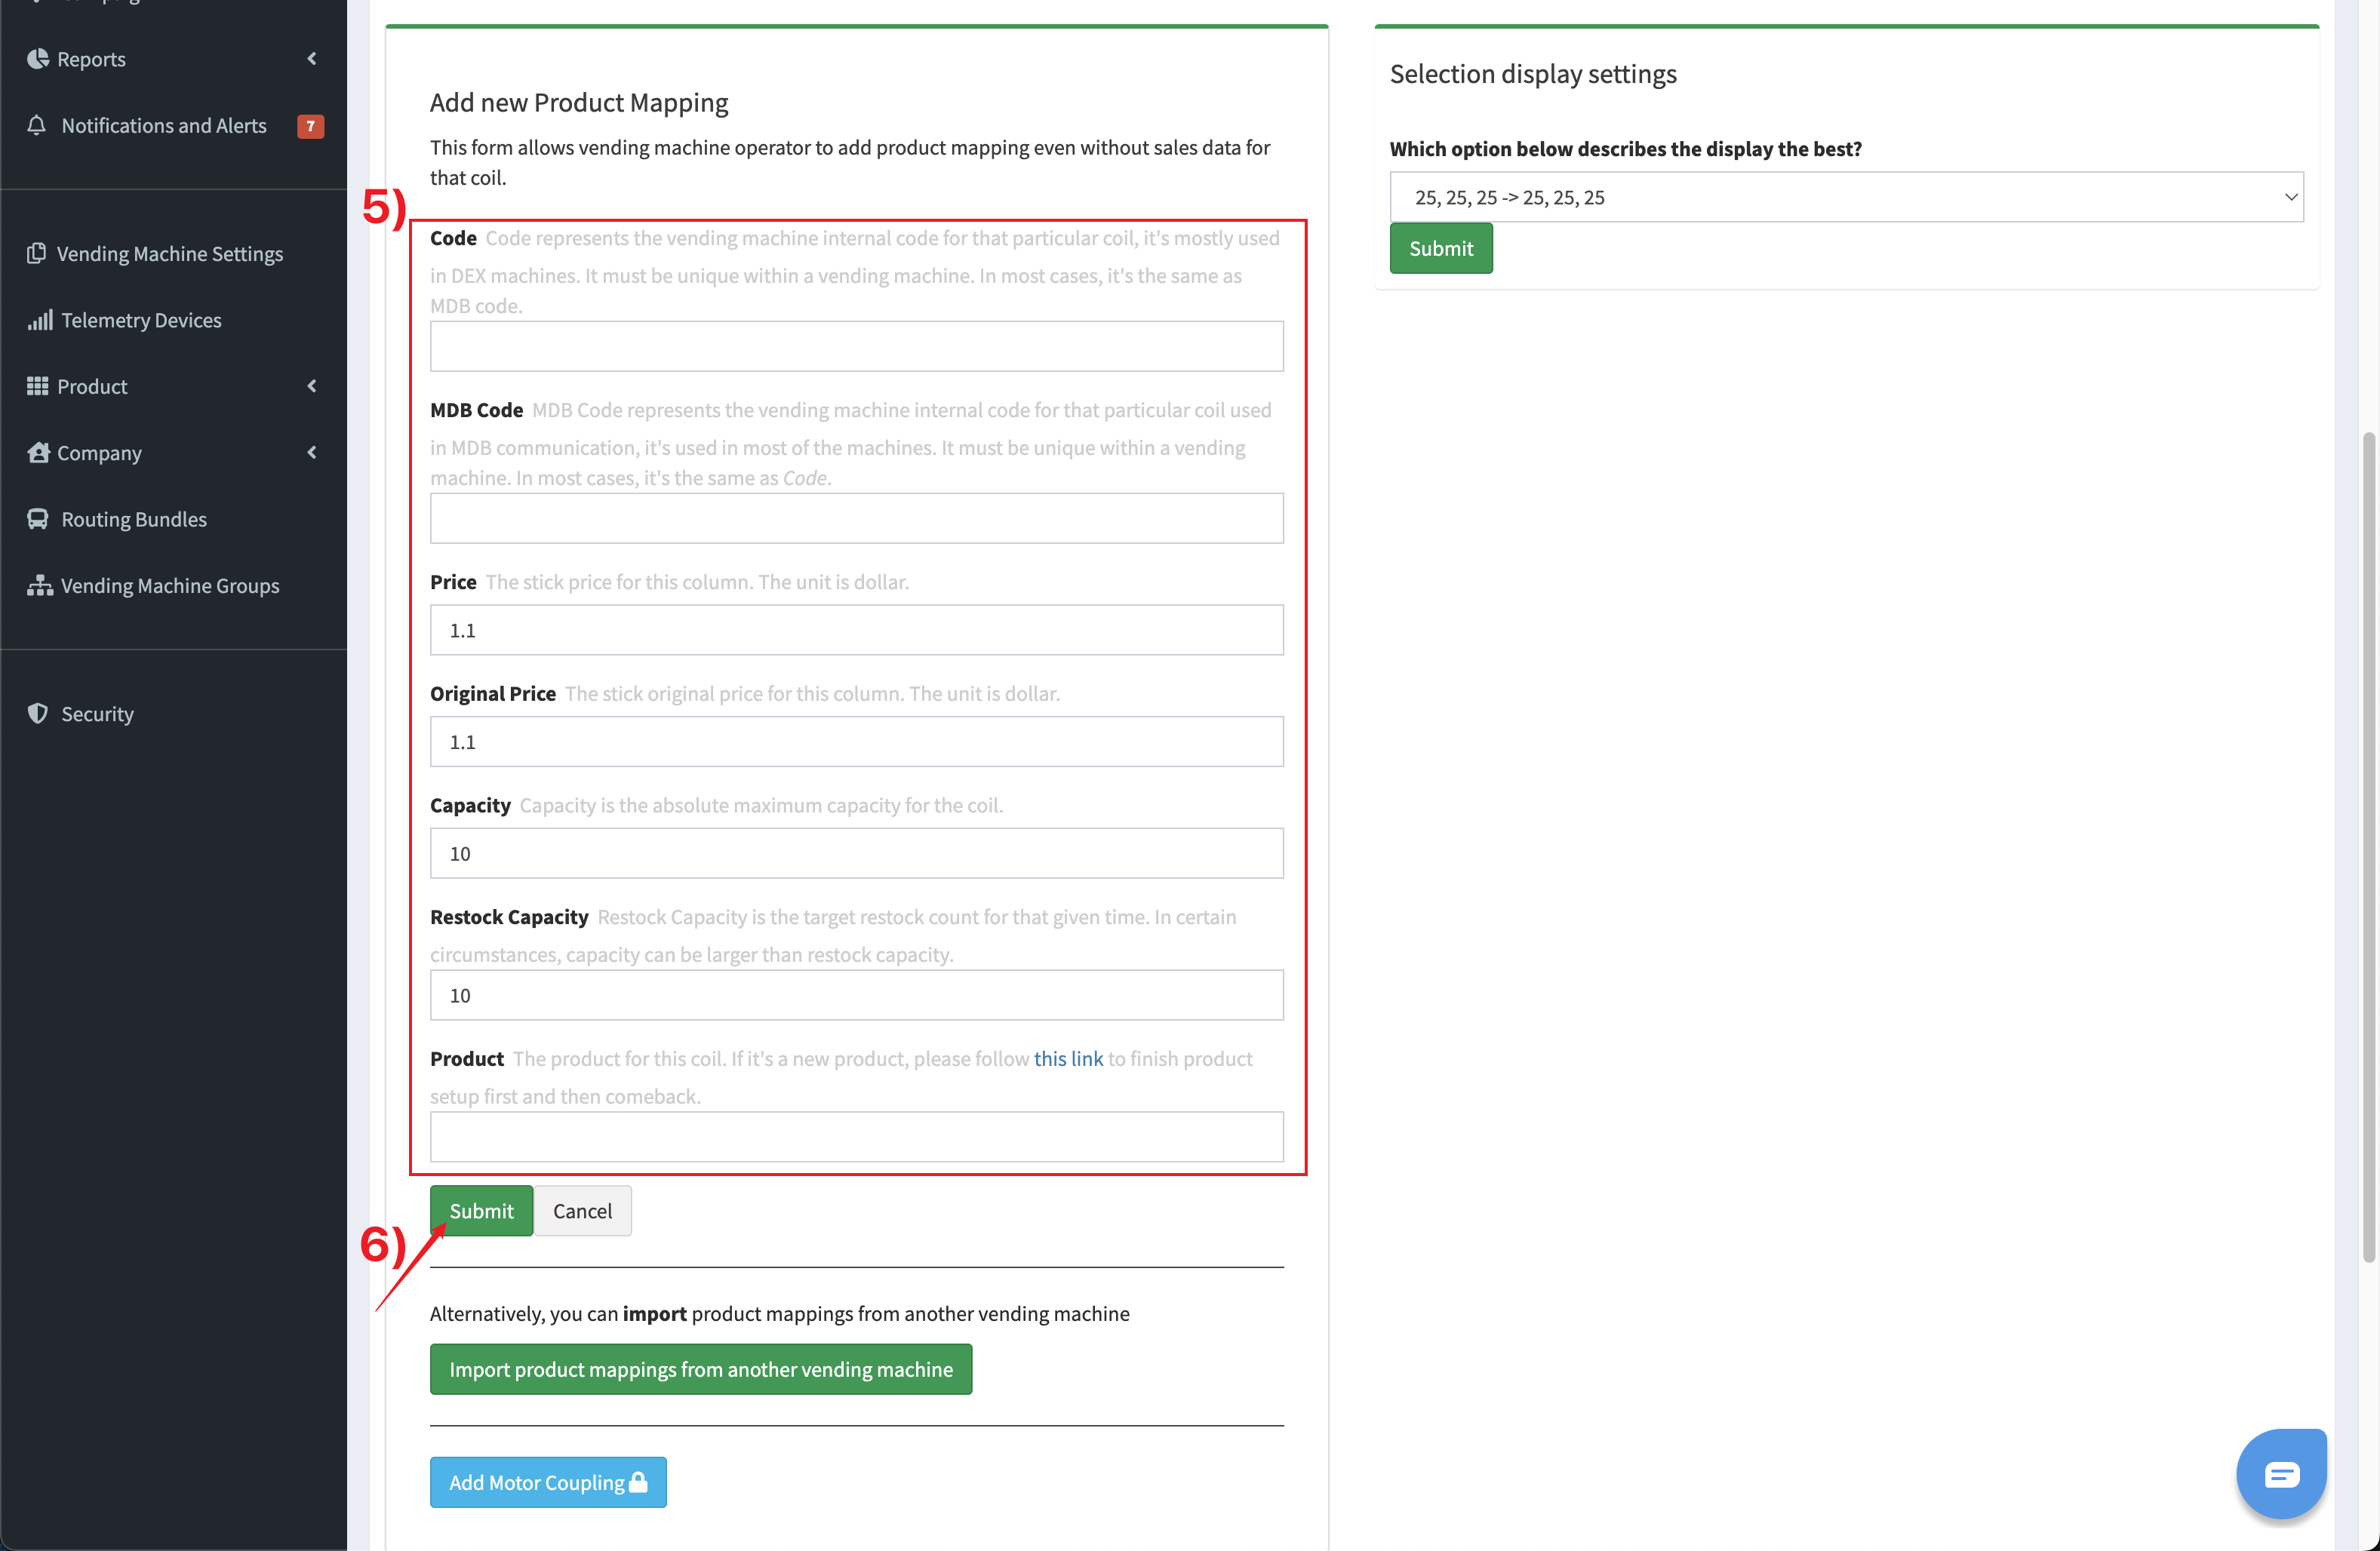
- On the pop-up window, input the relavent information:
- Code - the vending machine internal code for that particular coil (In most cases, it’s the same as MDB Code.)
- MDB Code - the vending machine internal code for that particular coil used in MDB communication (In most cases, it’s the same as Code.)
- Price - the price for that column
- Original Price - enter the original price for that column to make a discount (the discount will show on the machine with the original price struck through)
- Capacity - the maximum capacity of the coil (Normally, it’s the same as Restock Capacity)
- Restock Capacity - the target restock count of the coil (Normally, it’s the same as Capacity)
- Product - the product for the coil (If it is a new product, please refer to the Question 6 to add the new product first.)
- Click Submit to save
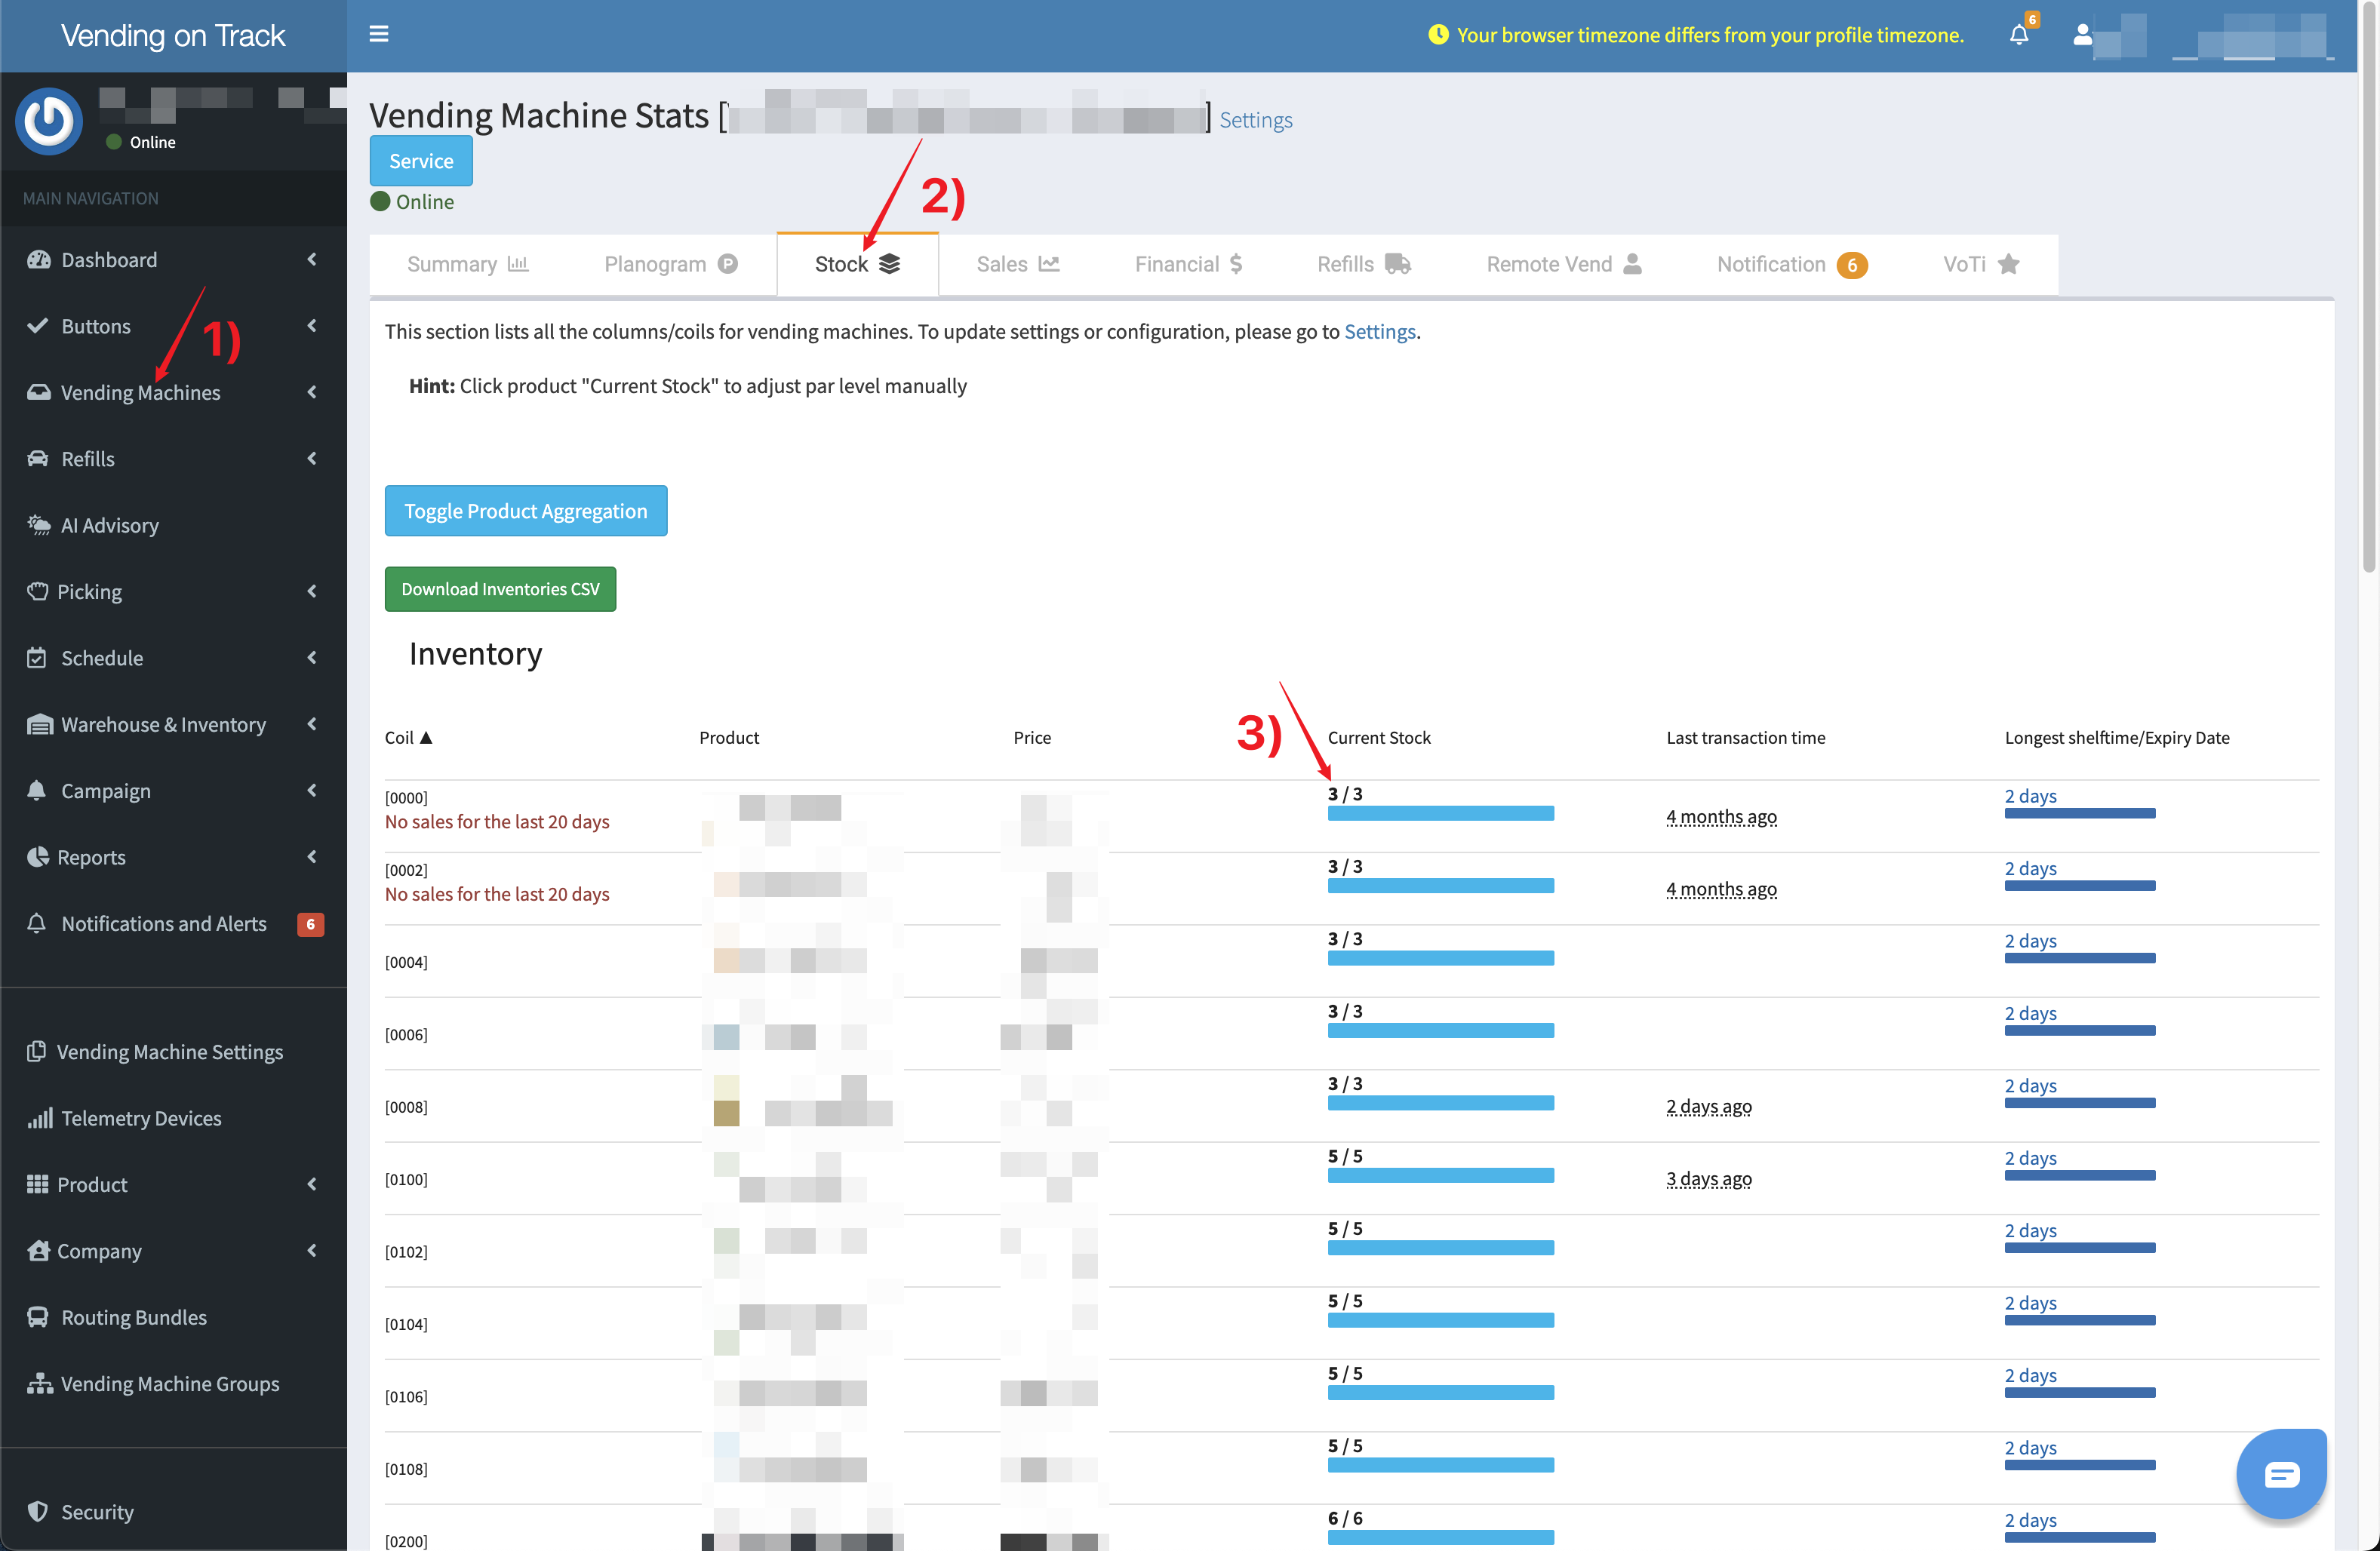
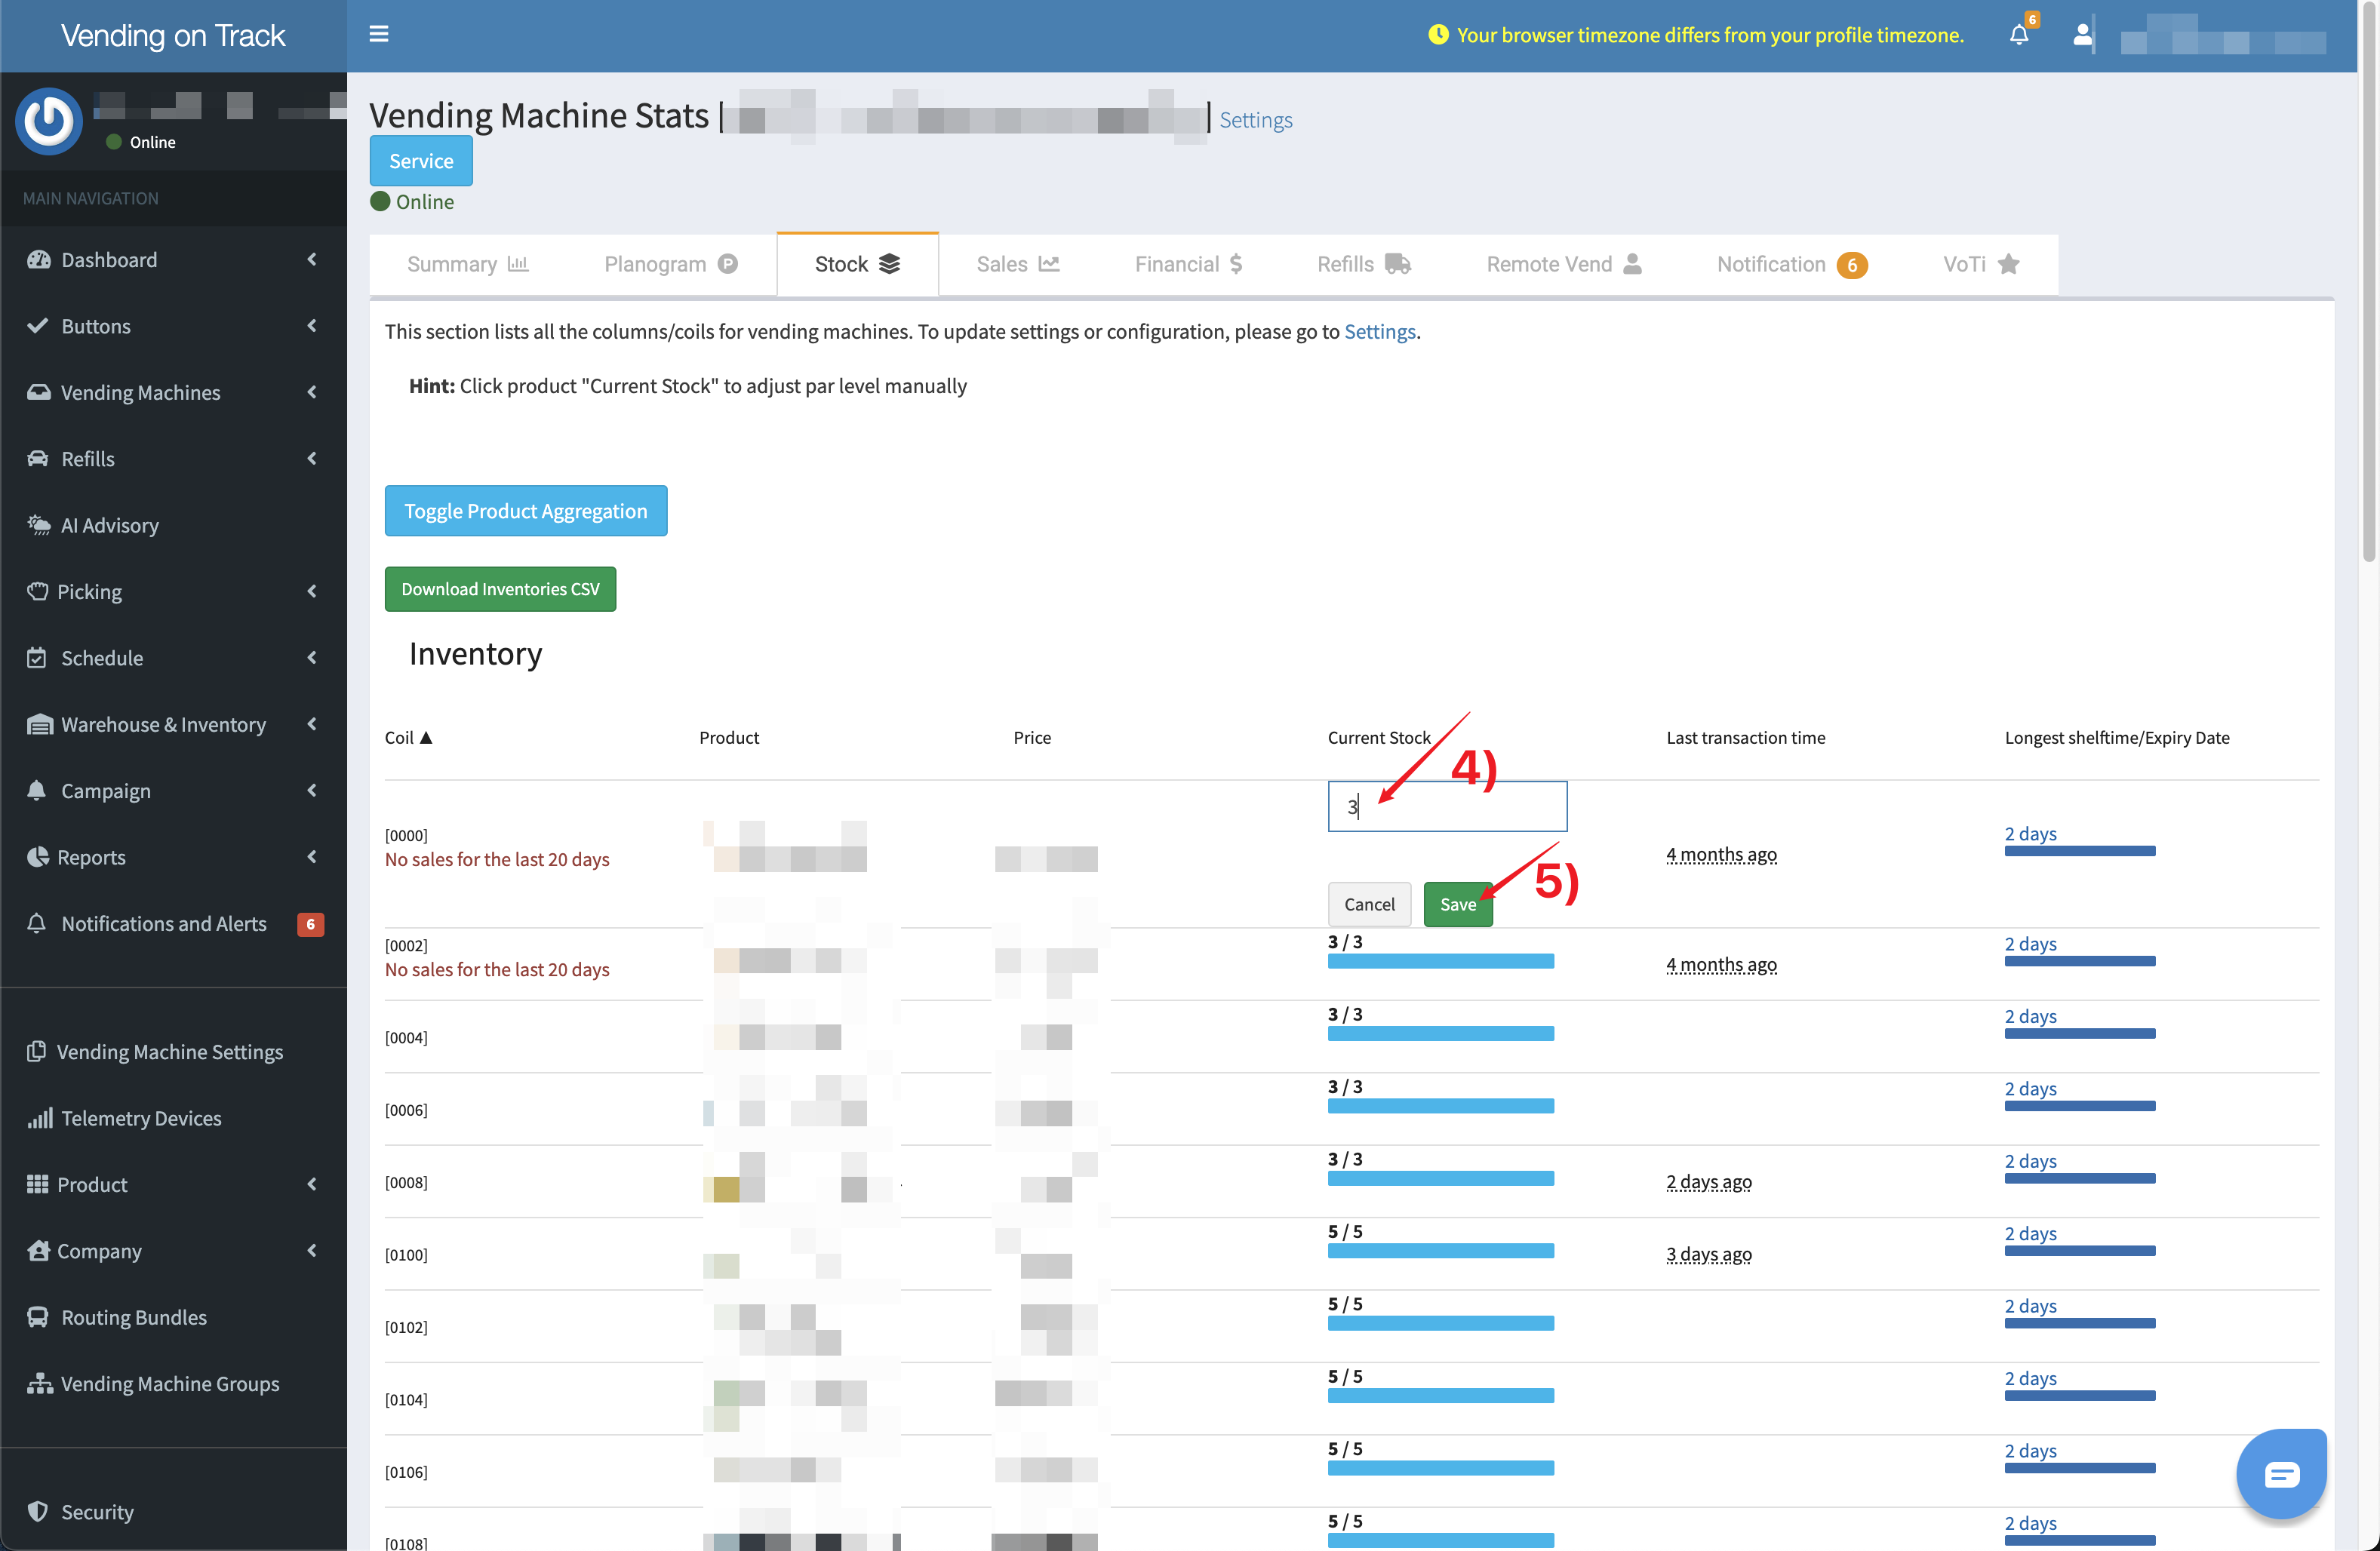
8. What’s the Difference Between Current Stock, Capacity, and Restock Capacity?
- Current Stock - the current number of items in each coil of the machine
- Capacity - the maximum number of items that can be accommodated in each coil (Normally, it’s the same as Restock Capacity)
- Restock Capacity - the target restock count of each coil (Normally, it’s the same as Capacity)
How to Change Current Stock / Par Level?
To change the current stock level, please follow this procedure:
- In the telemetry system, go to the Vending Machines page, find the target vending machine and click on the machine name
- On the machine information page, click the Stock tab
- Find the target coil and click the number of Current Stock
- Input the actual current stock
- Click Save to finish the process
How to Change Capacity and Restock Capacity?
To change capacity and restock capacity, please follow this procedure:
- In the telemetry system, go to the Vending Machines page, find the target vending machine and click on the machine name
- Go to the Settings page
- Click the Product Mapping tab
- Find the target coil and click the Edit button in the Operations column
- Input the updated number of Capacity and Restock Count
- Click Save to finish the process
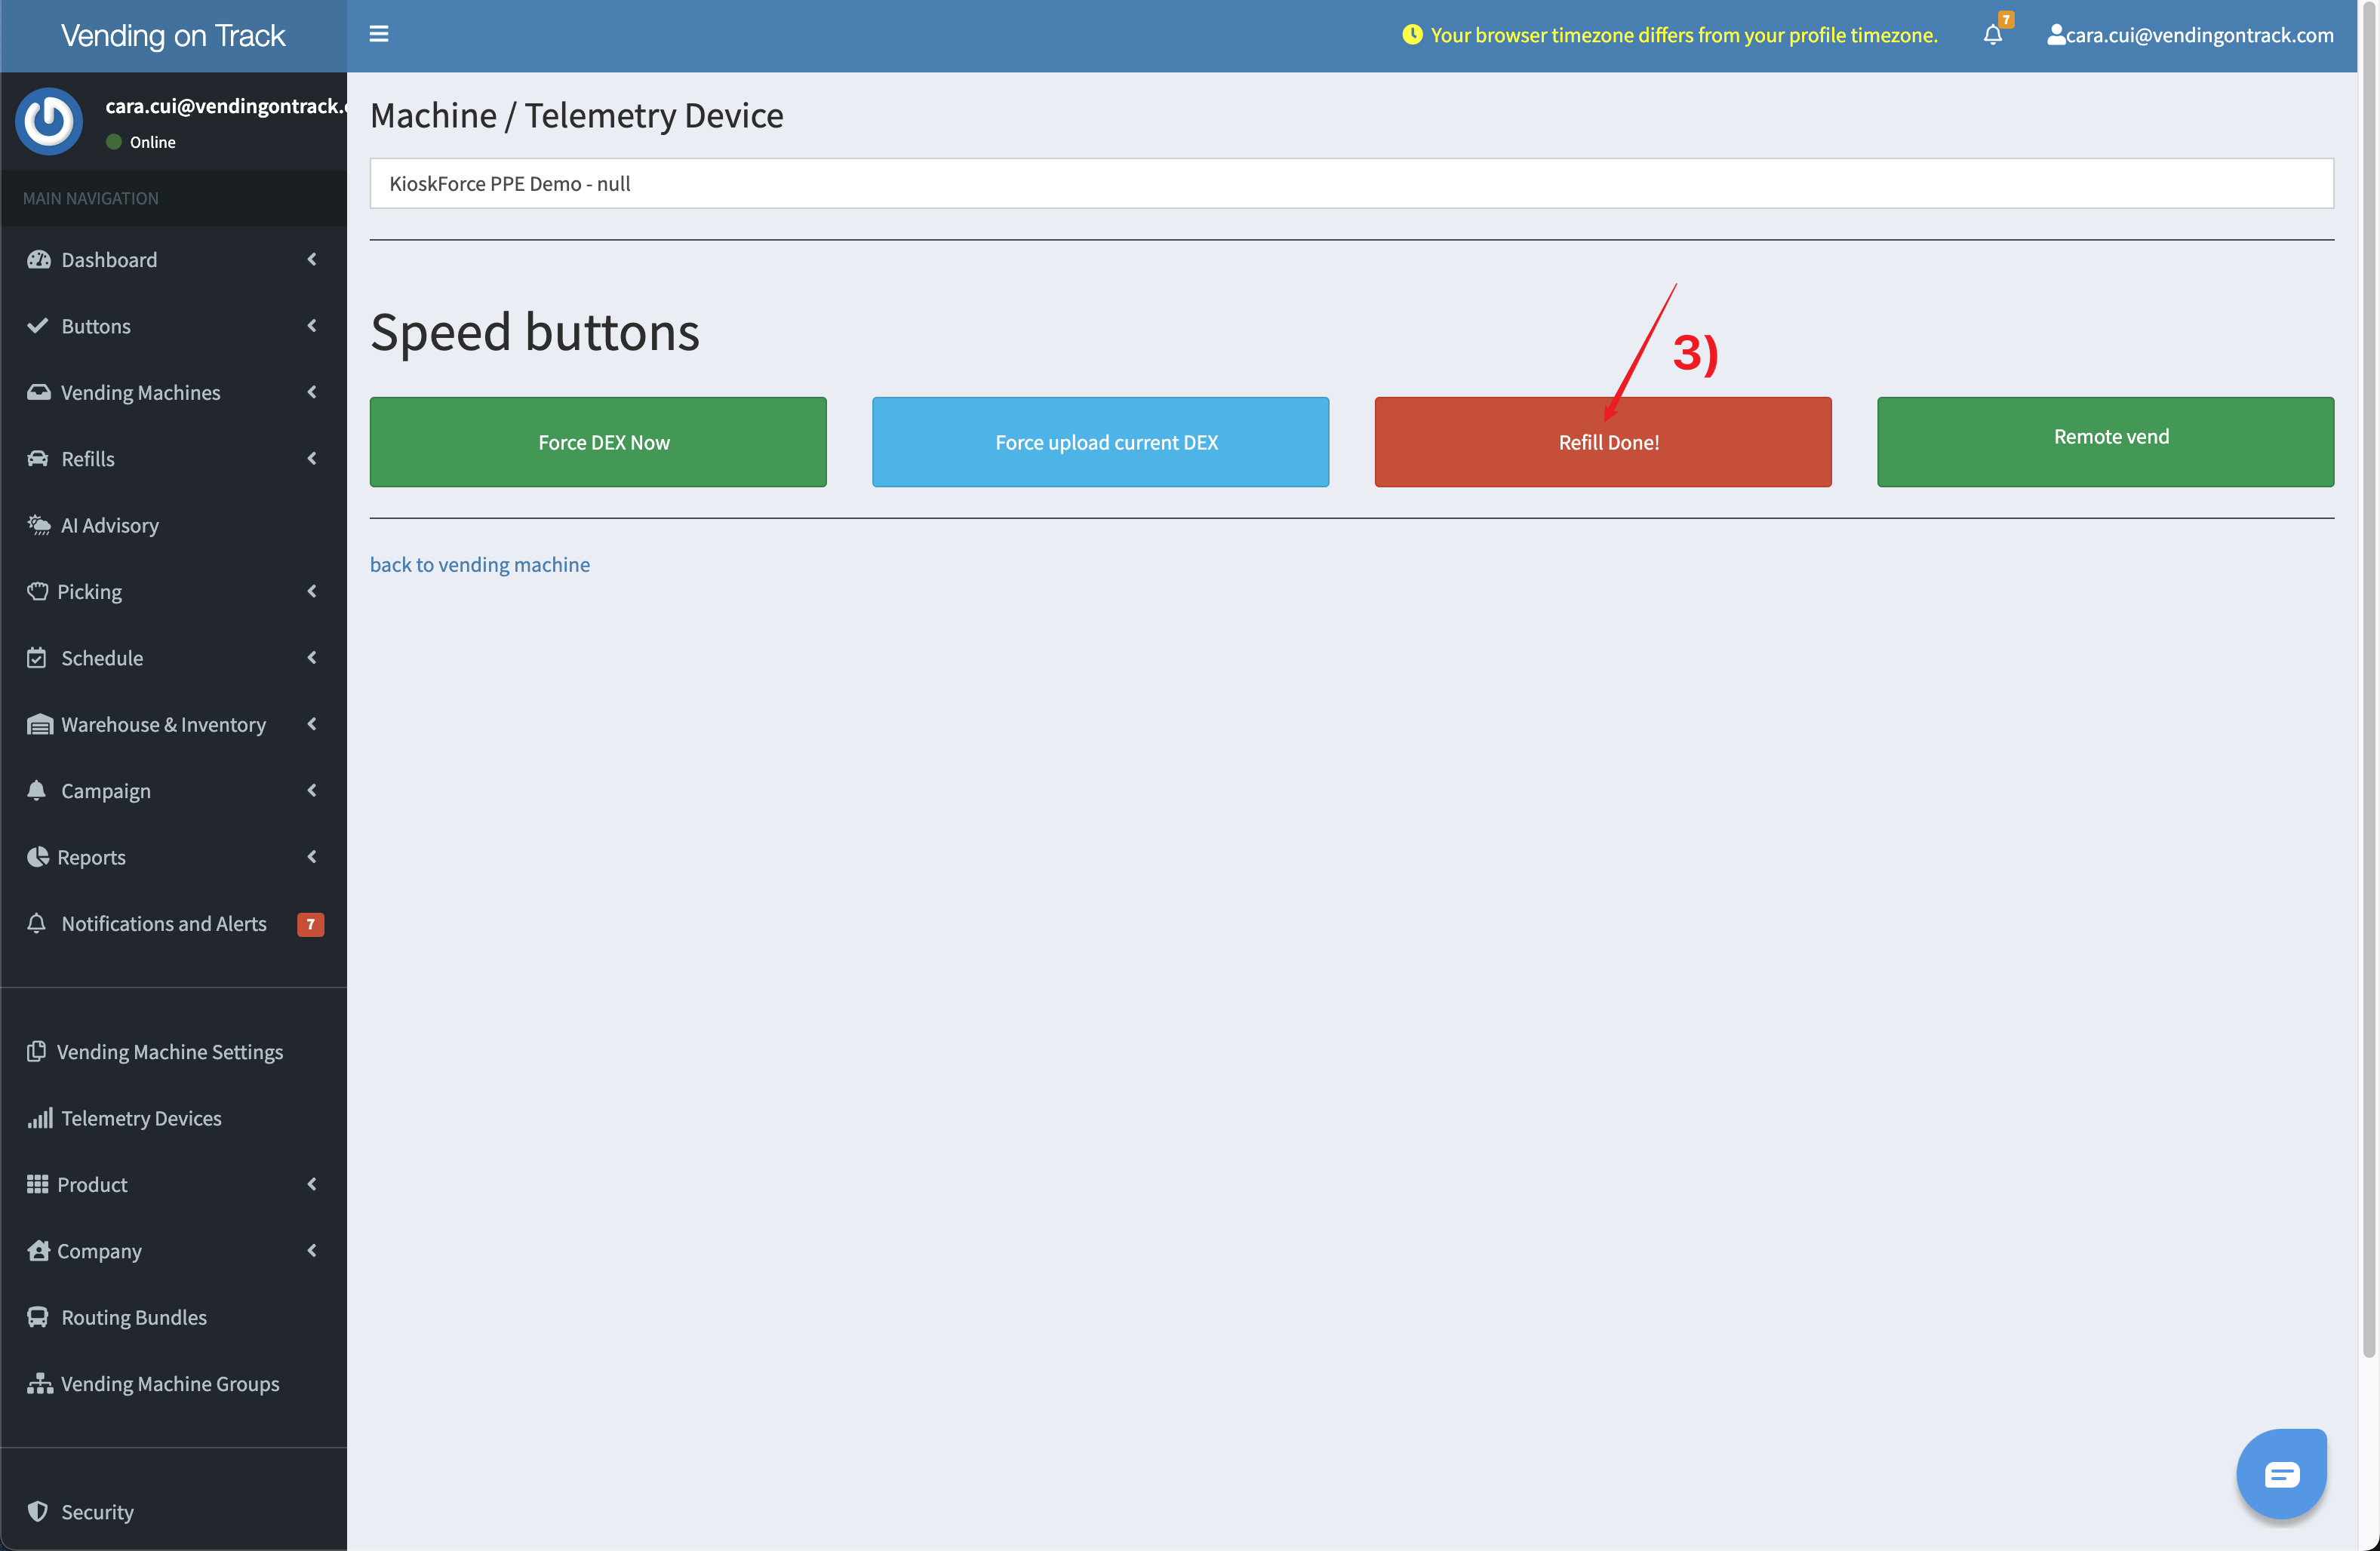
9. How to Refill the Machine Stock?
KioskForce vending machine can be refilled both from the machine and from the telemetry system.
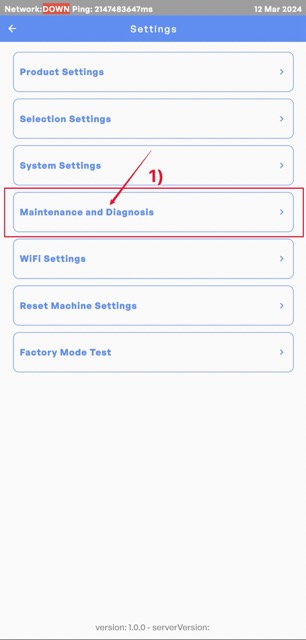
To refill the machine from the vending machine, please follow this procedure:
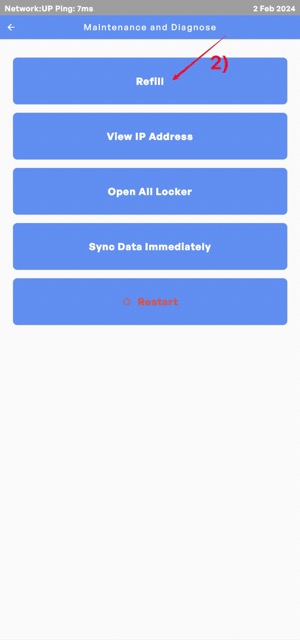
- Enter the admin interface (please refer to Question 4) and go to the Maintenance and Diagnosis page
- Click Refill button.
- Upon Refill confirmation, additional information can be added.

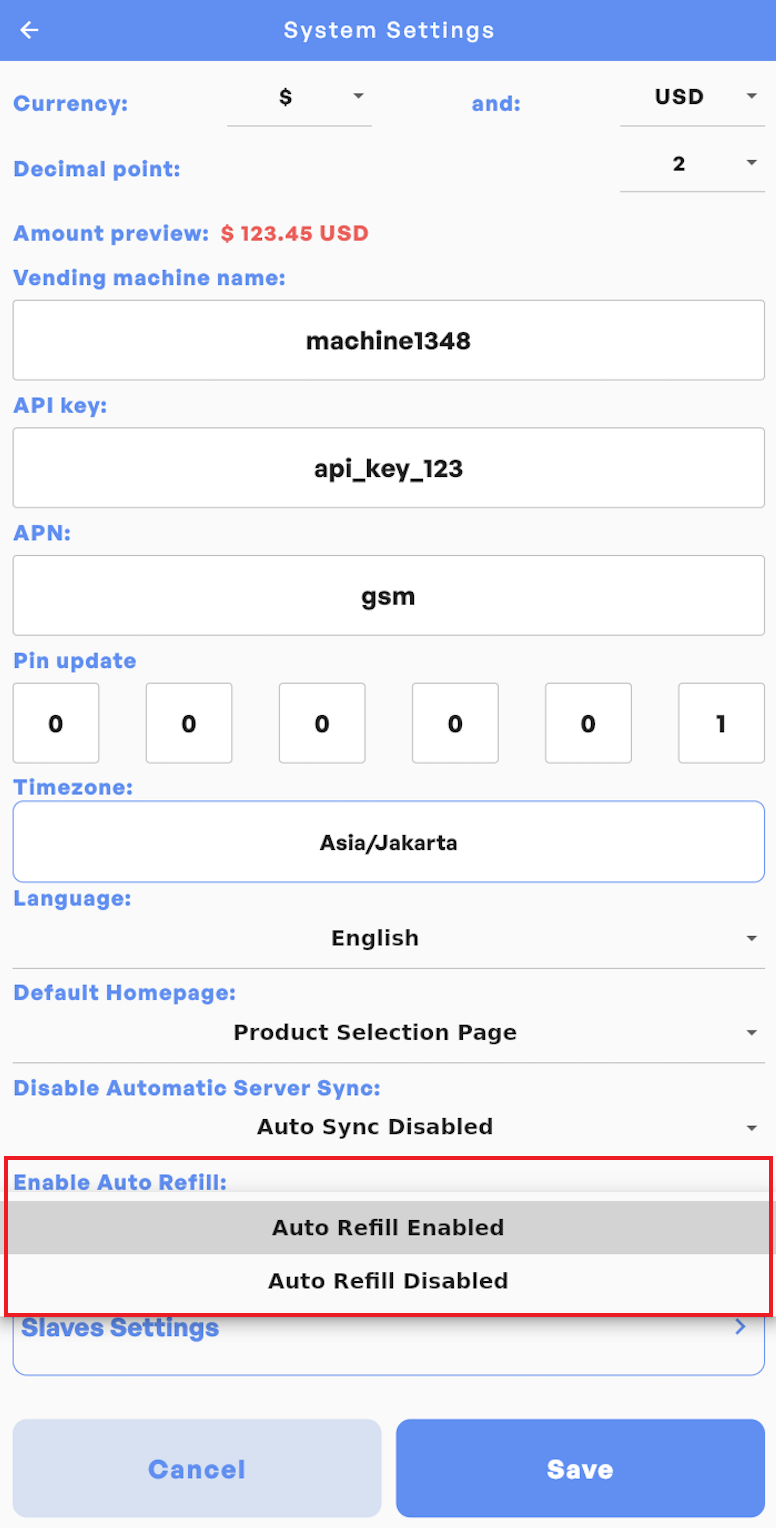
NOTE: On the System Settings page, if Automatic Refill is enabled, the machine will be automatically marked as Refilled as soon as you enter the admin interface.
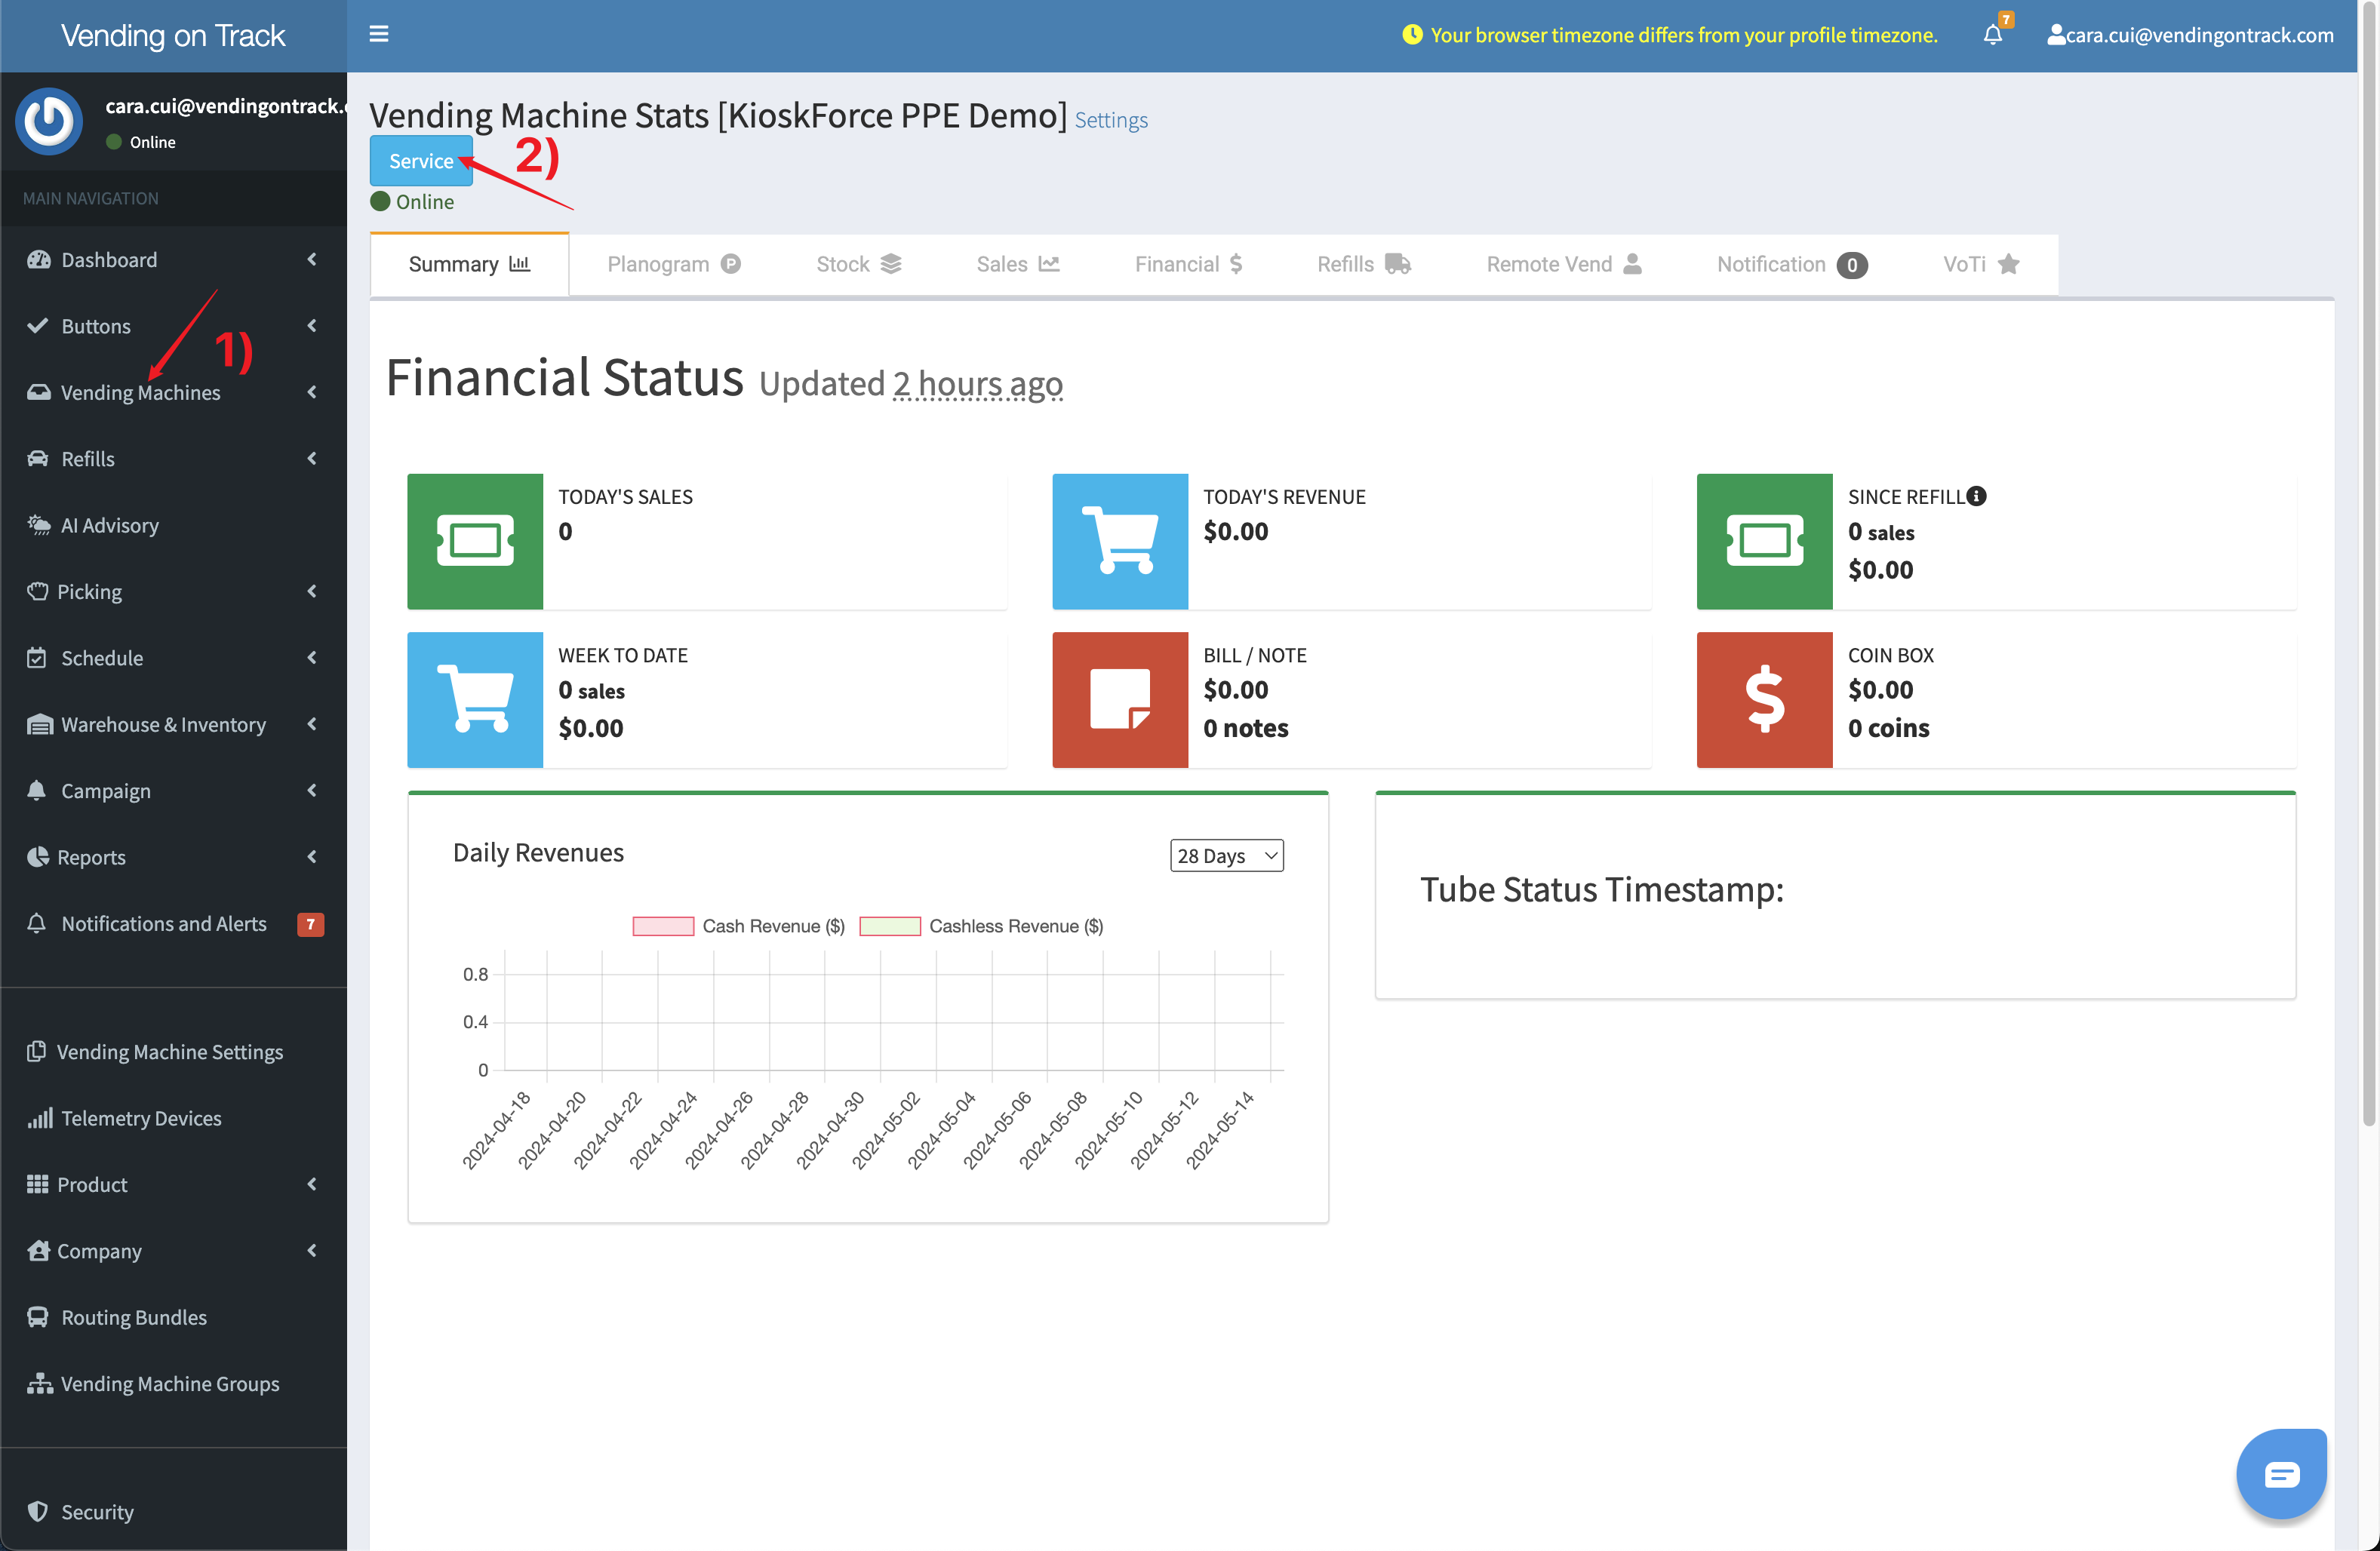
To refill the machine from the telemetry system, please follow this procedure:
- In the telemetry system, go to the Vending Machines page, find the target vending machine and click on the machine name
- On the vending machine information page, click the Service button
- On the speed buttons page, click the Refill Done! button to mark the machine as refilled
10. Can I Receive a Low Stock Alert?
Yes, global low stock alert customization is supported in the telemetry system. This feature allows operators to efficiently monitor inventory levels across wall-mounted vending machines stocked with the same products.
How to Set a Low Stock Alert?
To customize the low stock alert, please follow this procedure:
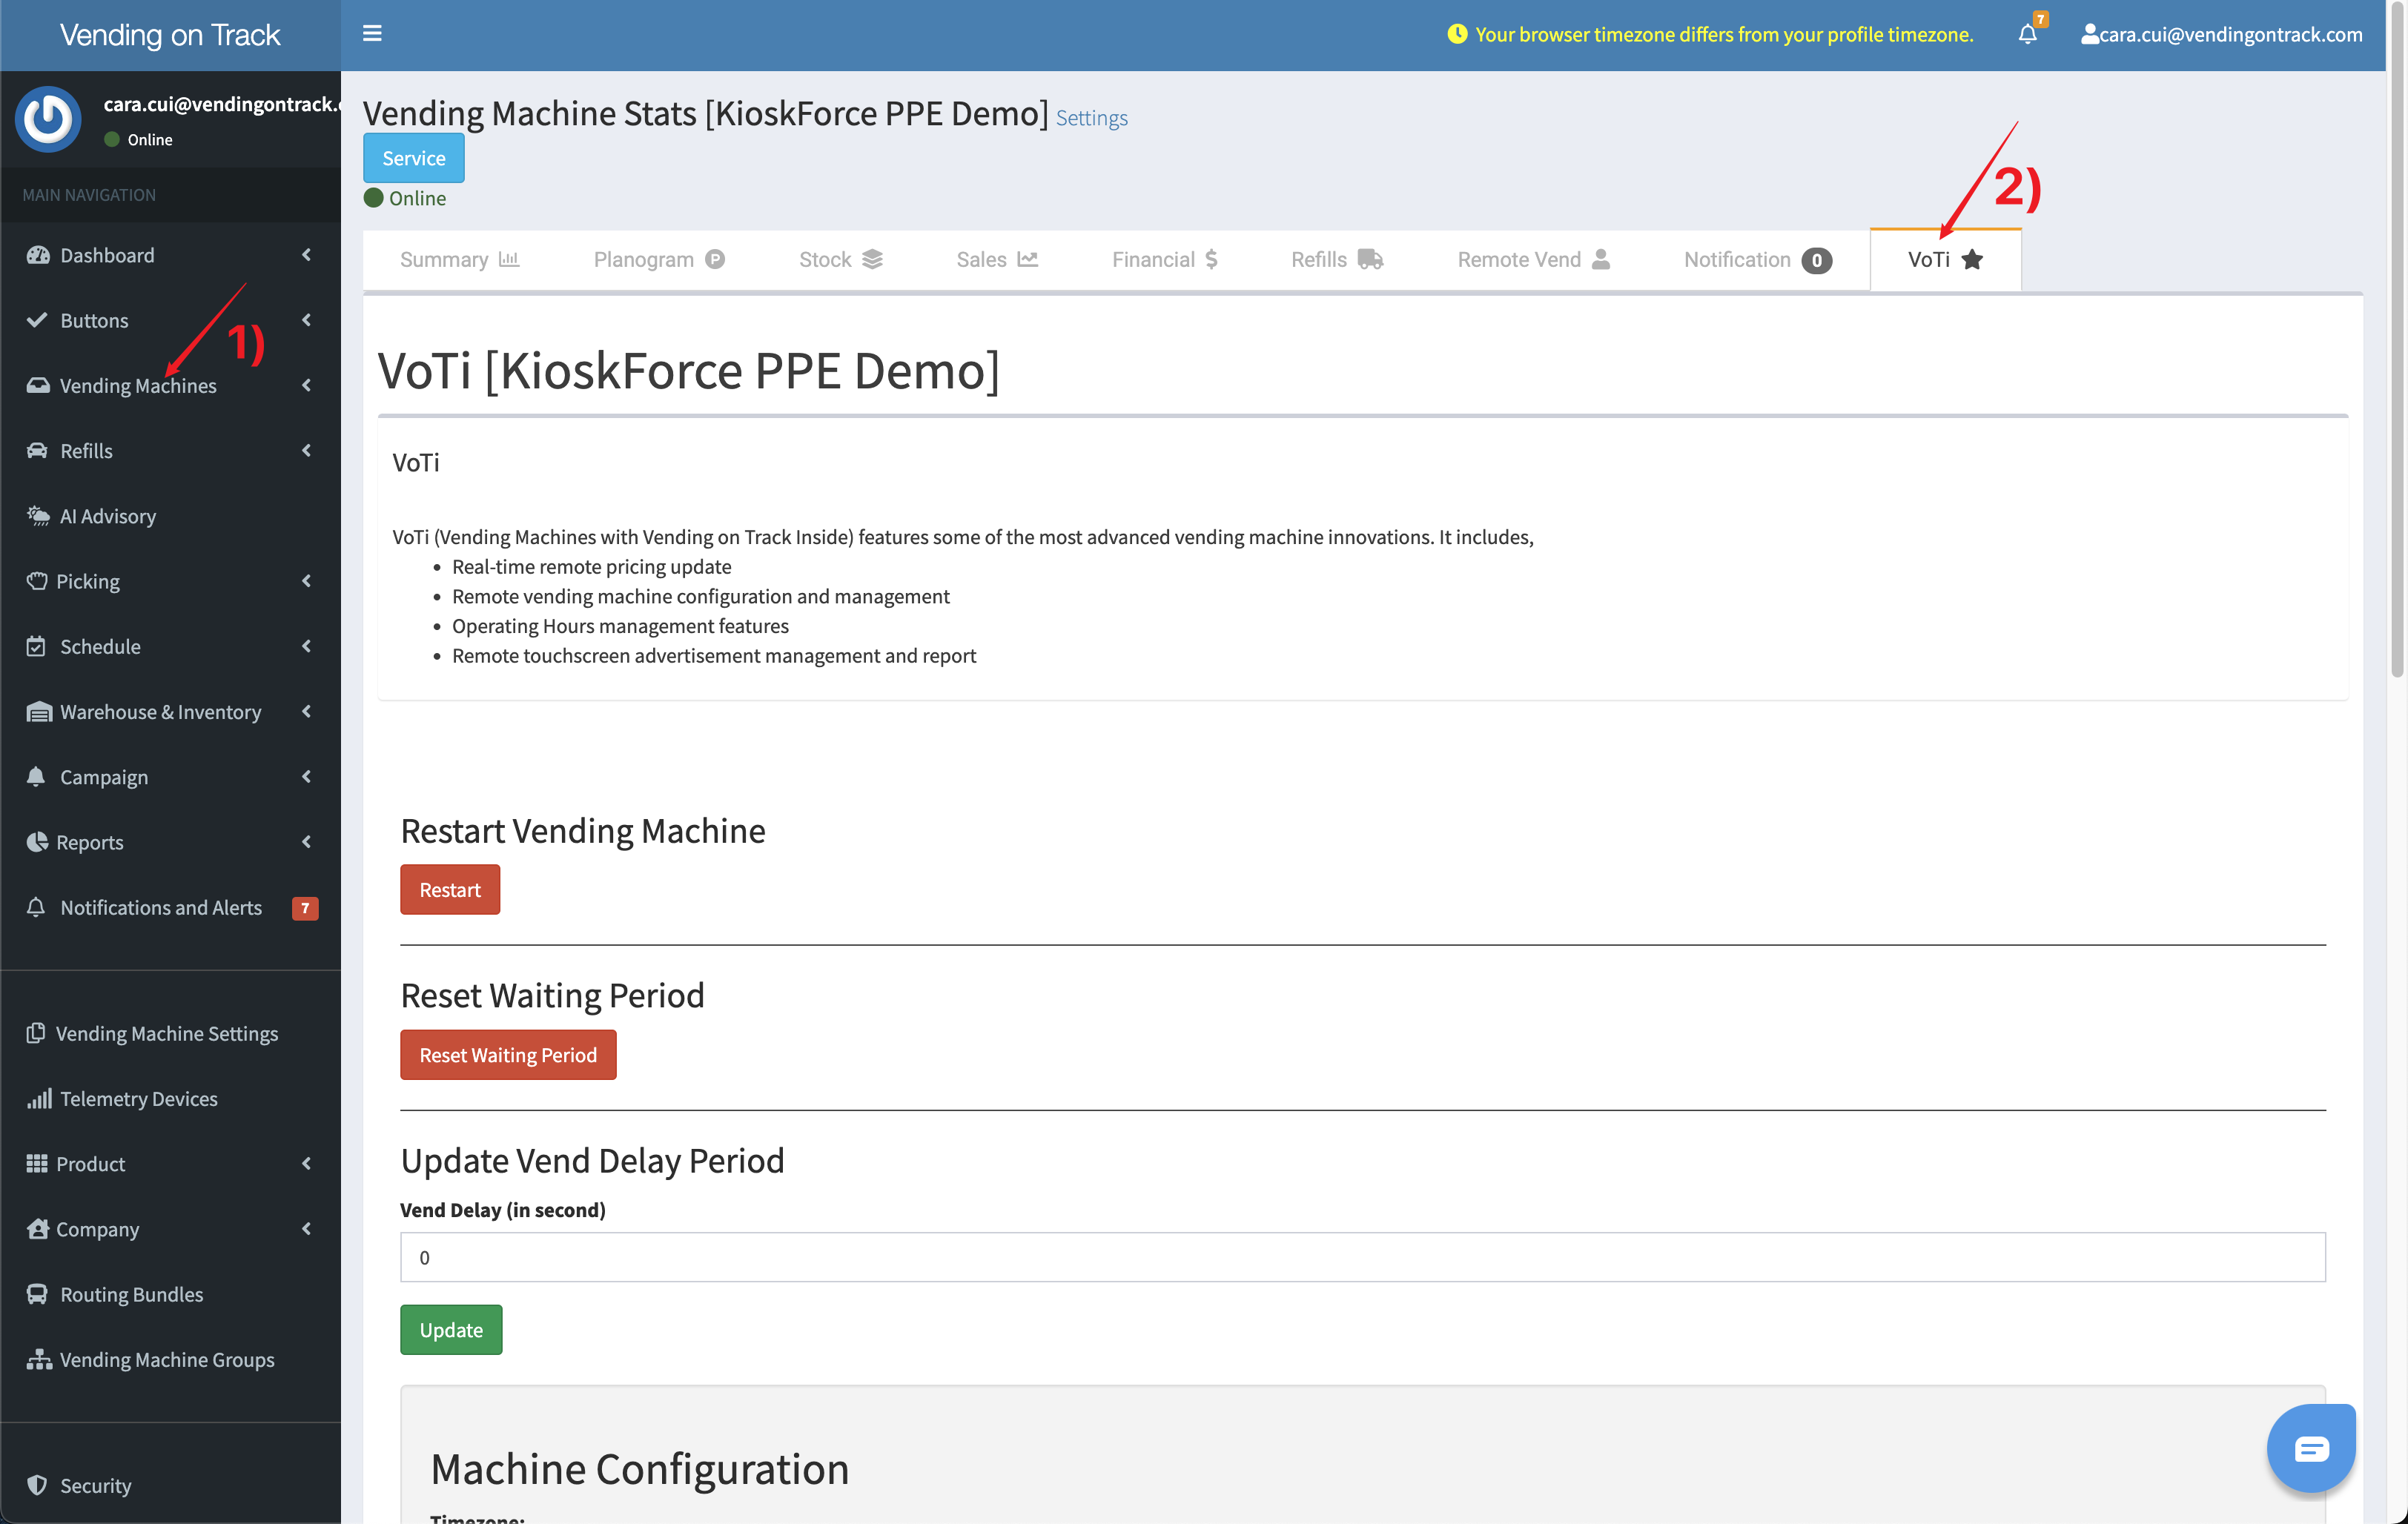
- In the telemetry system, go to the Vending Machines page, find the target vending machine and click on the machine name
- On the vending machine information page, click the VoTi button
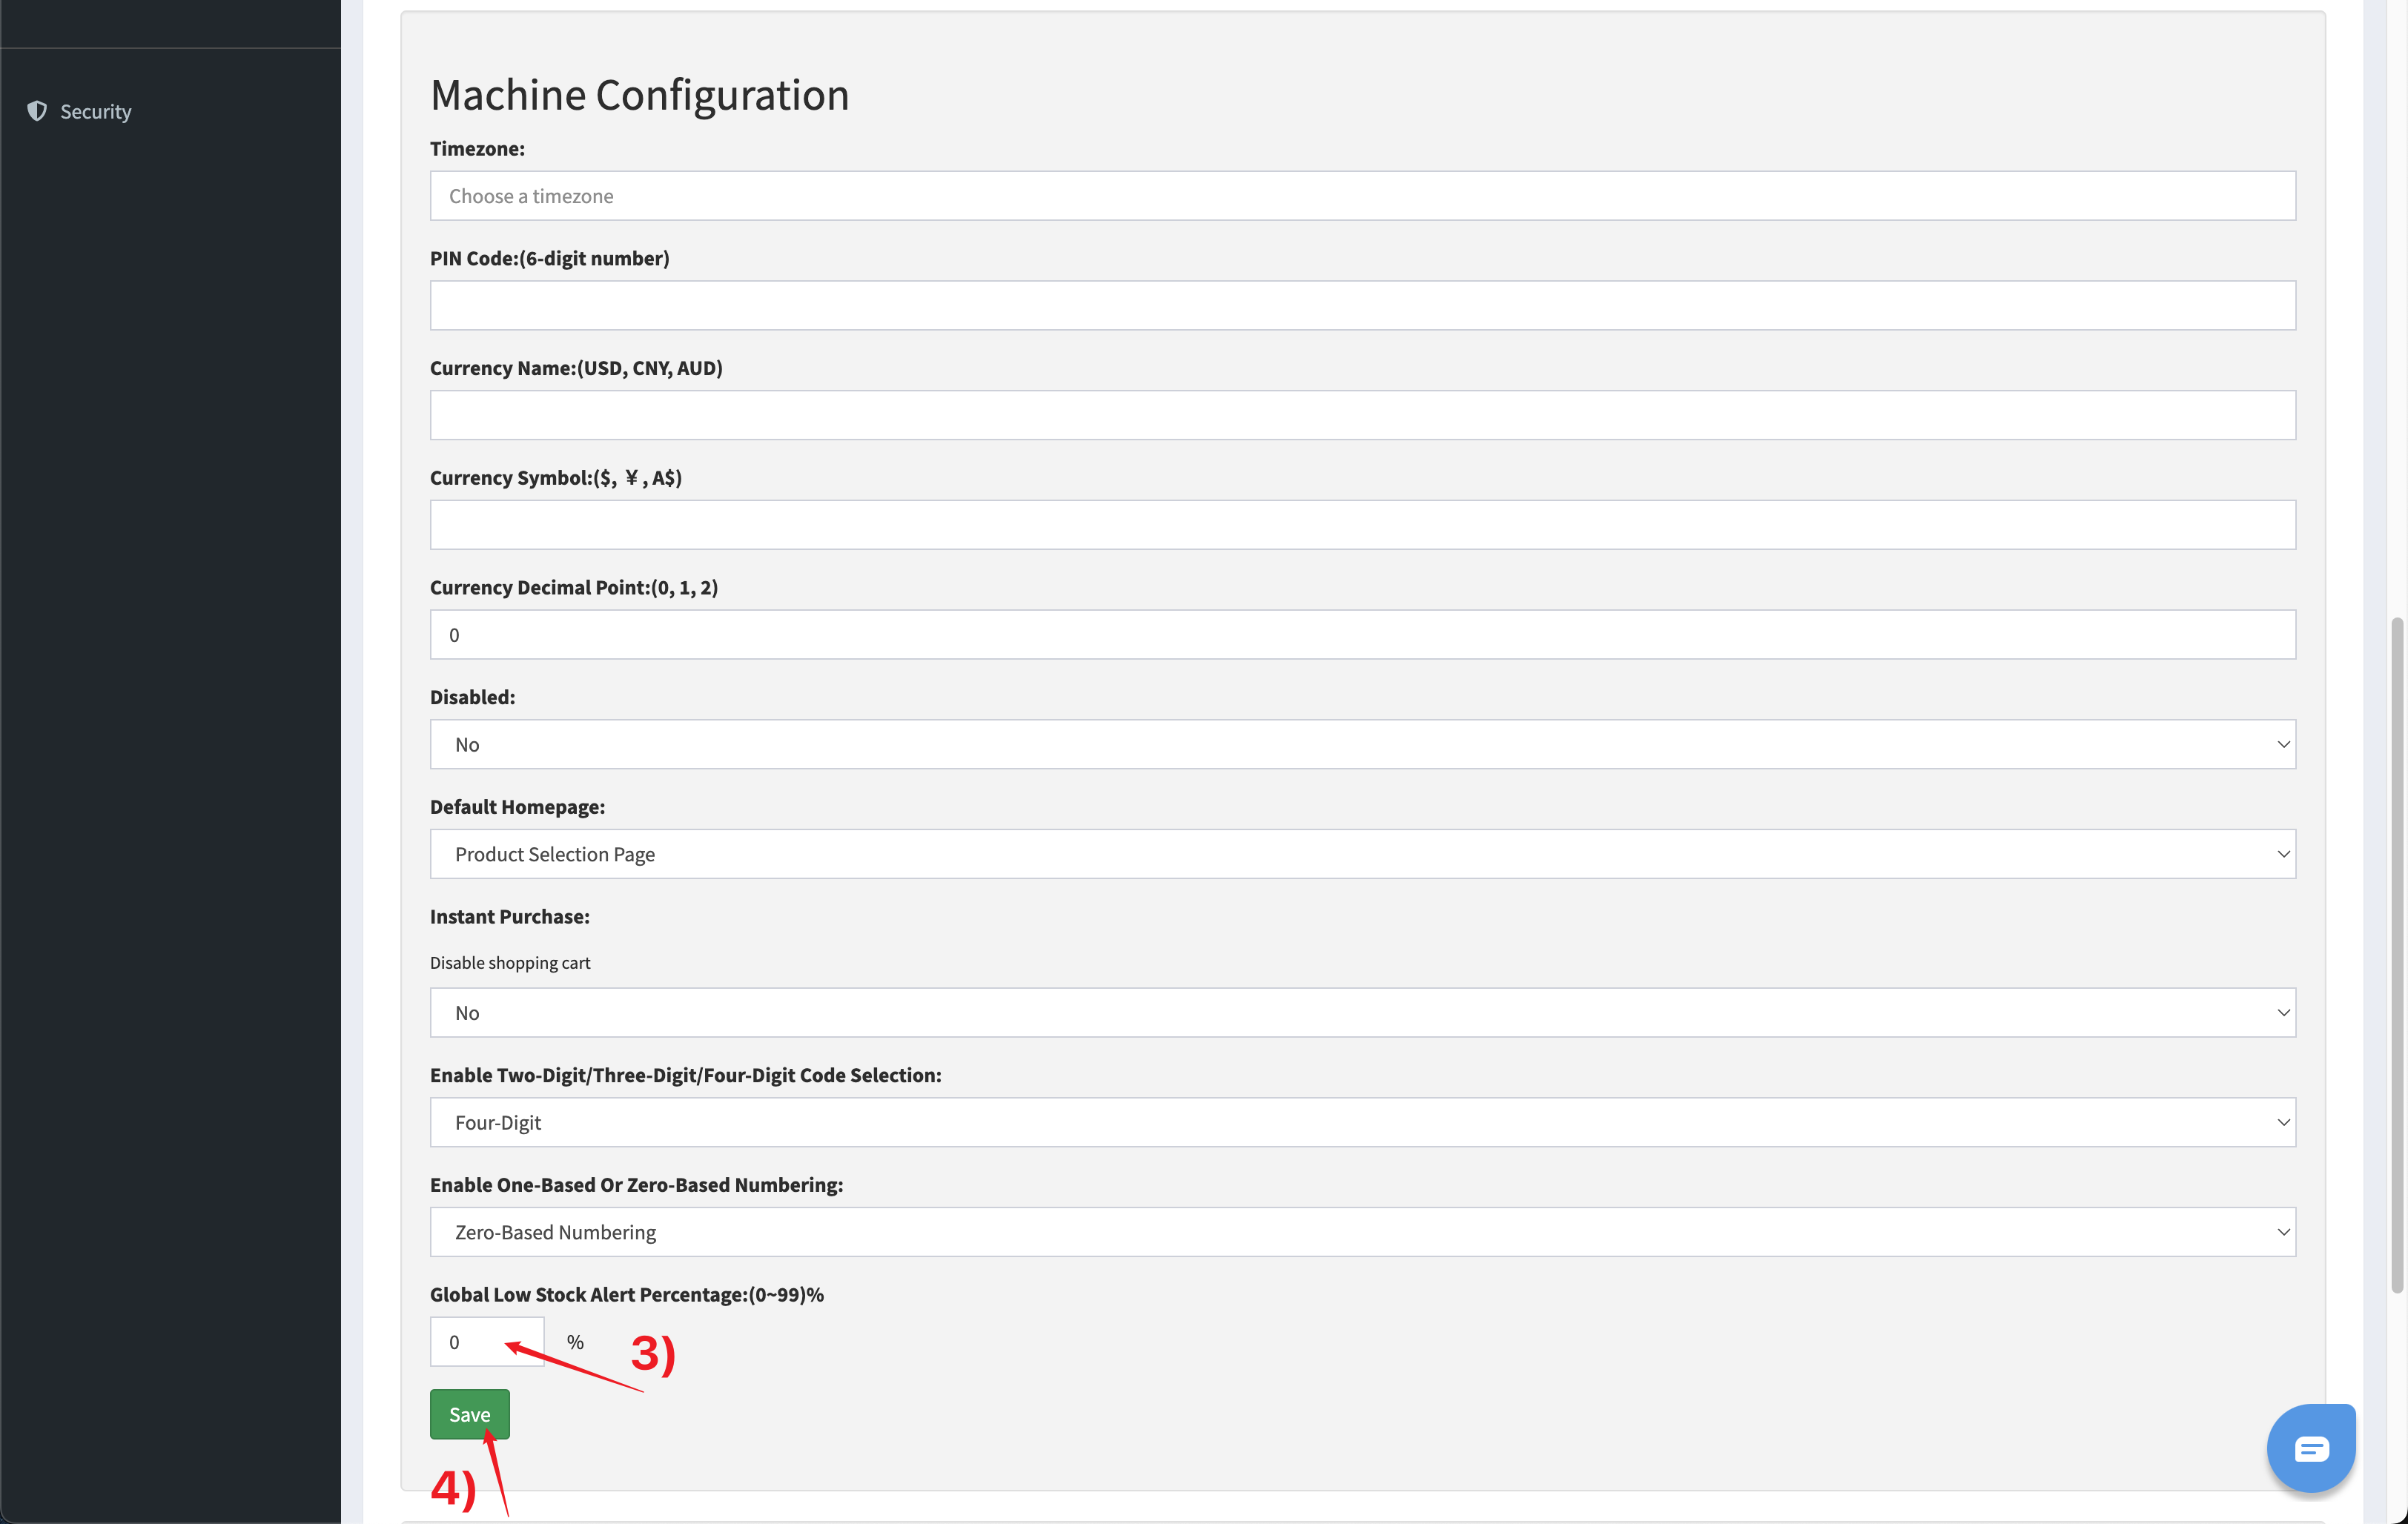
- In the Machine Configuration section, find the Global Low Stock Alert Percentage settings and set a threshold for the overall stock quantity as needed
- Click Save to finish the process
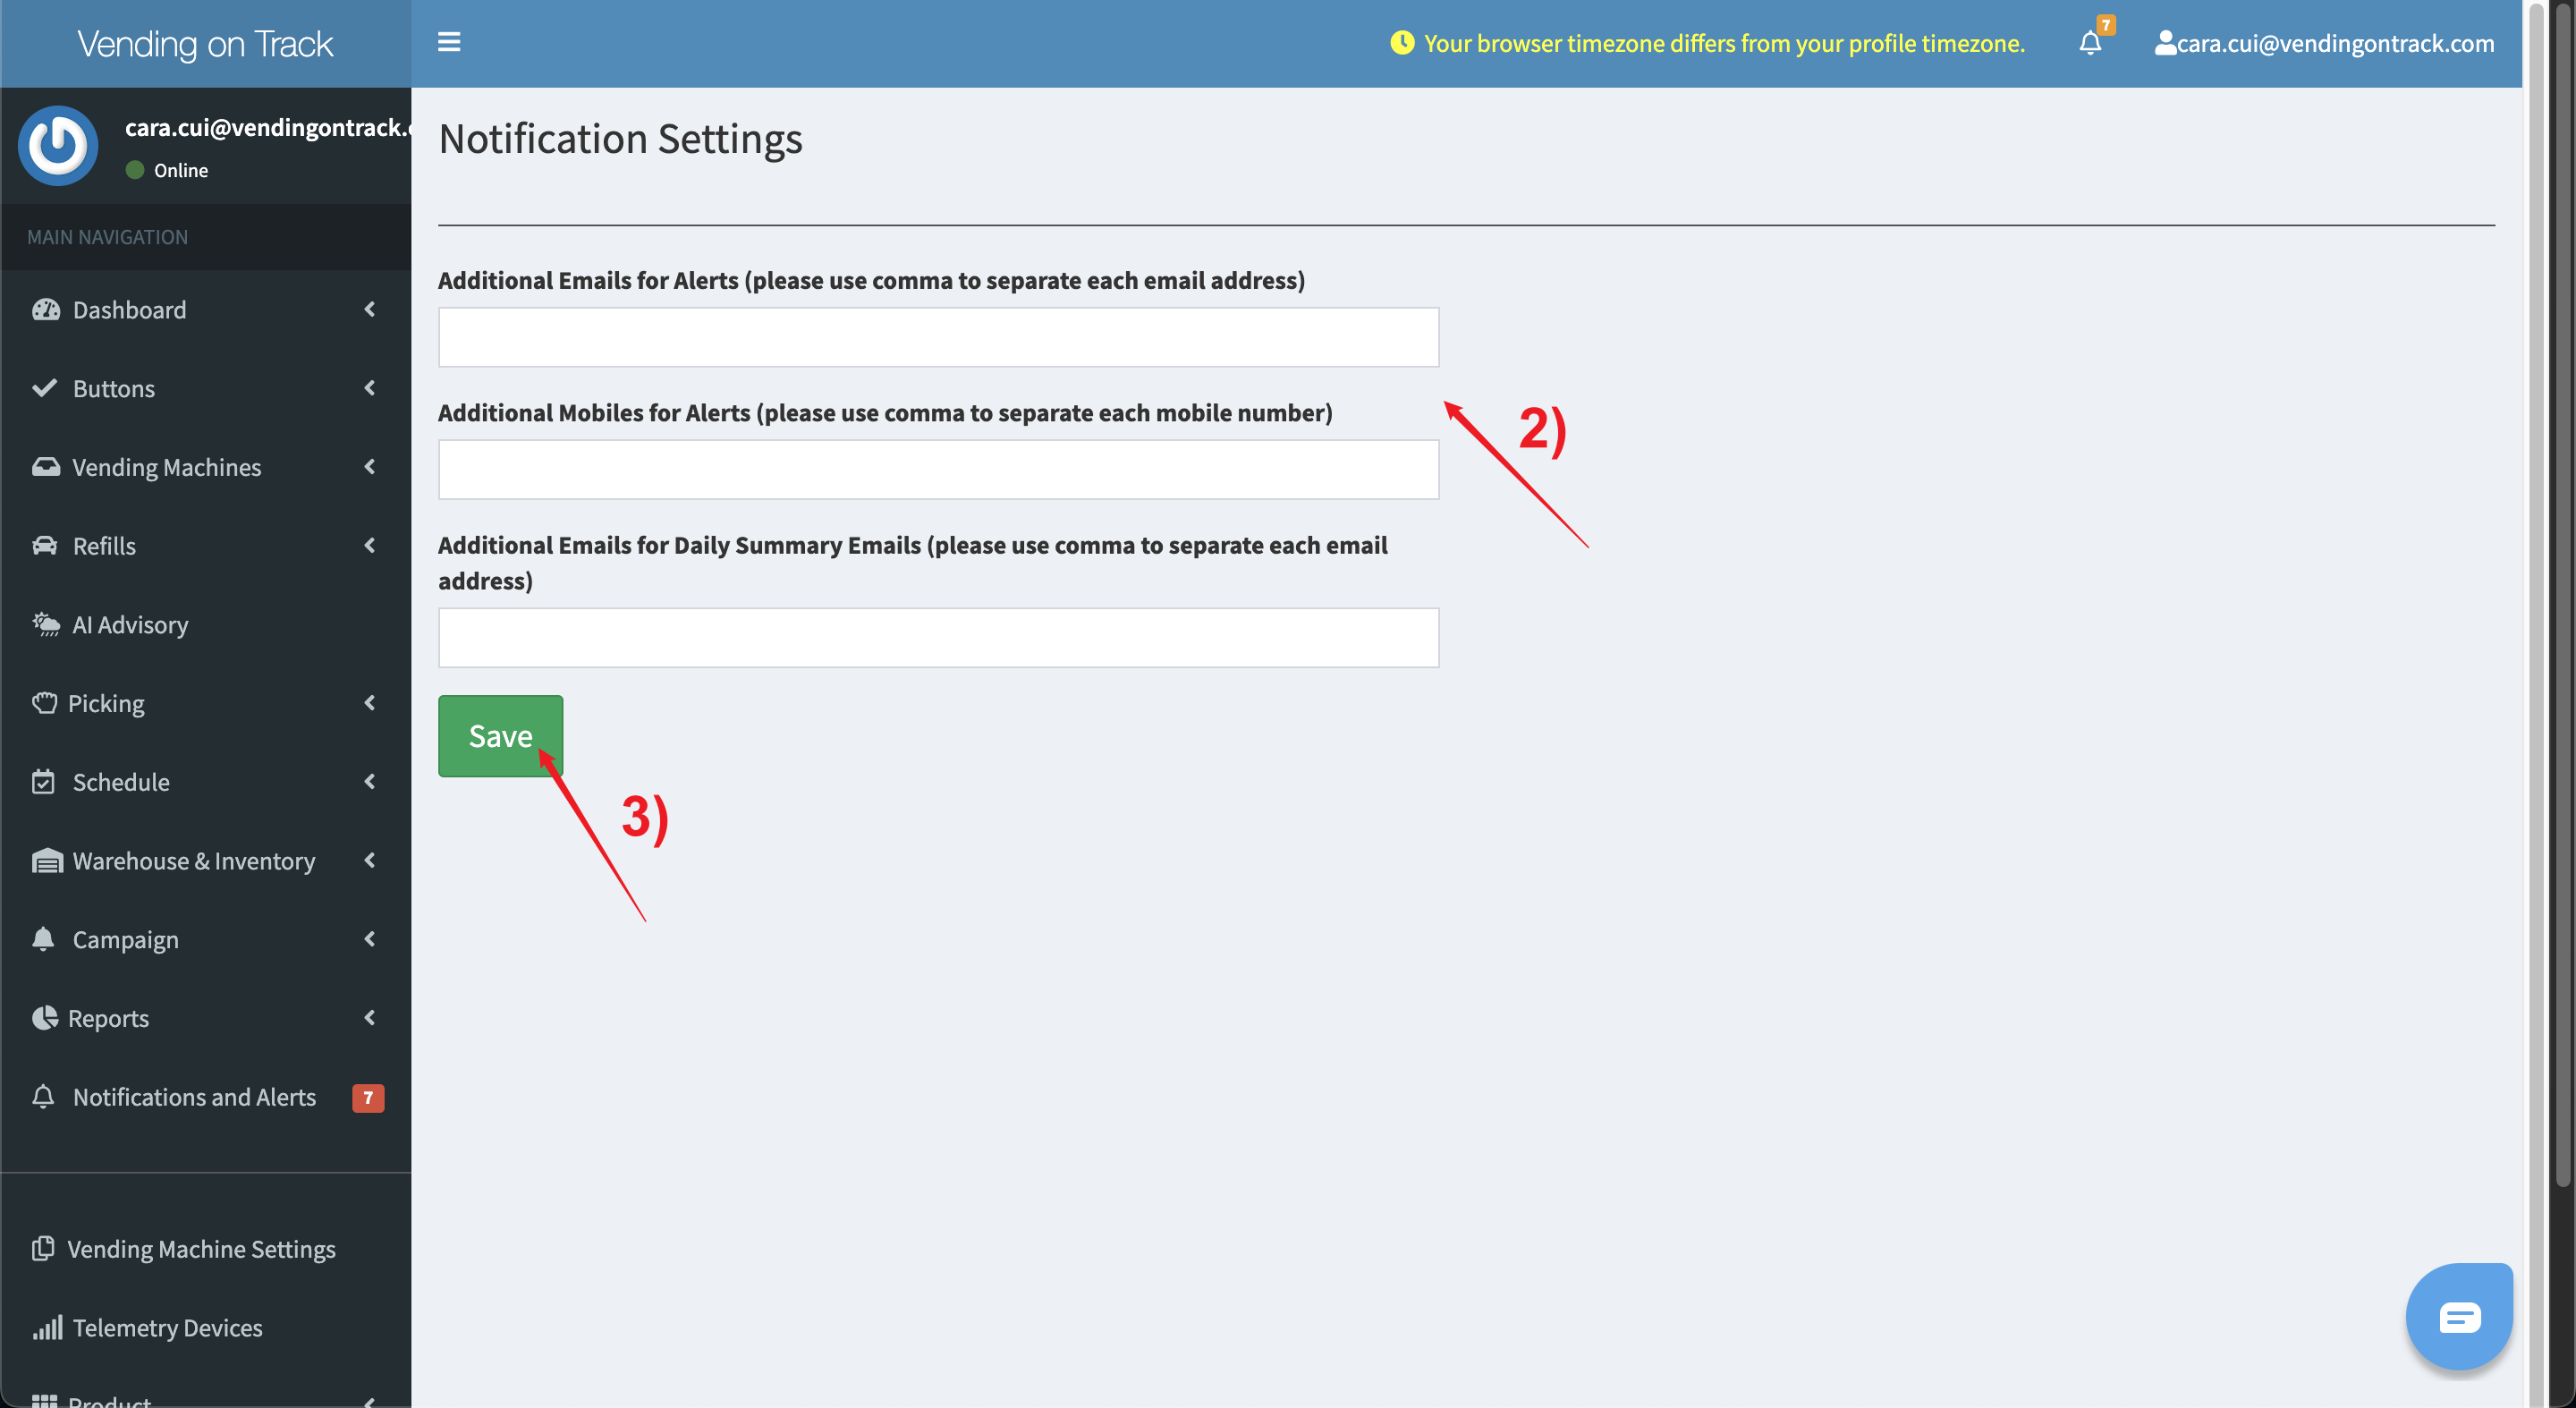
How to Set the Alert Recipient?
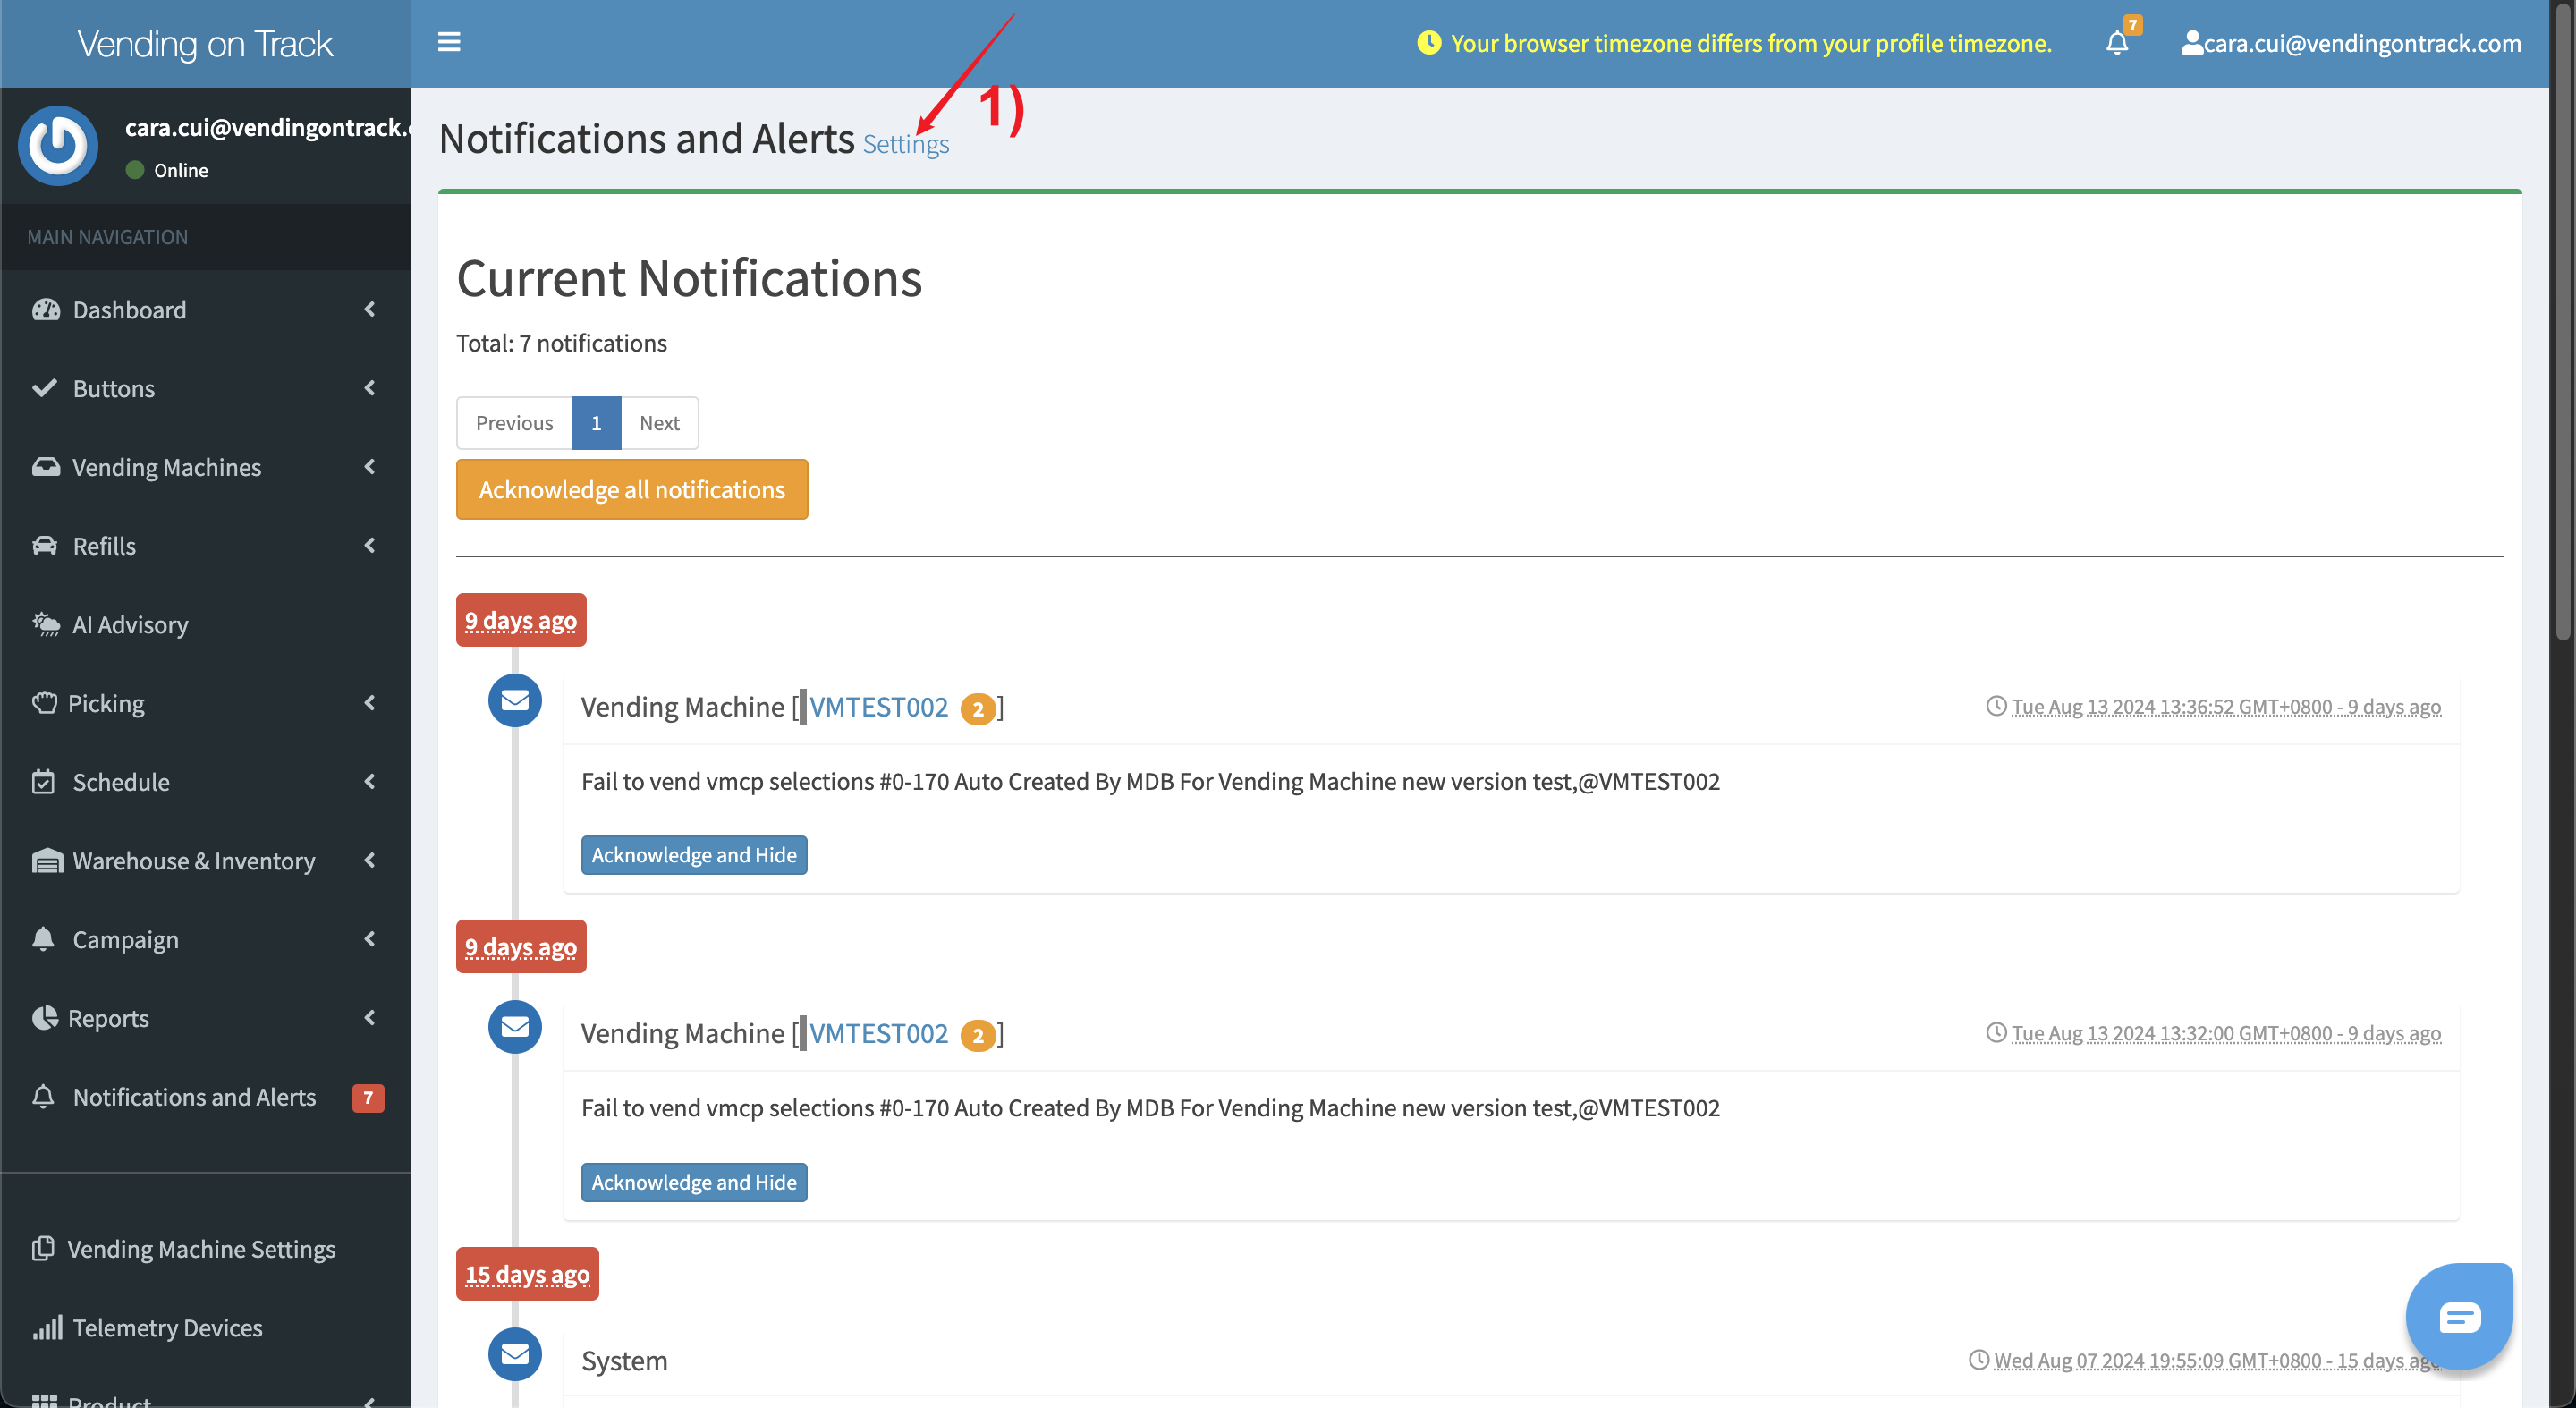
To set the notification and alert recipient, please follow this procedure:
- On the Notifications and Alerts page, click Settings
- On the Notification Settings page, input the recipient’s email address or phone number
- Click Save.
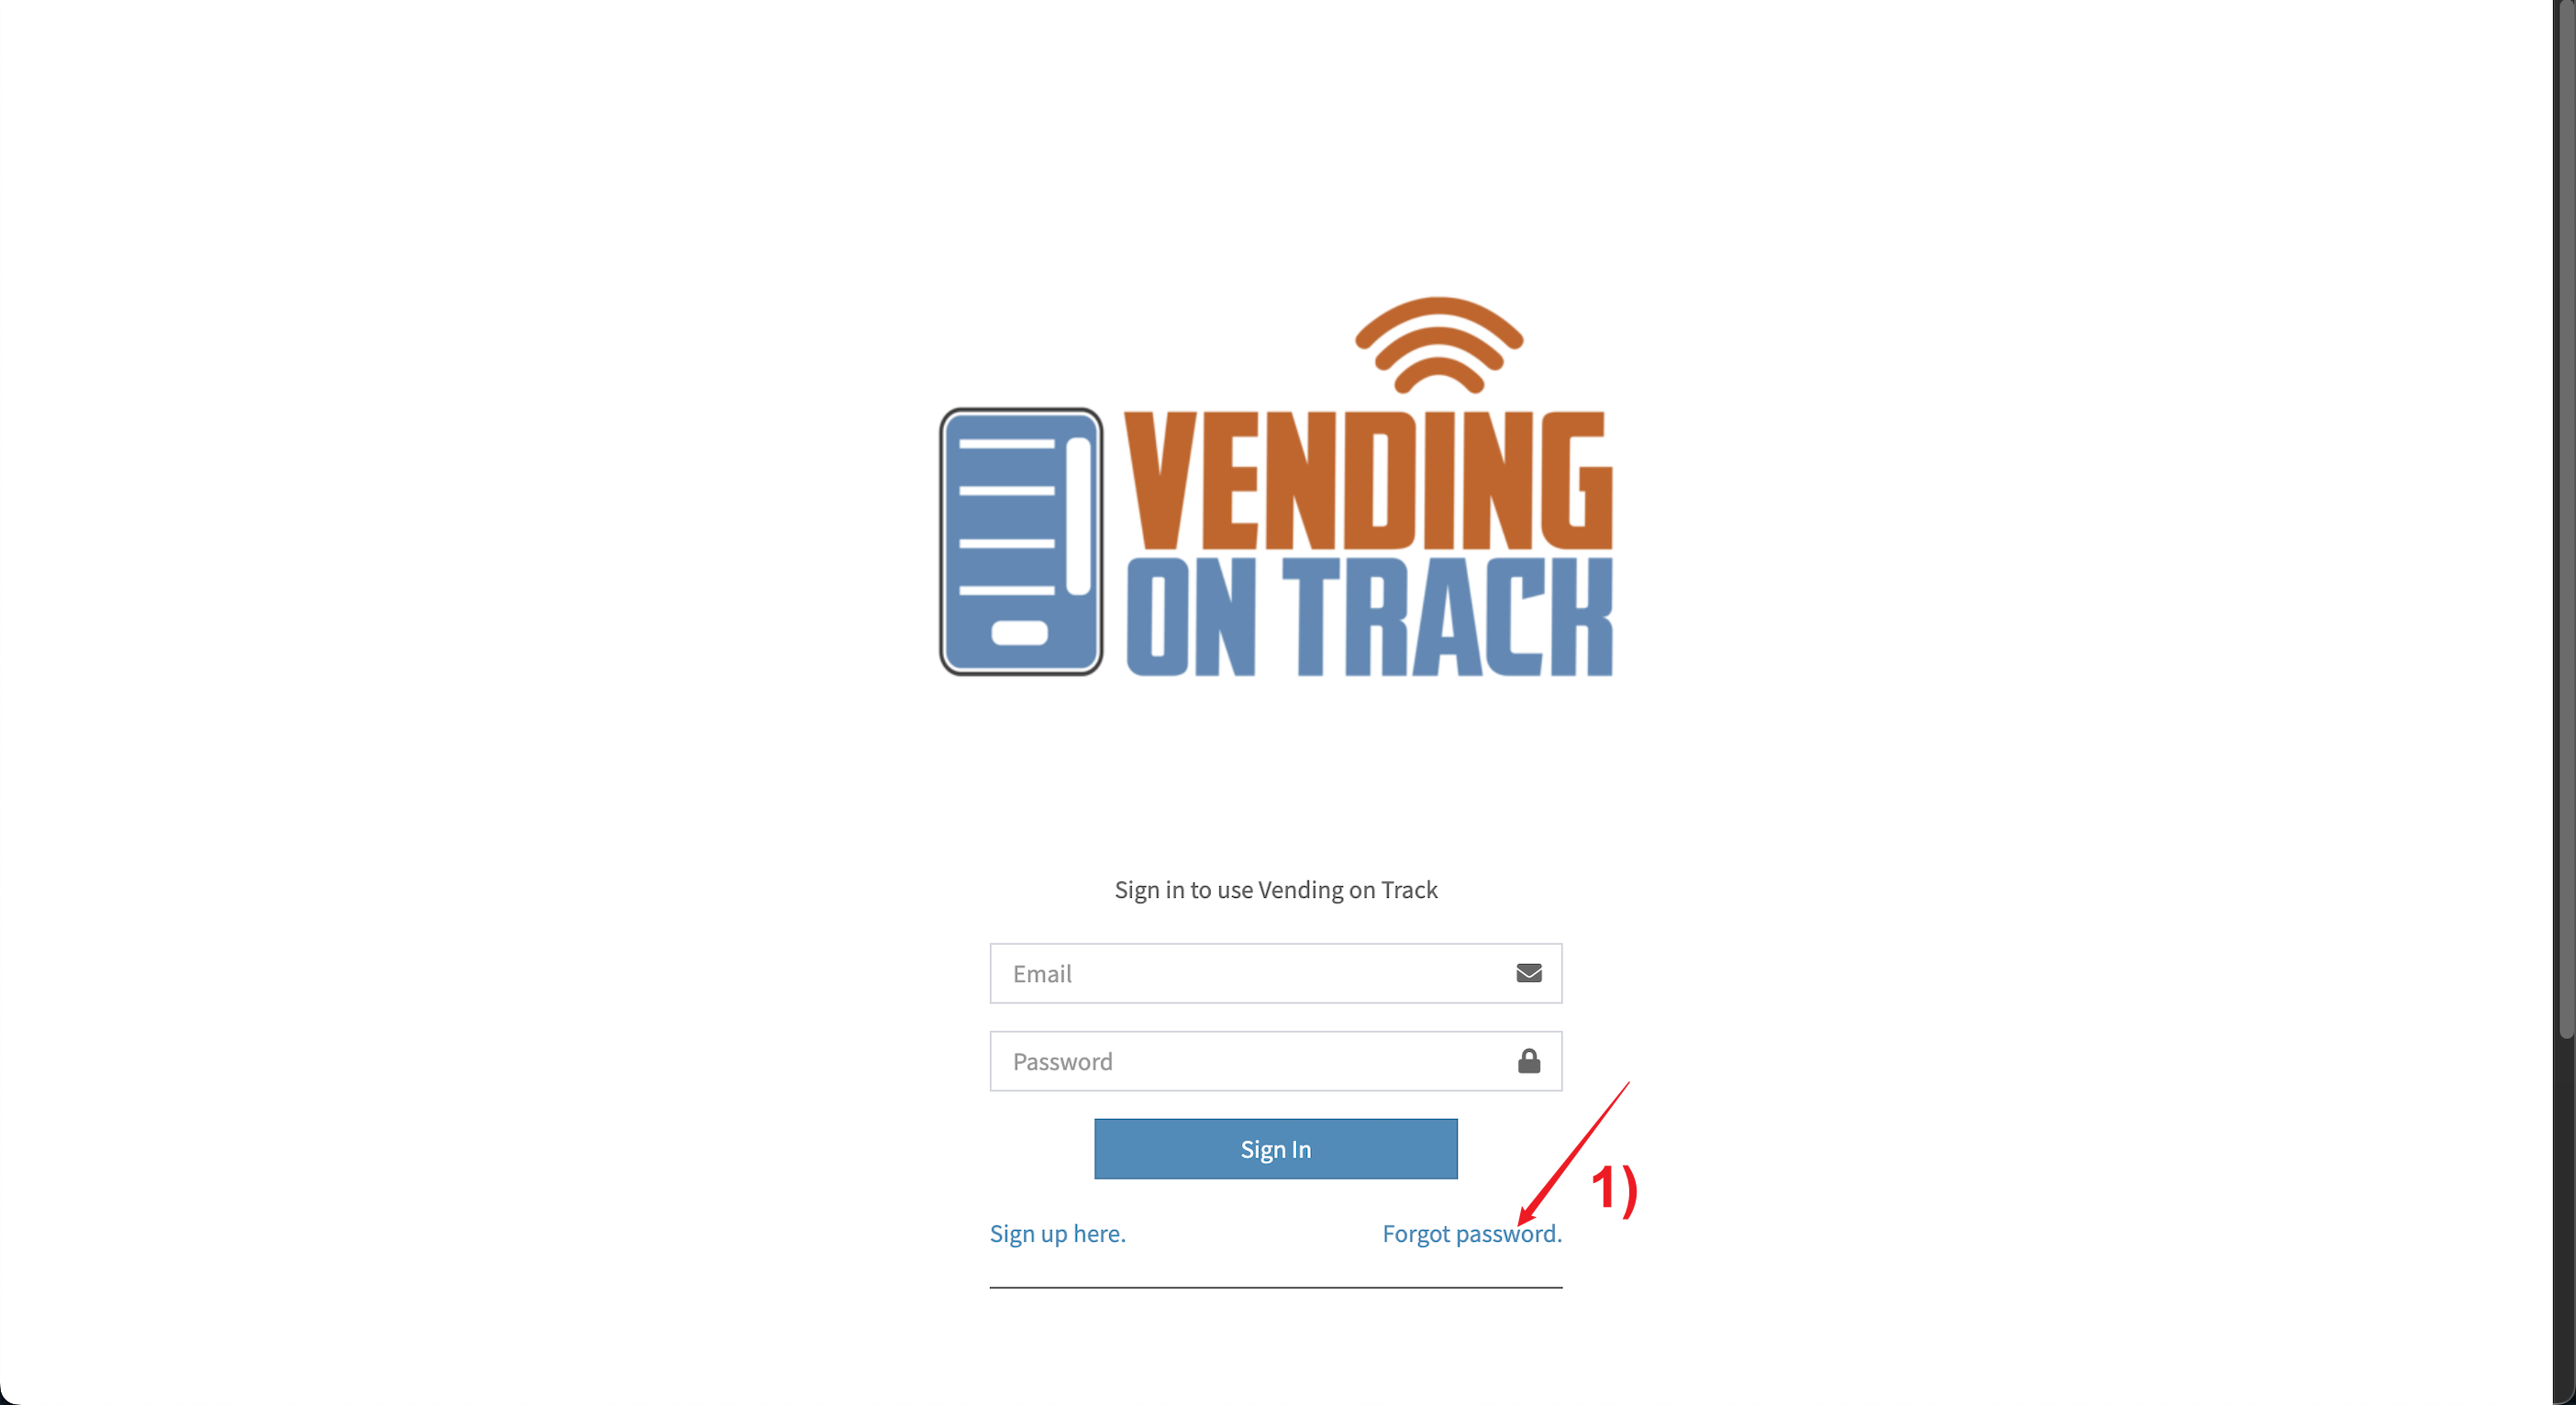
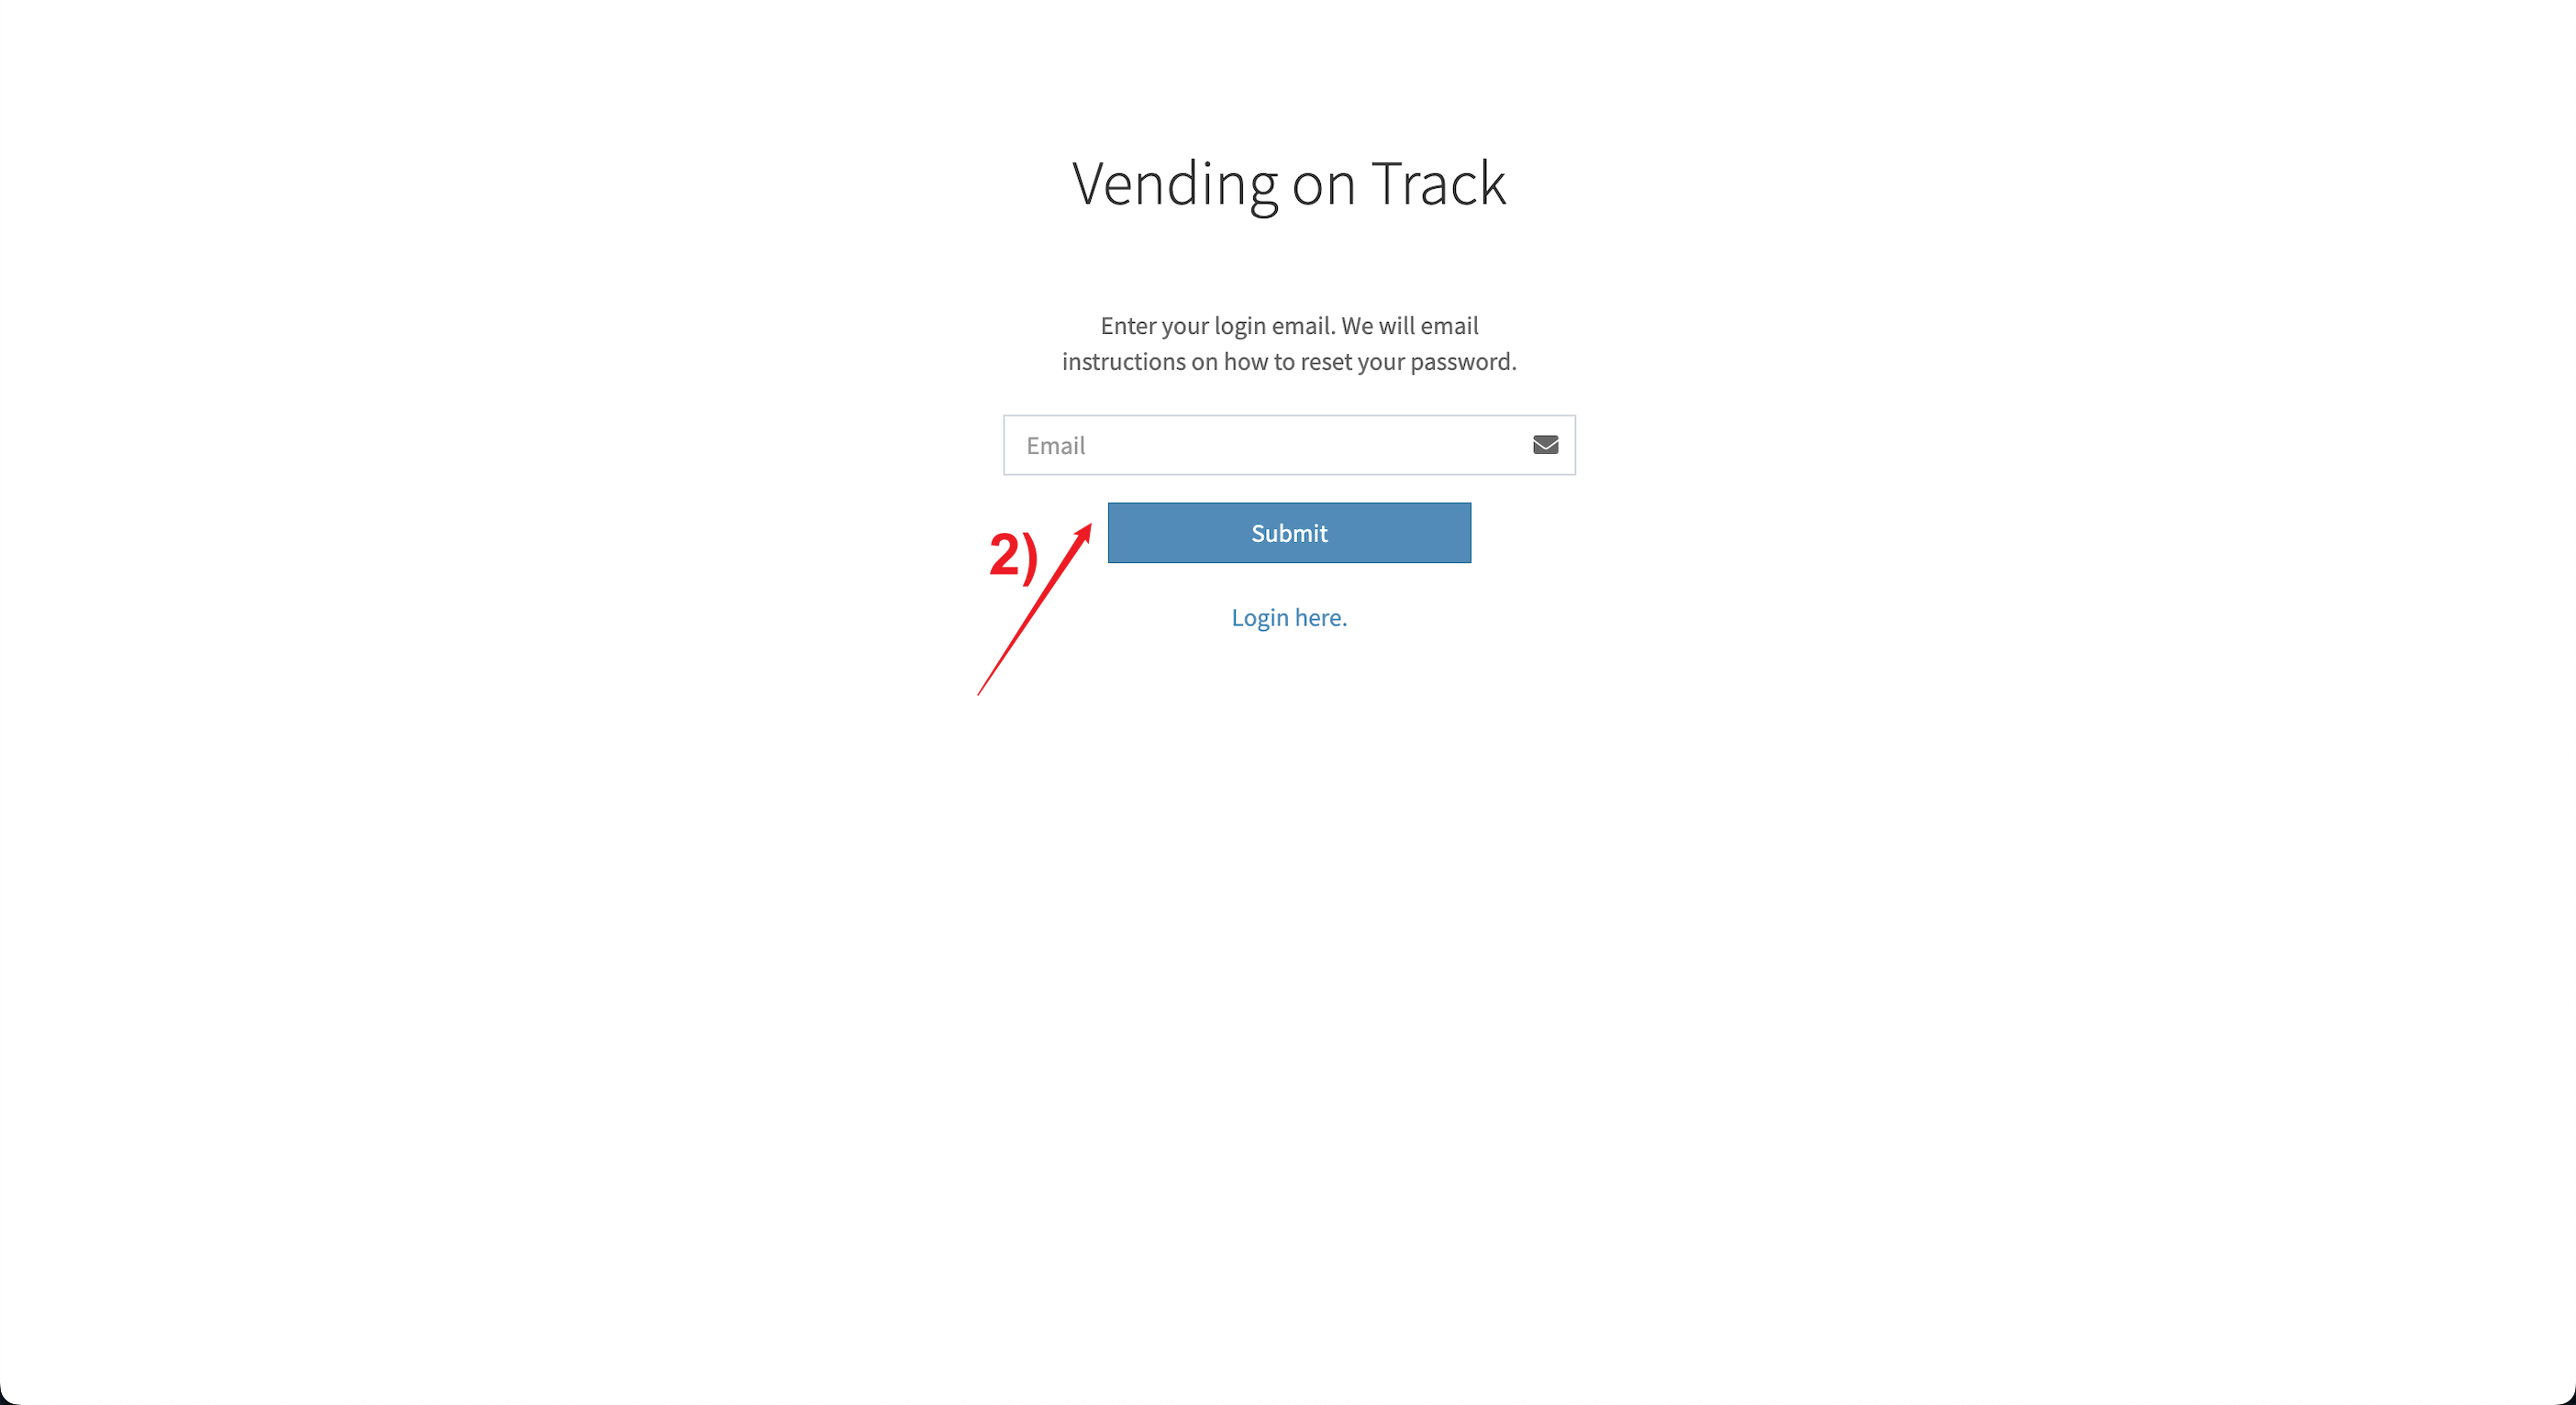
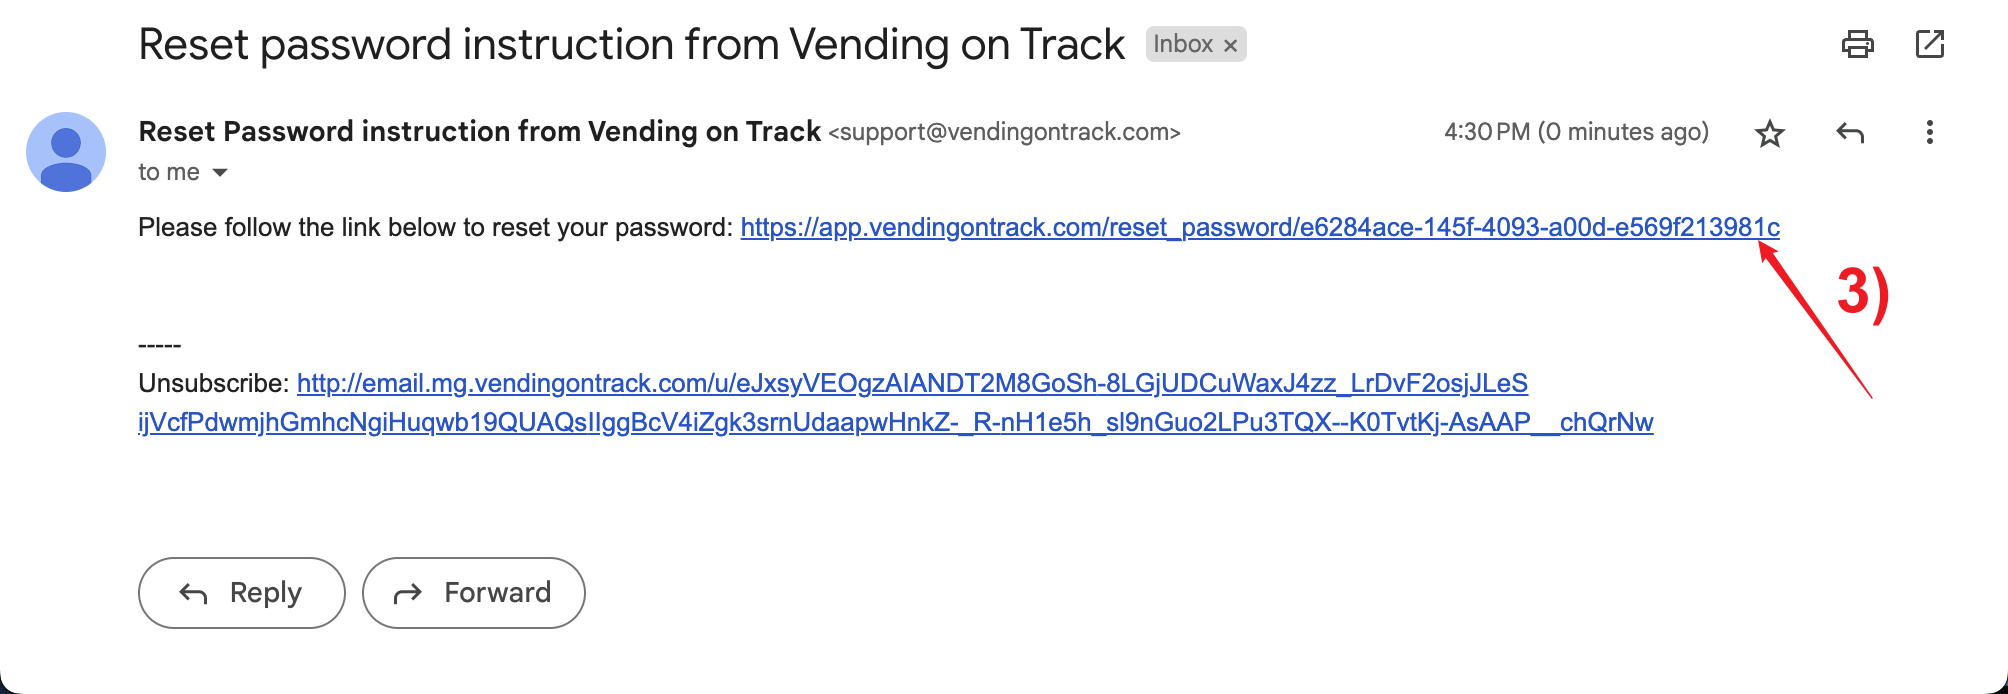
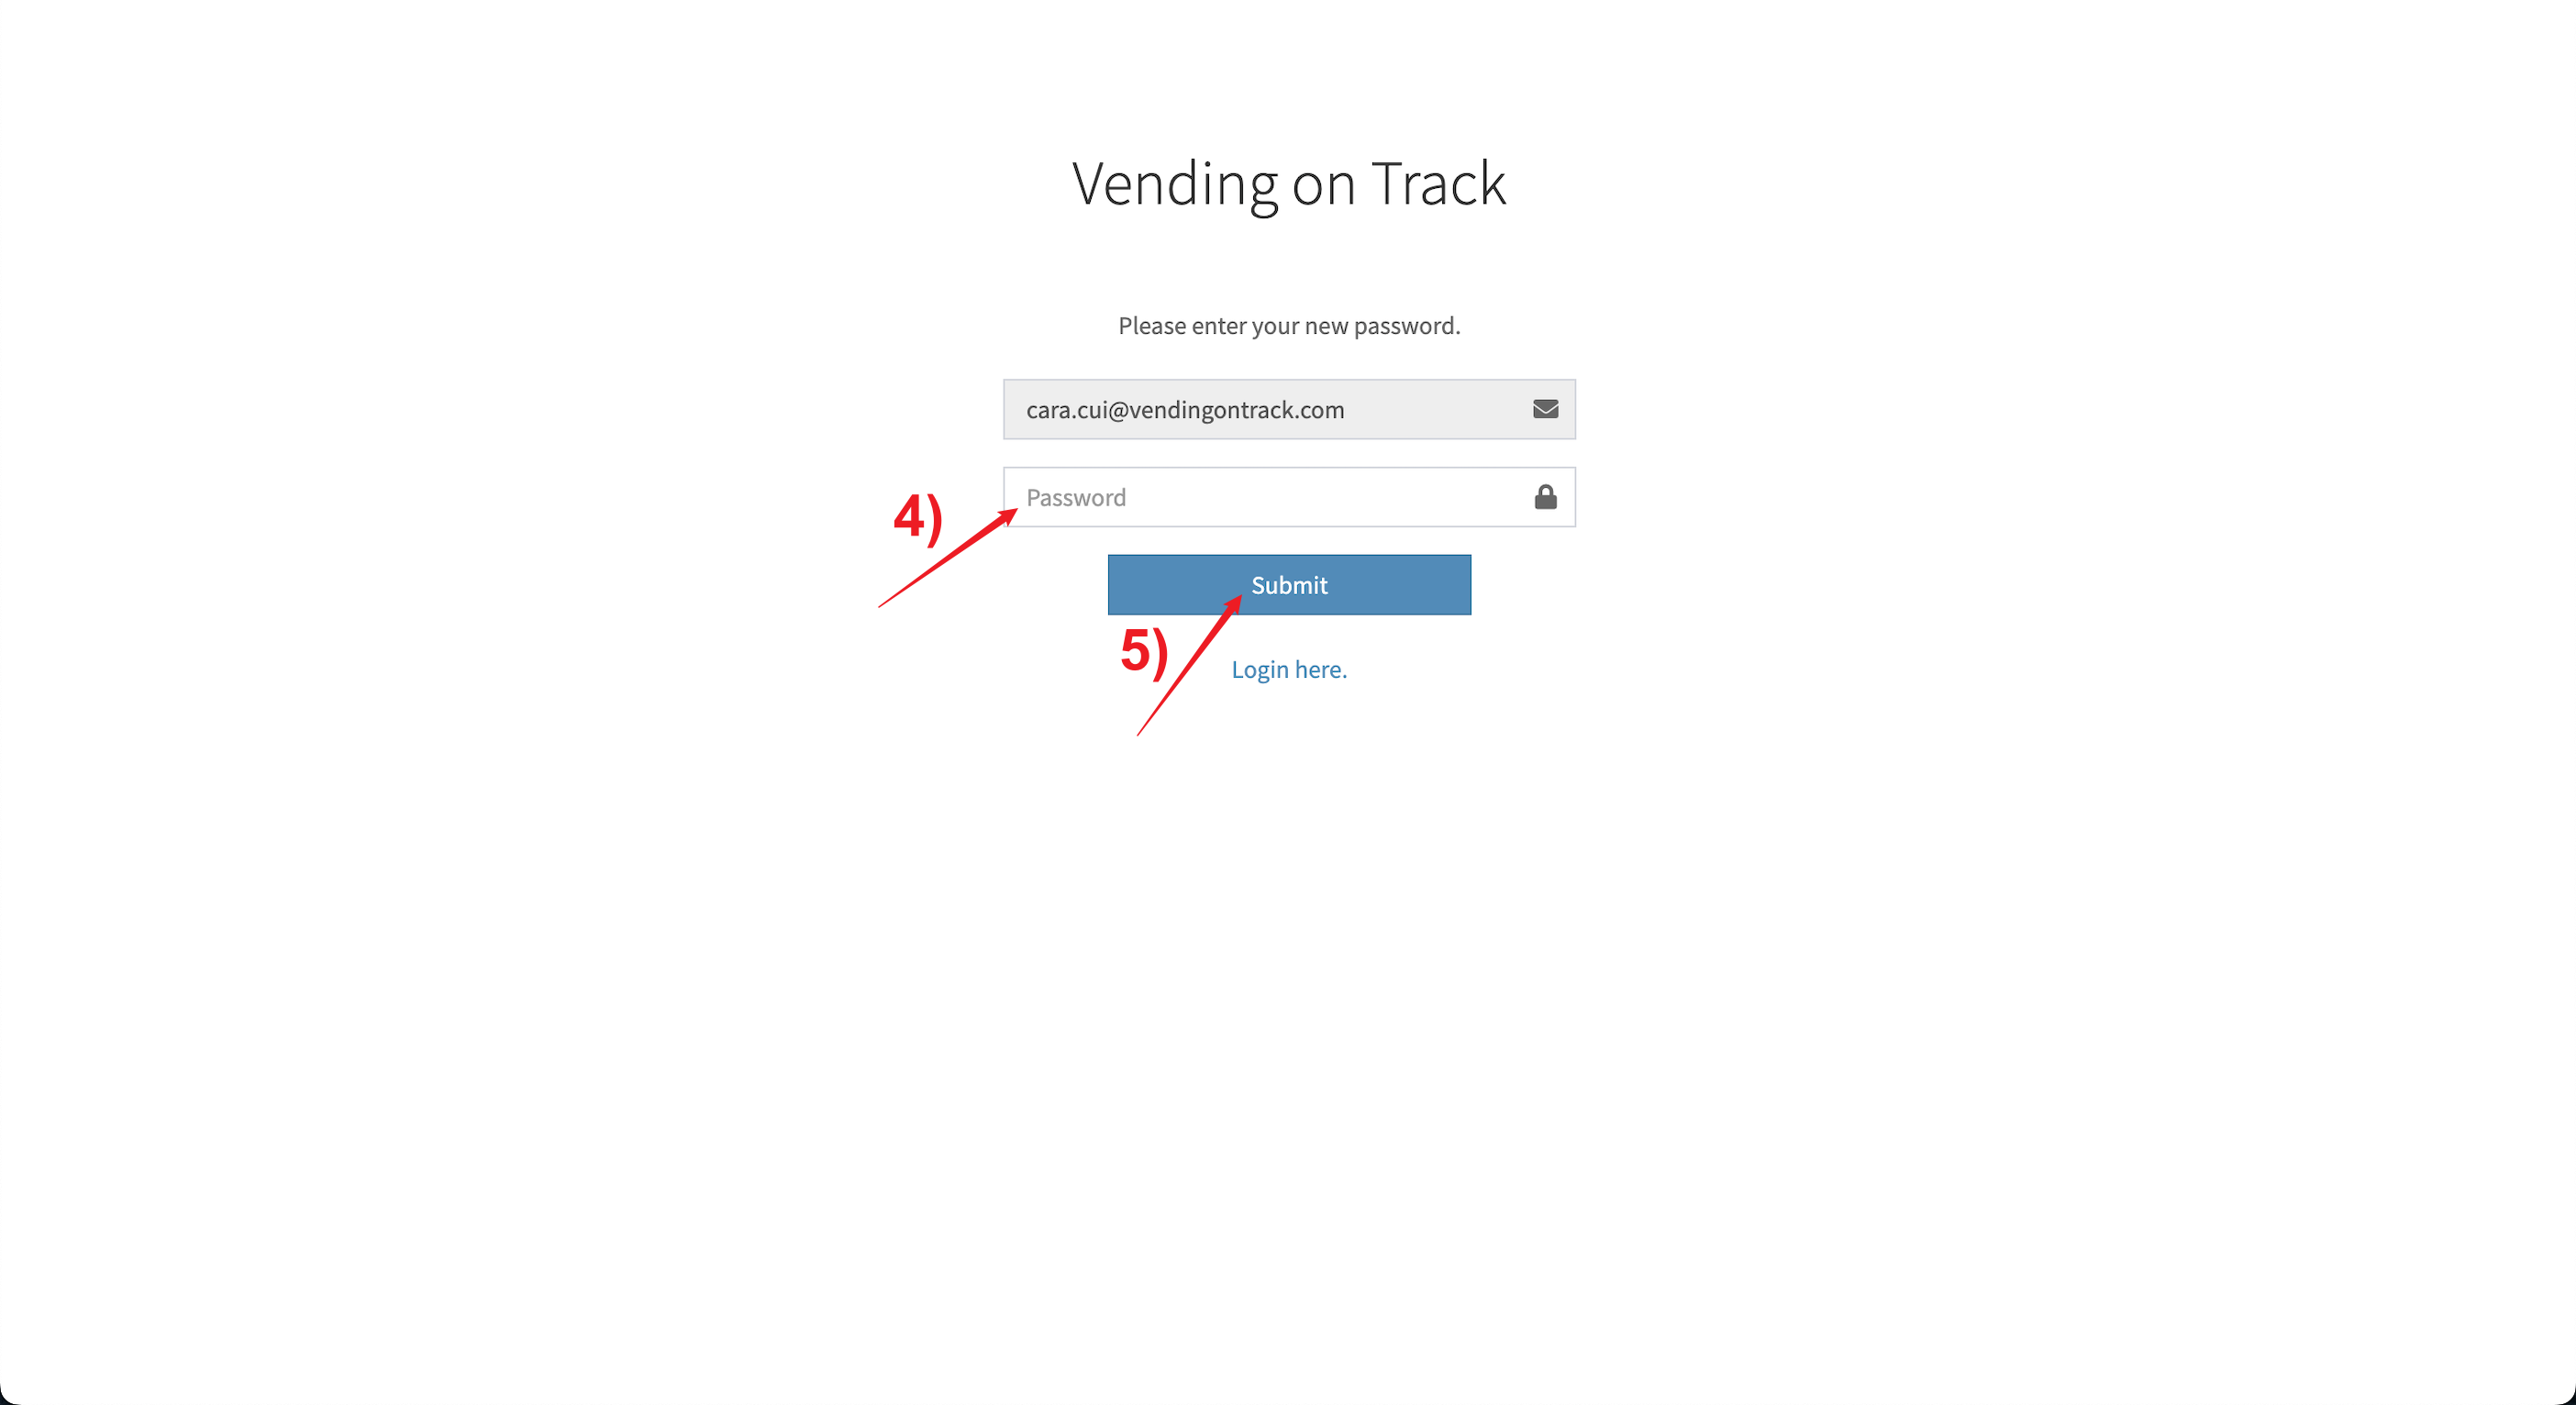
11. What if I Forget my Password?
If you forget your password to the system, please follow this procedure:
- On the Vending on Track login page, click Forgot password
- Enter your login email and click Submit
- Open the email from support@vendingontrack.com and click the link
- Enter your new password
- Click Submit to save.